Splinterlands Community Engagement Challenge: The Perfect Strategy to Overcome the Force
Hello summoners! Let's get to another edition, and this time, we'll be participating in the Splinterlands Community Engagement Challenge, and this week's theme is Architect of the Arena. Throughout the article, we will explore how I create and identify my best cards for the perfect battle formation. We will analyze this process, which, depending on your strategy, can determine your victory even before the battle begins.

It's quite common to see players who have one, two, or even more "starting teams" in each element type. I myself have a few, and one of my favorites is combining units of the Fire and Death element. To make this possible, I need the Archon Lorkus, as he's perfect for having more card options when deciding who goes into battle.

Planning in Victory Quest
In Splinterlands, the strongest doesn't always win. For that to happen, a set of circumstances must be in your favor, and depending on how you prepare your deck, the chances of victory will be high. But it's no use having a highly strong Tank if you don't have a healing card, or even a unit that repairs your shield. The balance between attack and defense is fundamental and is not a cliché in the game.
Furthermore, the modifiers are the set of rules that are elaborately implemented in each battle. Quickly identifying them will give you more time to prepare your deck. If you want to see them all, just click here. Paying attention to the amount of mana is also essential, because it's pointless to include your main cards that together cost, for example, 38 mana when in battle you can only use up to 28. Therefore, paying attention will help you avoid mistakes.

So, before clicking on "battle", keep these things in mind. The average time for each match is 3 minutes, which may seem like a lot, but sometimes you have difficulty selecting your cards and calculating the perfect combinations because of the modifiers. Therefore, what used to be a lot of time and what separates you from victory are those crucial seconds. So don't waste any.

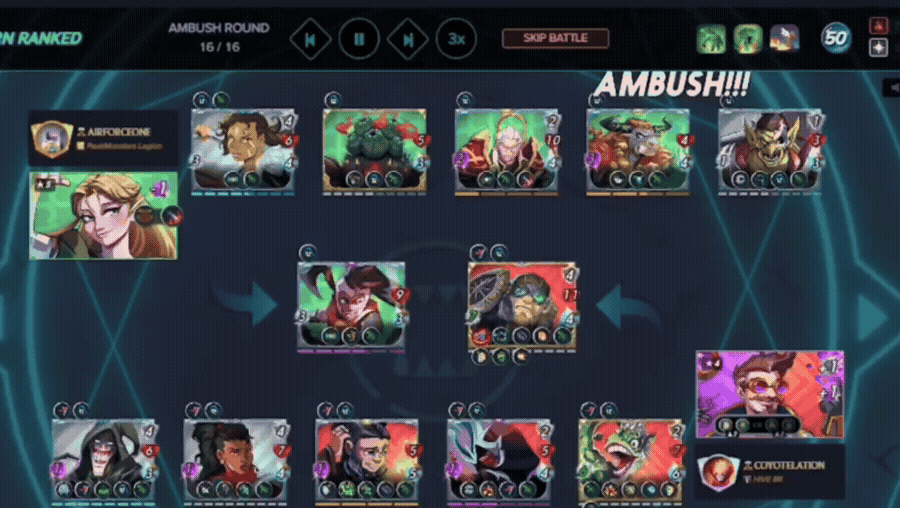
It's Time for the Battle
Now comes the other fun part, which is creating your deck. This is where you prepare your units for battle. As you can see, the mana cost is 50, so I can have a wide variety of cards to create my formation. For this specific battle, I only needed 36 mana.
For this battle I'm going to share, notice that there are three modifiers: Maneuvers (all melee units can attack in any position), Stampede (a melee unit that defeats the enemy can attack again on the unit next to the fallen enemy), and Need for Speed (only units with a speed above 3 can battle).

With Need for Speed, battles usually end much faster, because if you focus only on attacking and with units with speed above 5, the chances of winning the duel, like in Wild West, are high. But in Splinterlands, if you want to win, you must be cautious, and I usually always have healing units and units that can repair the shield. Because that way, the chances of me not losing my Tank quickly will be high.
As I said before, my Archon is Lorkus, because with this card, I have access to +1 magic damage and +1 melee damage. I also chose the Affliction skill (causes 50% of the cards hit to no longer be healed) and Life Leech (increases health and maximum health by 50%). Affliction is great because if my opponent has a healing card, it can be easily neutralized.

My Battle Formation
For the first three formations, this is undoubtedly my favorite trio. I have the perfect combination of Cavewise Wayfinder and Vicious Giraffe, because as my gnome attacks, my giraffe, despite losing a life, gains +1 melee attack. And that's why I chose them both to gain the Affliction and Life Leech abilities. In third place I have Tasoshi Drakamoto which, in addition to having the Paingforge ability, gives +1 melee attack to all my units.

For the other part of my formation, now I have my support units. In the fourth position I have Inept Healer, this old lady guarantees perfect support to bring life back to all my units with low health. She can't be missing from my "starting lineup" and I always include her whenever possible. In the fifth position, I have Conclave Tracker with its standout ability, Repair. A great card to avoid a lot of melee and ranged enemy damage.
In the last position I have Arcane Skinwalker, a kind of "wild card," because in addition to also giving +1 melee attack, it removes -1 magic damage from enemy units. Since it has the Camouflage ability, this card cannot be seen or attacked.

My opponent used the Archon Kaylia Silverleaf, which means I'll have problems with my magic units. Adding that to the Lurking Puffer and Boring Hobgoblin cards, I'll have -3 magic. But I had a plan, which is why I bet on my Gnome Tank and my Giraffe.
Right in round 1, I managed to eliminate an enemy card and left Boring Hobgoblin basically ready to be eliminated in the next round, as he was left with only 1 life. Defeating him is important because my magic units will recover at least 1 magic.
By round 2, I managed to eliminate almost all of the spell damage neutralizers on my units. This made my support cards stronger. Since it was a speed battle, I gave the full attack order to finish this battle once and for all.

In round 3, the Vicious Giraffe already had 9 melee attack and that was already causing absurd damage. As I said, the gnome plus the giraffe is a perfect combination. But not everything is as it seems. I had a loss, Tasoshi Drakamoto fell, but just like in war, we have casualties, don't we?

In round 4, it was simply the confirmation of what I had built up throughout all the battle progress, even before creating the deck; I already knew victory was coming, and now it was just the coup de grâce of Cavewise Wayfinder on the last enemy unit. A perfect and quick victory, as it should be.

I want to thank you for getting this far and realizing that choosing the biggest and most powerful cards in your deck doesn't always guarantee victory; you need to find the necessary balance in your main deck composition to be the best in duels. Understanding modifiers is an important step in this process, and it will increase your chances of creating perfect combinations and win.
Thank you for reading. If you want to see the complete battle, just click here. Once again, it's very satisfying to participate in the weekly challenge, and if you'd like to participate as well, just check here for more details. Until next time, and see you on the battlefield.

Olá invocadores! Vamos para mais uma edição e dessa vez, iremos participar do Desafio de Engajamento Comunitário Splinterlands e o tema desta semana é sobre Arquiteto da Arena. Ao longo do artigo iremos explorar como eu crio e identifico quais são as minhas melhores cartas para a formação de batalha perfeita. Analisaremos esse processo que dependendo da sua estratégia, pode determinar sua vitória até mesmo antes de iniciar a batalha.
É bastante comum ver jogadores que possuem um, dois ou até mais "times titulares" em cada tipo de elemento. Eu mesmo possuo alguns e um dos que eu mais gosto é juntar unidades do elemento Fogo e Morte e para isso ser possível, preciso do Arconte Lorkus, pois ele é perfeito para eu ter mais opções de cartas na hora de decidir quem irá para a batalha.
Planejamento em Busca da Vitória
Em Splinterlands nem sempre o mais forte vence. Para que isso de fato aconteça, um conjunto de situações devem estar ao seu favor e dependendo de como você preparou seu deck, as chances de vitória serão grandes. Mas de nada vai adiantar ter um Tanque altamente forte de você não tiver uma carta de cura, ou mesmo uma unidade que repara seu escudo. O equilíbrio entre ataque e defesa é fundamental e não é clichê no jogo.
Além disso, os modificadores são o conjunto de regras que de forma aleatória são lançadas em cada batalha. Conseguir identificar rapidamente eles te dará mais tempo para preparar seu deck. Caso queira ver todos, basta clicar aqui. Observar a quantidade de mana também é essencial, pois de nada vai adiantar colocar suas cartas principais que juntas custam por exemplo 38 de mana sendo que na batalha só é possível até 28. Por isso, ter atenção vai te ajudar a não cometer equívocos.
Então, antes de clicar em "batalha" tenha em mente essas coisas. A média de tempo em cada partida é de 3 minutos e pode parecer muito, mas às vezes você tem dificuldade para selecionar suas cartas e calcular as combinações perfeitas por conta dos modificadores, então o que era bastante tempo e o que separa você da vitória são esses segundos importantes. Então não desperdice nada.
É Hora da Batalha
Agora vem a outra parte mais divertida, que é a criação de seu deck. É onde você prepara suas unidades para a batalha. Como podem ver, o custo de mana é de 50, então eu posso ter uma ampla variedade de cartas para eu criar minha formação. Para esta batalha em específico, apenas precisei de 36 de mana.
Para essa batalha que irei compartilhar, percebam que existem três modificadores que são Maneuvers (todas as unidades corpo a corpo podem atacar em qualquer posição. Stampede (unidade corpo a corpo que derrotar o inimigo, pode atacar novamente na unidade ao lado do inimigo caído). Need for Speed (Somente unidades com velocidade acima de 3 poderão batalhar).
Com o Need for Speed, geralmente as batalhas acabam bem mais rápido, pois se você focar em só atacar e com unidades com velocidade acima de 5, as chances de você vencer o duelo como no Velho Oeste, é grande, mas em Splinterlands, se você quer vencer, deverá ter cautela e eu costumo sempre ter unidades de cura e com unidades que consigam reparar o escudo. Porque assim, as chances de eu não perder meu Tanque rapidamente serão grandes.
Como eu disse antes, meu Arconte é o Lorkus, pois com essa carta, me dá acesso a +1 dano mágico e +1 corpo a corpo. Também escolhi a habilidade Affliction (faz com que 50% das cartas atingidas podem não ser mais curadas e Life Leech (aumenta a saúde e saúde máxima em 50%). A Affliction é ótima, pois caso o meu adversário tenha uma carta de cura, ela pode ser facilmente neutralizada.
Minha Formação de Batalha
Para as três primeiras formações, essa é sem dúvidas meu trio favorito. Tenho a combinação perfeita de Cavewise Wayfinder e Vicious Giraffe, pois na medida que meu gnomo ataca, minha girafa apesar de perder uma vida, ela ganha +1 de ataque corpo a corpo. E é por isso que escolhi eles dois para ganhar as habilidades Affliction e Life Leech. Na terceira posição tenho Tasoshi Drakamoto que além de ter a habilidade Paingforge, ela dá +1 de ataque corpo a corpo a todas minhas unidades.
Para minha outra parte da formação, agora estarão meus suportes. Na quarta posição eu tenho a Inept Healer essa velhinha me garante dar o suporte perfeito para dar vida a todas minhas unidades com menos vida. Ela não pode faltar no meu "time titular" e sempre que posso, coloco ela. Na quinta posição, tenho Conclave Tracker com sua habilidade de destaque a Repair. Ótima carta para evitar muitos danos corpo a corpo e de longo alcance inimigo.
Na última posição tenho Arcane Skinwalker, uma espécie de "coringa", pois além de também dar +1 ataque corpo a corpo, ela retira -1 de magia as unidades inimigas. Como ela possui a habilidade Camouflage, esta carta não pode ser vista e ser atacada.
Meu adversário usou a Arconte Kaylia Silverleaf, isso quer dizer que terei problemas com minhas unidades de magia. Somando com a carta Lurking Puffer e Boring Hobgoblin, ficarei com -3 de magia. Mas eu tinha um plano e é por isso que eu coloquei minha aposta no meu Tanque gnomo e na minha girafa.
Logo na rodada 1, já consegui eliminar uma carta inimiga e deixei Boring Hobgoblin basicamente pronto para ser eliminado na próxima rodada, pois ele ficou com apenas 1 de vida. Derrotar ele é importante porque minhas unidades mágicas recuperarão ao menos 1 de magia.
Pela rodada 2, consegui eliminar quase todos os que neutralizam dano mágico em minhas unidades. Isso fez com que minhas cartas de suporte ficassem mais fortes. Como era uma batalha de velocidade, dei a ordem de ataque total para acabar de vez com essa batalha.
Na rodada 3, a Vicious Giraffe já tinha 9 de ataque corpo a corpo e isso já causava um dano absurdo. Como eu disse, o gnomo mais a girafa é uma combinação perfeita. Mas nem tudo é o que a gente pensa. Tive uma perda, Tasoshi Drakamoto caiu, mas assim como na guerra, temos baixas, não é mesmo?
Na rodada 4, foi apenas a constatação do que em todo o progresso de batalha que eu construí até mesmo antes de criar o deck, já sabia que a vitória chegaria e agora foi apenas o golpe de misericórdia do Cavewise Wayfinder sobre a última unidade inimiga. Vitória perfeita e rápida, como deve ser.
Quero agradecer a você que chegou até aqui e pôde perceber que nem sempre escolher as maiores cartas e mais poderosas de seu deck pode te dar vitórias, é preciso encontrar o equilíbrio necessário de sua formação principal para que você seja o melhor nos duelos. Entender os modificadores é um passo importante nesse processo e assim as chances de você criar as combinações perfeitas vão aumentar as chances de vitória.
Obrigado pela sua leitura, caso queira ver a batalha completa, basta clicar aqui. Mais uma vez, é muito satisfatório participar do desafio semanal e caso queira também participar, basta conferir aqui mais detalhes. Até a próxima e nos vemos no campo de batalha.
.gif)

Your line up is a great mix of damage dealers and support units. There's also the Wayfinder/Giraffe combo in front.
That's right, it's a powerful combination indeed.
https://www.reddit.com/r/Splinterlands/comments/1pn4b83/splinterlands_community_engagement_challenge_the/
This post has been shared on Reddit by @coyotelation through the HivePosh initiative.
Congratulations @coyotelation! You have completed the following achievement on the Hive blockchain And have been rewarded with New badge(s)
You can view your badges on your board and compare yourself to others in the Ranking
If you no longer want to receive notifications, reply to this comment with the word
STOPDelegate Tokens and HP to Fallen Angels to earn weekly rewards!
Delegate | Join to the guild