Battle Mage Secrets Weekly Challenge! Ferocity Ruleset | Splinterlands
Hello everyone, I hope everything is going well in your life. Welcome to my Battle Mage Secrets post. In this post, I will talk about the Ferocity Ruleset. I hope it will be useful for you.

In battles with the Ferocity Ruleset, all Monsters receive the Fury Ability. Monsters with the Fury Ability do double damage to targets with the Taunt Ability. And all enemy Monsters target the Monster with Taunt Ability first, that is, they attack to destroy it first, which means you can't prevent it from becoming a target. Using Monsters with Taunt Ability against Monsters with Fury Ability is not advantageous, on the contrary, a big disadvantage can turn into an advantage, so I recommend you to think carefully before including them in your lineup in battles with the Ferocity Ruleset.
Most players do not prefer Monsters with the Taunt Ability as they will take double damage in battles with the Ferocity Ruleset, but do not hesitate to use them if you think they will help your strategy. If I feel like they will help my strategy, I don't hesitate to include them in my lineup as well. If you need to add the Taunt Ability to your lineup, I would like to give you some tips about it.
If I feel that the opposing team will only have magic attackers, I can add Monsters with Void and Taunt abilities to my lineup. Because Void Ability reduces the damage caused by magic attacks by 50%, using Monsters with both Void Ability and Taunt Ability against them may not be a big disadvantage. Additionally, if you put a Monster with the Lookout Ability next to a Monster with the Taunt Ability, it will receive 1 less damage from attackers with sneak, snipe and opportunity. Additionally all units take half damage from ambushes as long as a Lookout unit is on your team. In short, when you need to use a Monster with the Taunt Ability, you can ensure that it takes less damage if you include these abilities in your strategy. I generally do not include the Taunt Ability in my lineup in battles with the Ferocity Ruleset, but I can say that I include it in my lineup without hesitation when I can predict my opponents' strategy or when I feel that the Taunt Ability will help my strategy.
Let's examine the Ferocity Ruleset in a battle.


- Ferocity: All Monsters have the Fury ability.
- Super Sneak: All Melee attack Monsters have the Sneak ability.
- Aim True: Attacks always hit their target.
According to the rulesets of the battle, all Monsters in this battle will have the Fury Ability and Sneak Ability, and the attacks will always hit their target. And before starting the battle, when I reviewed the recent 5 battles of the opposing player, it was difficult for me to predict what kind of strategy the opposing player would team up with in this battle. If I could predict the opposing player's strategy, I could use the Taunt Ability in this battle, but since I can't predict it, I won't use it. However, I will take every possibility into consideration when determining my strategy to win this battle.
First of all, since I want to use a dragon card and a gladiator card in this battle, I will choose Helios Matriarch as the summoner. And I will put Grum Flameblade with Void Ability and Void Armor Ability in the first position against magic attack monsters. And in the last position, I will put Djinn Chwala with Thorns Ability against enemy Sneak Monsters with melee attacks. And I will include the Repair Ability in my lineup to make them harder to destroy. Additionally, I will include the protect ability in my lineup as I think that having 2 extra armor on all monsters in my team will provide an advantage in this battle. And I will also use the Demoralize Ability to reduce the melee attack of all enemy melee attack monsters by 1. Also, it could have greatly benefited my team to use Tank Heal Ability and Triage Ability in such a battle, but I gave up on it because I could not predict the opposing player's strategy.
The continuation of my strategy and my lineup is as follows;
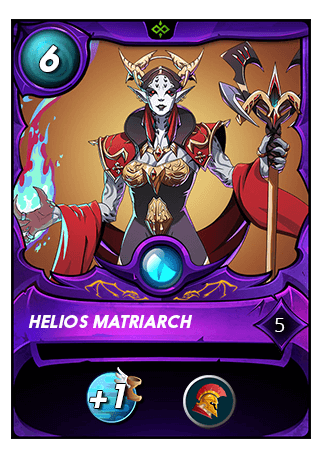
Helios Matriarch is a Dragon Summoner that allows the use of one additional Gladiator card in battle, and grants +1 speed to all friendly monsters. I can say that I chose Helios Matriarch as the summoner because I wanted to use both a dragon card and a gladiator card in this battle. Also, thanks to the Helios Matriarch, all monsters in my team would have +1 speed.
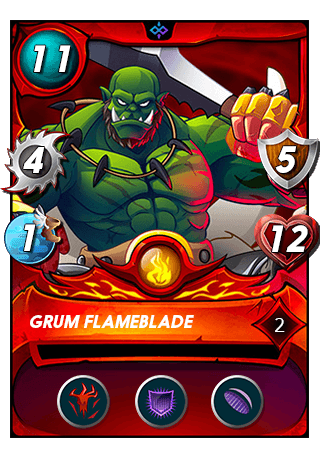
Grum Flameblade is a Fire Monster that can attack the target with Melee Attacks and has Bloodlust Ability, Void Armor Ability and Void Ability at level 2. Grum Flameblade is a monster that can be effective in battles with its abilities, but although it is a disadvantage that it only has 1 speed, it will not miss its target in this battle due to the Aim True ruleset. I also put Grum Flameblade in the first position because I believe it will defend well against magic attack monsters.
- Bloodlust Ability : This Monster revels in the glory of combat and becomes more dangerous as the battle goes on. Every time it defeats an opponent, it gets +1 to all stats.
- Void Armor Ability : Magic attacks hit this Unit's armor before its Health.
- Void Ability : Reduced damage from Magic attacks by 50%.
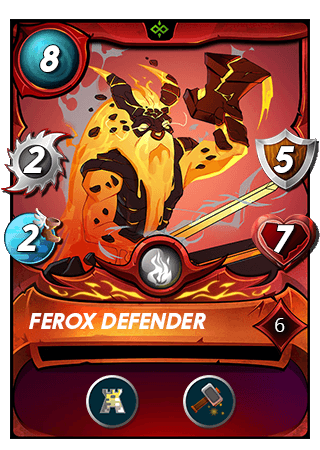
Ferox Defender is a Fire Monster that can attack the target with Melee Attacks and has Protect Ability and Repair Ability at level 6. The most important reasons I added Ferox Defender to my team in this battle is that it has Protect Ability and Repair Ability. Also, since it would have the Sneak Ability in this battle, it would be able to attack while in the back line and I put Ferox Defender in the second position.
- Protect Ability : All friendly Units gain +2 Armor.
- Repair Ability : Restores a third of max armor to the friendly Unit whose armor has taken the most damage.
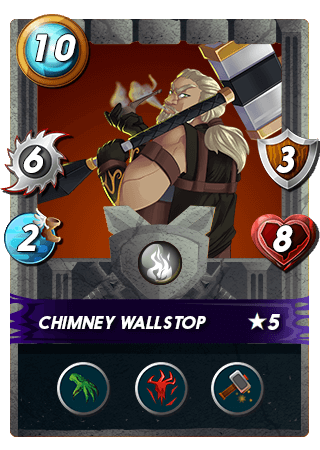
Chimney Wallstop is a Fire Gladiator that can attack the target with Melee Attacks and has Reach Ability, Bloodlust Ability and Repair Ability at level 5. Chimney Wallstop can attack with 6 melee attacks and has repair ability, and bloodlust ability which makes it very effective especially against melee attack monsters, so I added it to my team and put it in the third position to keep it away from the enemies' first attacks.
- Reach Ability : Melee attack Units with the Reach ability may attack from the second position on the team.
- Bloodlust Ability : This Monster revels in the glory of combat and becomes more dangerous as the battle goes on. Every time it defeats an opponent, it gets +1 to all stats.
- Repair Ability : Restores a third of max armor to the friendly Unit whose armor has taken the most damage.
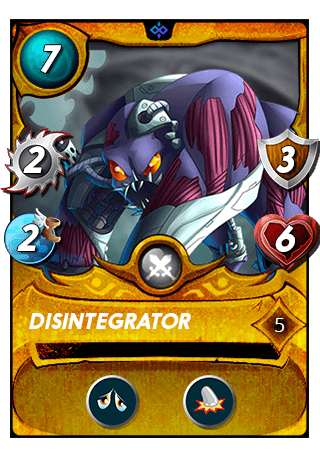
Disintegrator is a Neutral Monster that can attack the target with Melee Attacks and has Demoralize Ability and Trample Ability at level 5. The most important reason why I added Disintegrator to my team was that it has the Demoralize Ability, and thanks to the Demoralize Ability, the melee attack of all enemy melee attack monsters will be reduced by 1. And I put Disintegrator in the fourth position.
- Demoralize Ability : Reduces the Melee attack of all enemy Units by 1.
- Trample Ability : When a Monster with Trample hits and kills its target with a Melee attack, it will perform another Melee attack on the next Monster on the enemy Team.
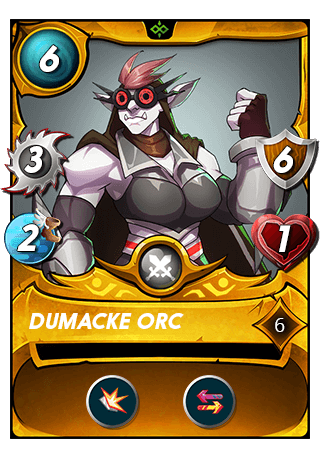
Dumacke Orc is a Neutral Monster that can attack the target with Melee Attacks and has Shield Ability and Retaliate Ability from level 5. Although it seems more logical to put Dumacke Orc in the last position in such battles, many players add Quora Towershead to their team in such battles, so I could not ignore this possibility, so I put it in the fifth position. If the Earth Unit wasn't active in this battle, I could have put it in the last position.
- Shield Ability : Reduces damage from Melee and Ranged attacks by 50%.
- Retaliate Ability : When hit with a Melee attack, Units with Retaliate have a 50% chance of immediately attacking their attacker.
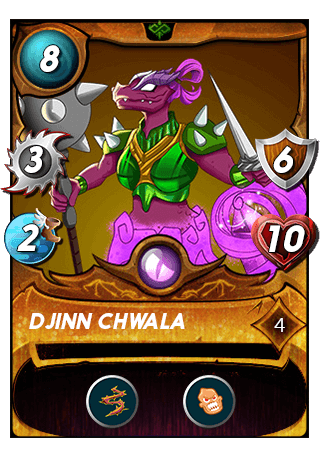
Djinn Chwala is a Dragon that can attack the target with Melee Attacks and has Thorns Ability and Enrage Ability at level 4. The most important reason why I added Djinn Chwala to my team is that it has the Thorns Ability, and since all Monsters will have the Sneak Ability in this battle, I put it in the last position.
- Thorns Ability : When hit with a Melee attack, does 2 Melee damage back to the attacker.
- Enrage Ability : This unit has 50% bonus Melee attack and Speed when not at full health.
You can watch the entire battle from the video or from the Battle Link
First of all, I would like to say that I was very surprised that in such a battle, the opposing team did not have Monsters with abilities such as Thorn Ability, Triage Ability, Repair Ability. Their absence would be a huge disadvantage for the opposing team, but it was great news for my team.
Round 1
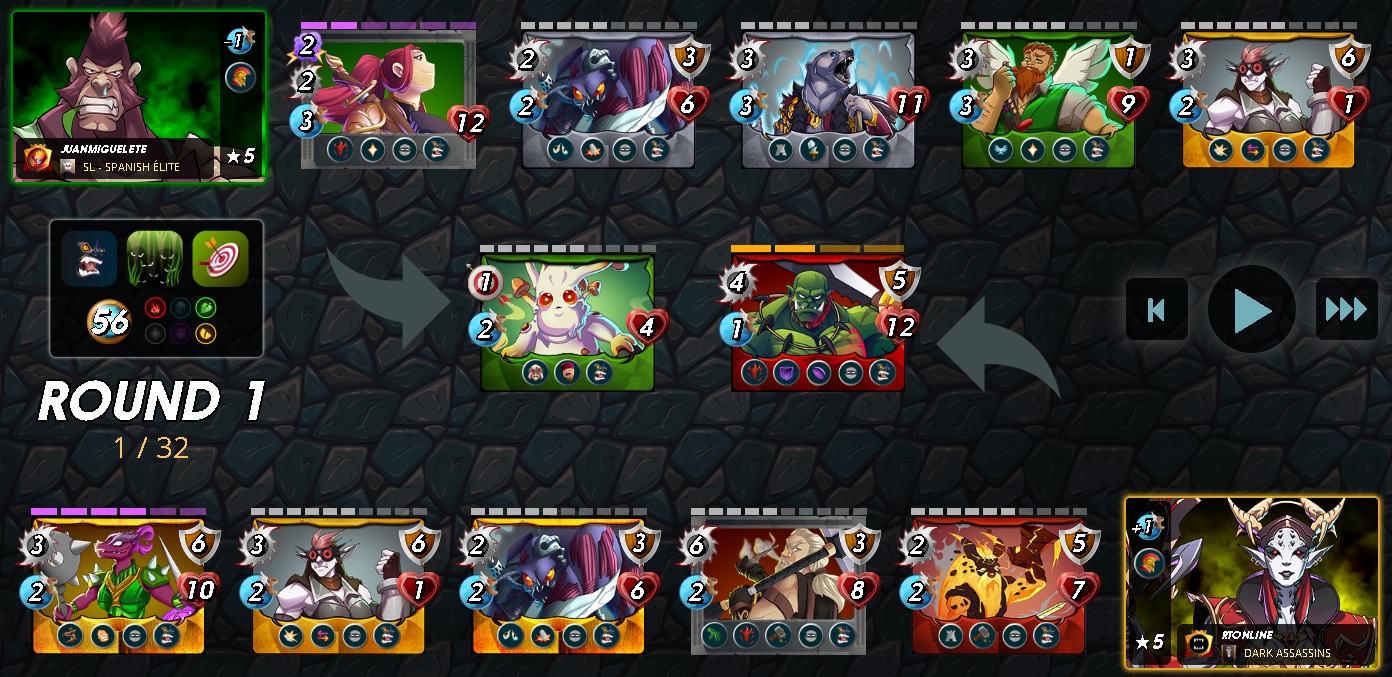
In the first round, putting Dumacke Orc, who has Shield Ability and Retaliate Ability, in the last position was very useful for the opposing team, but my placement of Djinn Chwala in the last position caused all enemy melee attack monsters to take back damage. And having two monsters with repair ability in my team was very useful. No monsters could be destroyed in the first round, but the Dumacke Orc on the opposing team had only 1 armor left, which meant that it would be destroyed in the next round.
Round 2
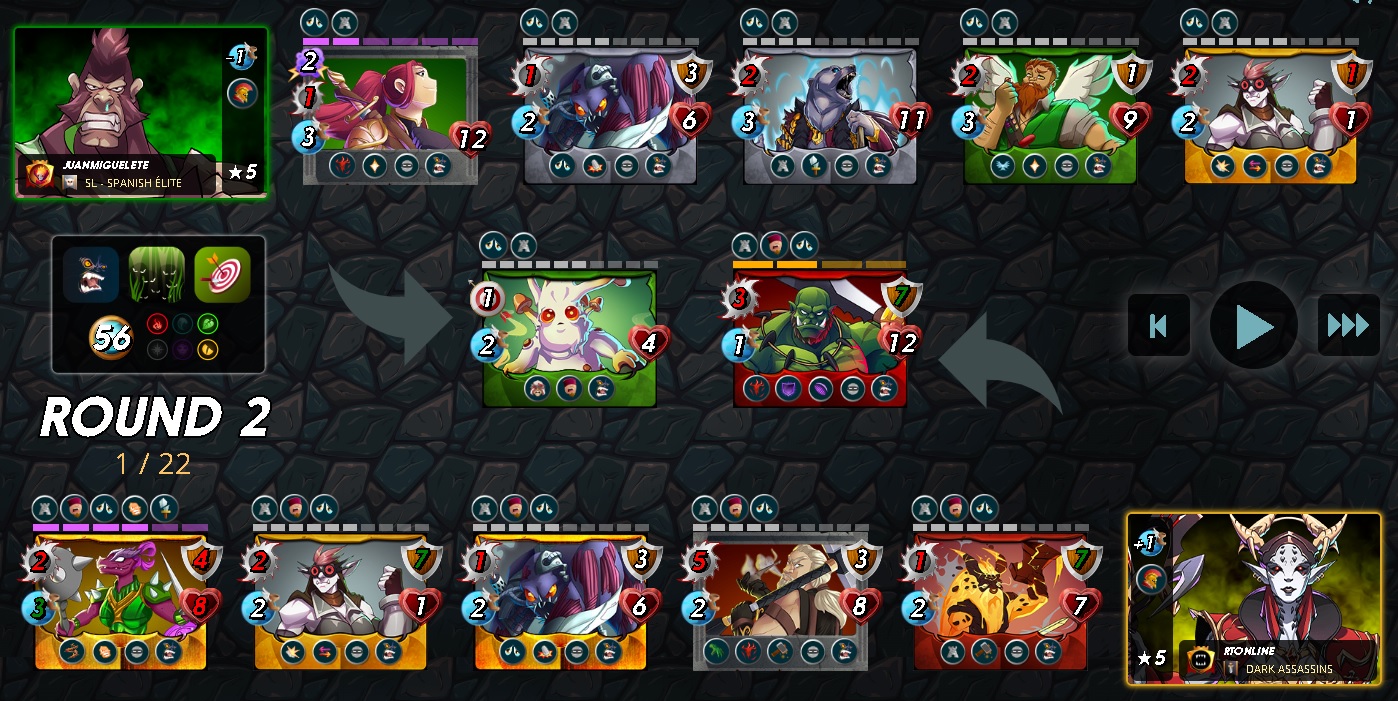
At the beginning of the second round, Dumacke Orc in the opposing team was destroyed and the attacks of the monsters in my team started to become much more effective and Pelacor Mercenary was also destroyed despite having the Heal Ability. Things were no longer going well for the opposing team, and the lack of the abilities I mentioned above on the opposing team made it easier to destroy the monsters on the opposing team. In the second round, while 2 monsters from the opposing team were destroyed, all the monsters on my team were still alive.
Round 3
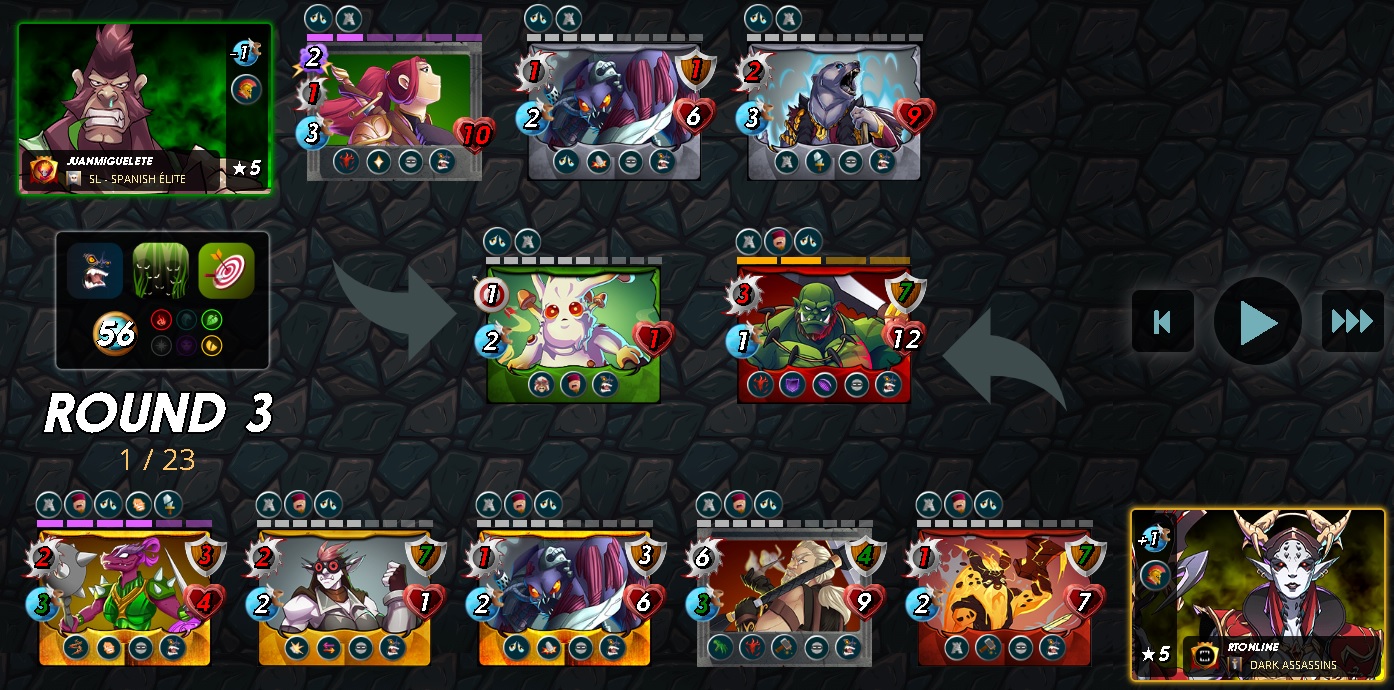
The enemies' inability to destroy Djinn Chwala made their job very difficult. And even in the third round, they failed to destroy it, which clearly shows how useful the Repair Ability is in such battles. In the third round, while 2 more monsters from the opposing team were destroyed, all the monsters on my team were still alive. At the end of the third round, only Quora Towershead and Disintegrator remained on the opposing team.
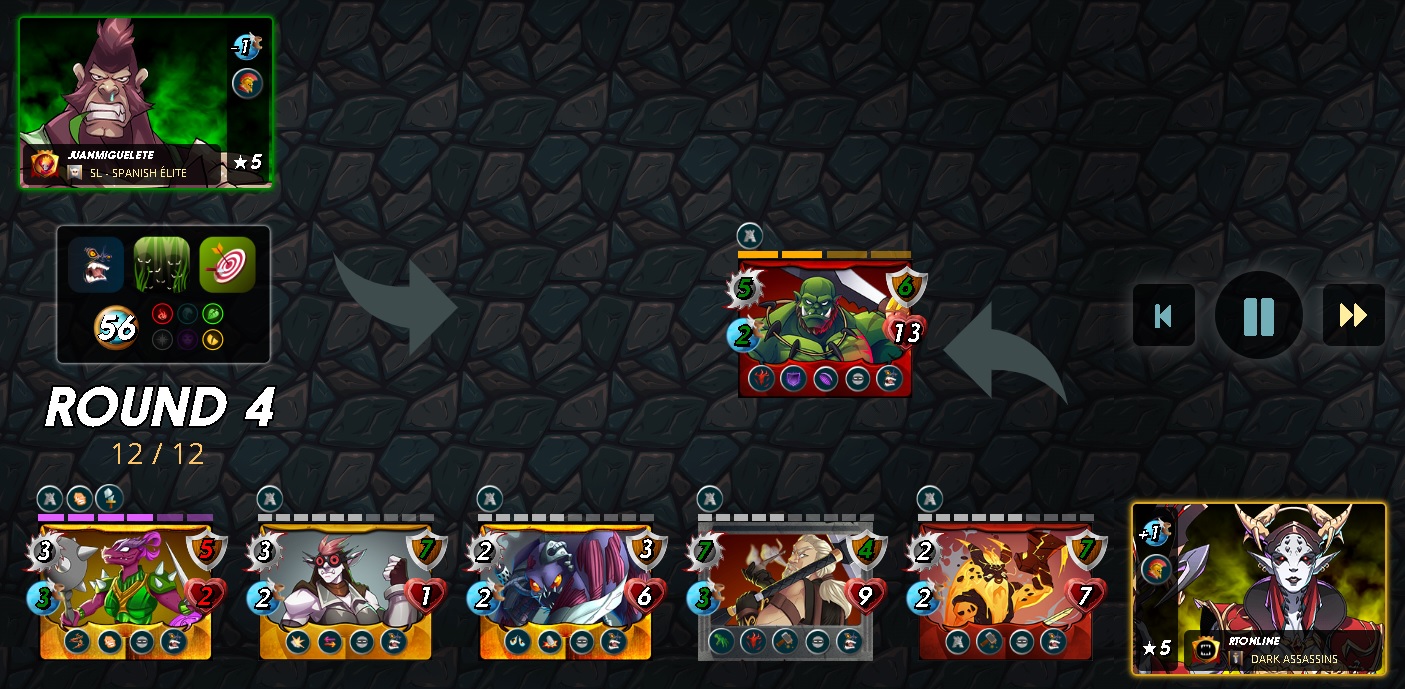
Round 4
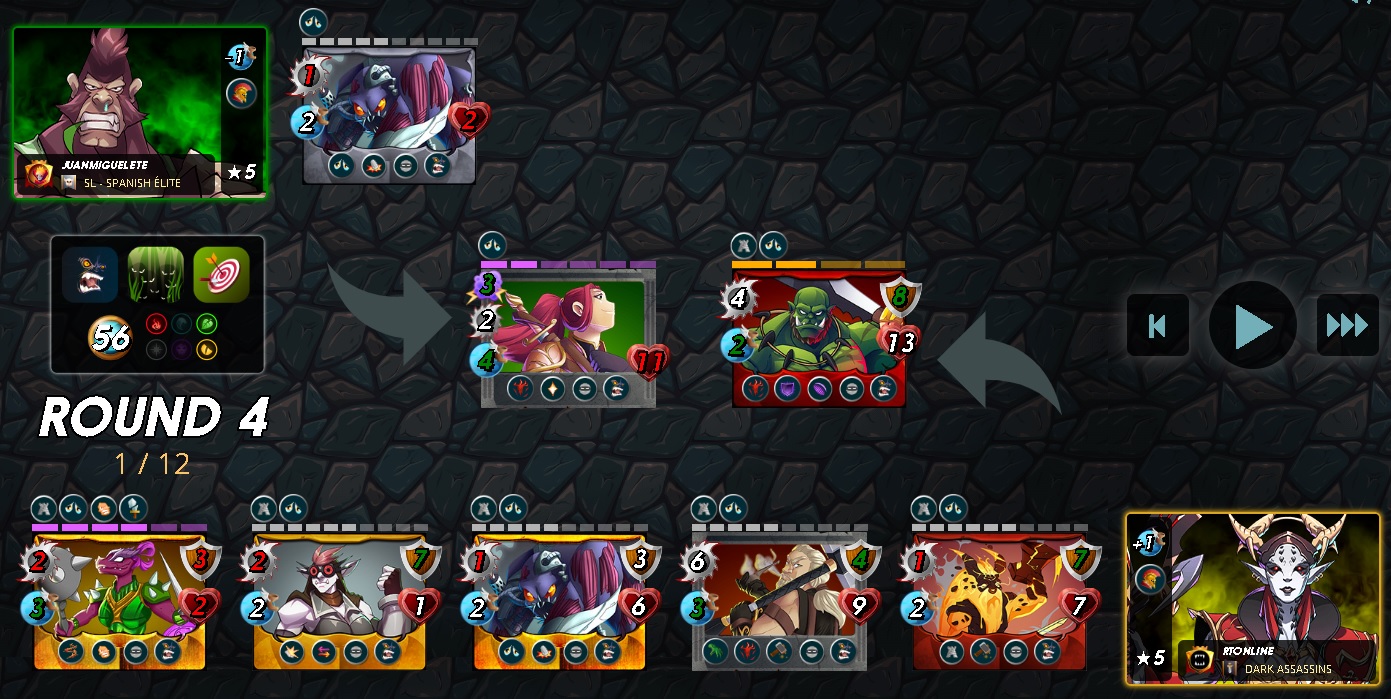
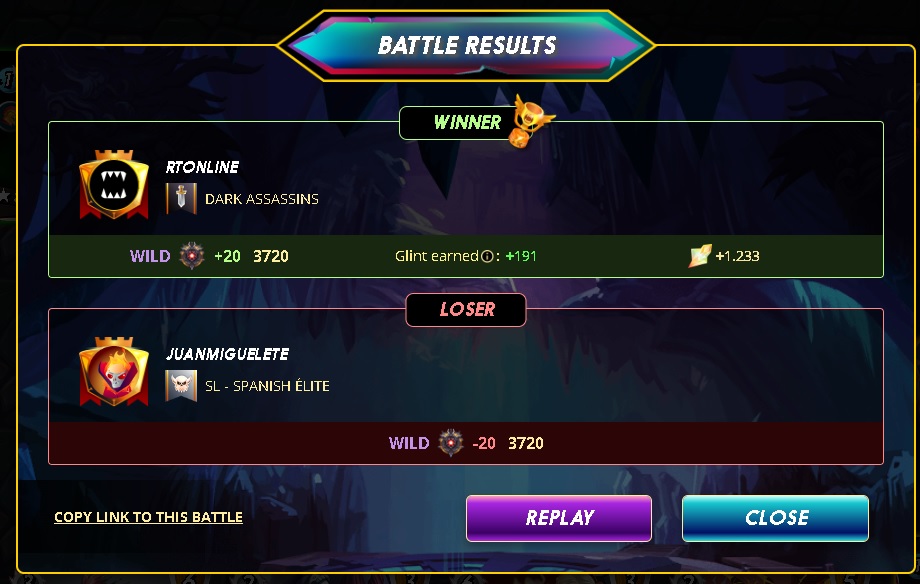
In the fourth round, the opposing team's Quora Towershead and Disintegrator were also destroyed. And my team managed to win this battle quite easily. It was unbelievable that all the monsters in my team were still alive at the end of the battle.
Even though the mana cap was 54, the battle lasted only 4 rounds. And at the end of the battle, while all the monsters on the opposing team were destroyed, all the monsters on my team were still alive, which shows that my strategy worked quite well in this battle. Especially the fact that I put a monster with Thorns Ability in the last position and used 2 Monsters with Repair Ability and a Monster with Demoralize Ability in my team worked very well in this battle and my team achieved a very easy victory against a powerful team. This battle was a good example of how Thorns Ability, Repair Ability, and Demoralize Ability are very useful, especially in such battles. In battles, survival is as important as destroying enemies. I recommend you to watch this very interesting and challenging battle from Battle Link. I hope you will like it.
All Images Taken from Splintelands.

What are your thoughts on the battle and my strategy? I would be glad if you write your thoughts in the comments.
Would you like to join Splinterlands? Here is my reference link
I Love Splinterlands
Thank you for reading.
@rtonline

Posted Using InLeo Alpha
!PIZZA
$PIZZA slices delivered:
@tin.aung.soe(1/10) tipped @rtonline
!pizza
Thanks for sharing! - @alokkumar121

Thank you very much for the support.