How to attach hardware to a low tank toilet. Step by step. / Cómo colocar herraje a inodoro de tanque bajo. Paso a Paso EN/ESP..

How to attach hardware to a low tank toilet. Step by step. / Cómo colocar herraje a inodoro de tanque bajo. Paso a Paso.
Introducción / Introduction:
First of all cordial greetings to the Hive Diy community and Hive in general, this is the first post I write in this community, because if it is true that I am constantly doing repairs and fixes at home, it is also true that it had not occurred to me to make a post of the same.
Antes que nada cordiales saludos a la comunidad de Hive Diy y de Hive en general, este es el primer post que escribo en esta comunidad, ya que si es cierto estoy constantemente haciendo reparaciones y arreglos en casa, también es cierto que no se me había ocurrido hacer un post de los mismos.
I'm going to start with this post, because a friend had a water leak from the toilet in his house, however, did not know how to change it, because it was a low tank toilet, and most of these pieces of bathroom come with the integrated tank, while the most common are two pieces, which are the body of the toilet and the tank.
Voy a iniciar con este post, debido a que un amigo tenía una pérdida de agua por el inodoro de su casa, sin embargo, no sabía como cambiar el mismo, debido a que era un inodoro de tanque bajo, y la mayoría des estás piezas de baño vienen con el tanque integrado, mientras que los más comunes son de dos piezas, que son, el cuerpo del inodoro y el tanque.
So this friend, seeing that it was difficult to change the hardware, called me to help him to place it, which I did, explaining step by step the process, and from there the idea of making this post was born, hoping that it will help them and help them to reduce the maintenance costs of their home, since the purchase of a toilet hardware and labor to change it, have a cost between 40 to 50 $.
Así que este amigo al ver que se le hacía difícil el cambio del herraje, me llamó para que le ayudase a colocarlo, lo cual hice, explicándole paso a paso el proceso, y de ahí nació la idea de hacer este post, esperando que el mismo les sirva y les ayude a disminuir los costes de mantenimiento de su hogar, ya que la compra de un herraje de baño y la mano de obra para cambiarlo, tienen un costo entre 40 a 50 $.
In the case of my friend and neighbor, the hardware with the Teflon, cost him $26 and the plumber was charging him $20 to install the hardware. When we did it ourselves, it came out to only $26, which was the cost of the new parts to be installed.
En el caso de mi amigo y vecino, el herraje con el teflón, le salió en 26$ y el plomero le estaba cobrando 20$ por colocar el herraje. Al hacerlo nosotros mismos, nos salió solo en 26$ que fue el costo de las piezas nuevas a colocar.
Paso a paso de la colocación del herraje / Step by step of the installation of the hardware:
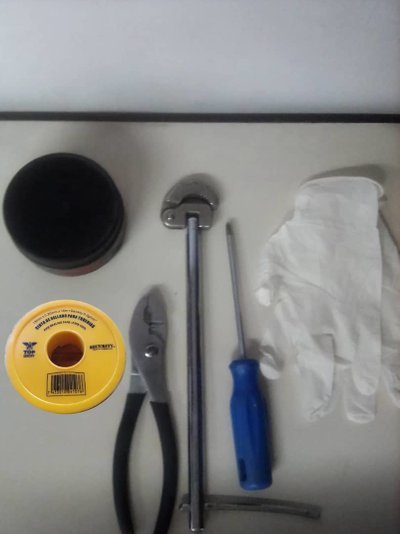
Step 1: Have all the tools we are going to use, in my case, use a fluted screwdriver, a plumber's wrench, fibrous grease, Teflon and in case you don't have a plumber's wrench, you can use mechanical pliers or tweezers, not the electric one. And latex gloves.
Paso 1: Tener todas las herramientas que vamos a utilizar, en mi caso, utilice un destornillador de estrías, una llave de plomero, grasa fibrosa, teflón y en dado caso que no se tenga una llave de plomero, se puede usar un alicate o pinza mecánico, no el eléctrico. Y guantes de latex.
Step 2: Turn off the stopcock or water supply to the toilet. If there is no stopcock, turn off the water at the main tap.
Paso 2: Cerrar la llave de arresto o de paso de agua al inodoro. En dado caso que no haya llave de arresto, cerrar el agua en la toma principal.
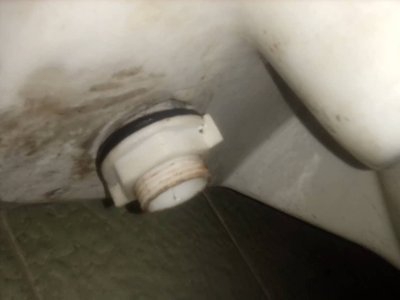
Step 3: Remove the toilet lid and drain the water, and then remove the faucet that goes from the stopcock to the tank.
Paso 3: Quitamos la tapa del inodoro y vaciamos el agua, para posteriormente pasar a quitar la canilla que va de llave de arresto al tanque.
Once we remove the faucet, we remove the nut that holds the water dispenser, normally this is done by hand without the need for wrenches. If the nut feels too tight, move the dispenser a little from side to side and then press it down, this usually allows us to remove the adjusting nut without the need for wrenches. If it is still too tight, use a wrench to loosen it, but this is rarely necessary. The plumber's wrench or mechanical pliers will only be used to tighten the tap nut that goes to the stopcock, everything else will be done with manual force.
Una vez que sacamos la canilla, quitamos la tuerca que sostiene el dispensador de agua, normalmente esto se hace con la mano sin necesidad de llaves. Si se siente muy apretada la tuerca, movemos un poco el dispensador de lado a lado y luego lo presionamos hacia abajo, eso normalmente nos permite retirar la tuerca de ajuste sin necesidad de llaves. En dado caso que continúe muy apretada utilice una llave para aflojarla, pero casi nunca es necesario. La llave de plomero o en su defecto el alicate mecánico, únicamente lo utilizaremos para apretar la tuerca de la canilla que va a la llave de arresto, todo lo demás lo haremos con fuerza manual.

Step 4: Once the water dispenser is removed, proceed to remove the drain valve.
Paso 4: Una vez que quitamos el dispensador de agua, procedemos a quitar la válvula de desagüe.
This is where most people get confused.
En este punto es cuando la mayoría de las personas se confunden.
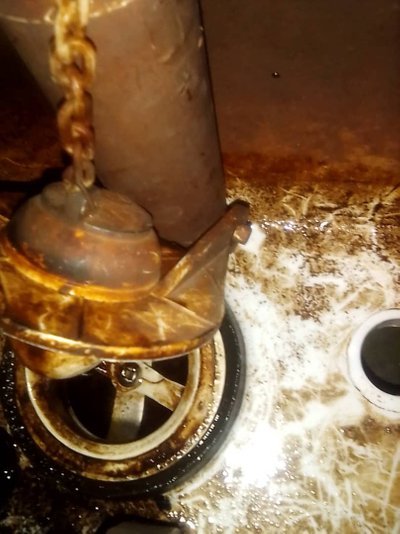
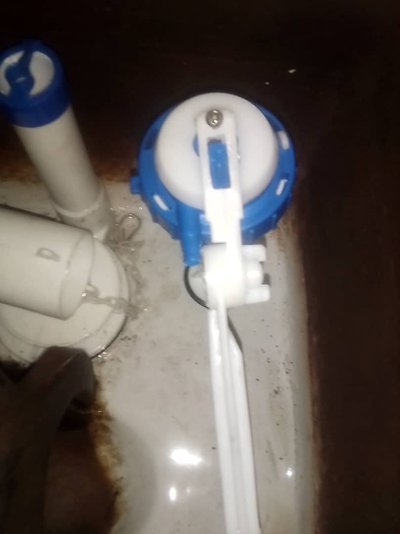
What we have to do, to remove the valve is to loosen the screw that is on the inside of the valve as shown in the picture.
Lo que tenemos que hacer, para quitar la válvula es aflojar el tornillo que está en la parte interna de la válvula como lo muestra la imagen.
Once we loosen it completely, the butterfly that holds it will fall allowing us to remove the valve without any problem.
Una vez que lo aflojemos completo, la mariposa que lo sostiene caerá permitiendo sacar sin problema la válvula.
Once the valve is removed, we introduce the pliers or our fingers and remove the butterfly that holds the valve, which will be visible once we remove the valve body.
Una vez que sacamos la válvula, introducimos la pinza o los dedos y sacamos la mariposa que sostiene la válvula, la cual quedará a simple vista una vez que saquemos el cuerpo de la válvula.
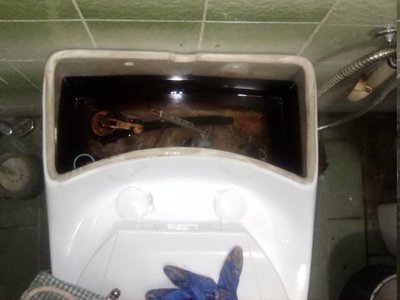
Once we remove both the water dispenser and the drain valve, it is advisable (at least I do) to clean the tank with a rag and remove all dirt and mud residues left by the water.
Una vez que saquemos, tanto el dispensador de agua, como la válvula de desagüe, es recomendable, (por lo menos yo lo hago) limpiar el tanque con un trapo y quitar todos los residuos de tierra y barro que deja el agua.
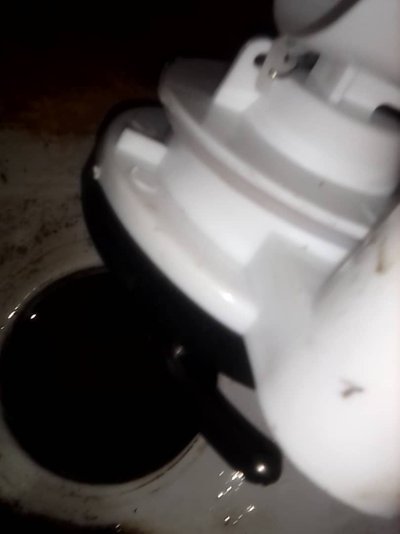
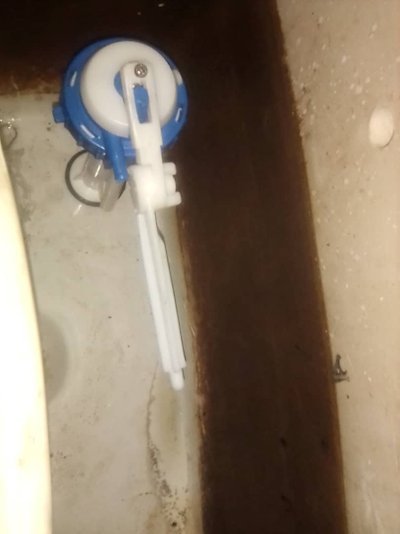
Step 5: Install the new drain valve. / Colocamos la válvula de desagüe nueva.
At this point we must take into account the following, to be able to mount the drain valve in this type of tanks, we will unscrew as much as possible the butterfly that is at the bottom of the valve, but without removing the butterfly.
En este punto debemos tomar en cuanta lo siguiente, para poder montar la válvula de desagüe en este tipo de tanques, vamos a desenroscar lo más posible la mariposa que está en la parte de abajo de la válvula, pero sin quitar la mariposa.
This will give us a few centimeters between the lower part of the valve and the butterfly, this space between the valve and the butterfly, is what will allow us to put the body of the valve in the drain hole.
Eso nos dará unos centímetros entre parte baja de la válvula y la mariposa, ese espacio que tenemos entre la válvula y la mariposa, es lo que nos va a permitir meter el cuerpo de la válvula en el agujero de desagüe.
Once we do it, we must take the precaution that it is in the position we want and then proceed to tighten with a screwdriver.
Una vez que lo hacemos, debemos tomar la precaución, de que quedé en la posición que deseamos y posteriormente procedemos a apretar con destornillador.
Personally, I usually put a little bit of fibrous grease on the rubber of the drain valve before tightening to guarantee a better seal.
En lo personal, suelo colocar un poco de grasa fibrosa en la goma de la válvula de desagüe, antes de apretar, para garantizar un mejor sellado.
Finally, remember not to tighten it too hard, because if you tighten it too much you run the risk of breaking the porcelain of the toilet and rendering it useless.
Finalmente recordar que se debe apretar no con mucha fuerza, debido a que si se aprieta demasiado se corre el riesgo de romper la porcelana del inodoro e inutilizar el mismo.
I recommend tightening until it feels snug and then turning the screw a half turn, no more than that.
Yo recomiendo apretar hasta que se sienta ajustado y luego dar media vuelta al tornillo, no más de ahí.
 )
)
Step 6: We install the water dispenser. / Paso 6: Instalamos el dispensador de agua.
Personally, I usually do the following and it is what I recommend doing.
En lo personal, yo suelo hacer lo siguiente y es lo que recomiendo hacer.
Place fibrous grease to the lower part of the water dispenser, which will have contact with the tank, subsequently, place fibrous grease to the front and third part of the rubber that goes in the lower part of the water dispenser and to the upper part of the nut that has contact with the rubber.
Colocar grasa fibrosa a la parte baja del dispensador de agua, que va a tener contacto con el tanque, posteriormente, colocar grasa fibrosa a la parte delantera y tercera de la goma que va en la parte baja del dispensador de agua y a la parte superior de la tuerca que tiene contacto con la goma.
Once I place the grease, I put the piece in position and I make sure that the float can make its journey without problems.
Una vez que coloco la grasa, coloco la pieza en posición y me aseguro que el flotante pueda realizar su recorrido sin problemas.
Once I have verified the position in which the piece is going to be, I start screwing in the nut and tighten it with the force of my hand.
Una vez que haya verificado la posición en la que va a quedar la pieza, comienzo a enroscar la tuerca y aprieto la misma con la fuerza de la mano.
To make the piece fit better, once it reaches the point when I'm squeezing with my hand, what I do is press down the water dispenser, that usually gives me a couple more turns and assures me, that the piece was well adjusted and even more, that it will not have water loss.
Para que la pieza quede mejor ajustada, una vez que llega al punto cuando estoy apretando con la mano, lo que hago es presionar hacia abajo el dispensador de agua, eso normalmente, me da un par de vueltas más y me asegura, que la pieza quedó bien ajustada y más aún, que no tendrá perdida de agua.
Step 7. We make sure that the pieces we place are well placed and we check that the float is not going to have obstruction.
Paso 7. Nos aseguramos que las piezas que colocamos estén bien colocadas y revisamos que el flotante no vaya a tener obstrucción.

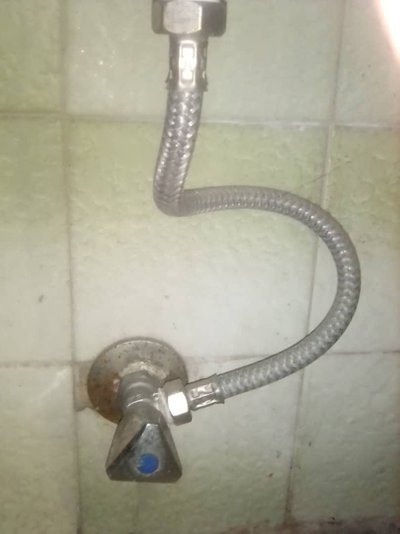
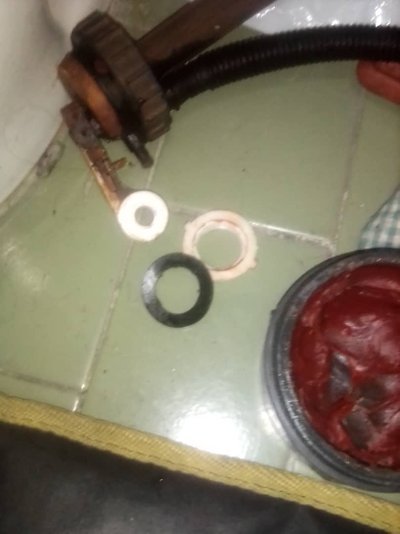
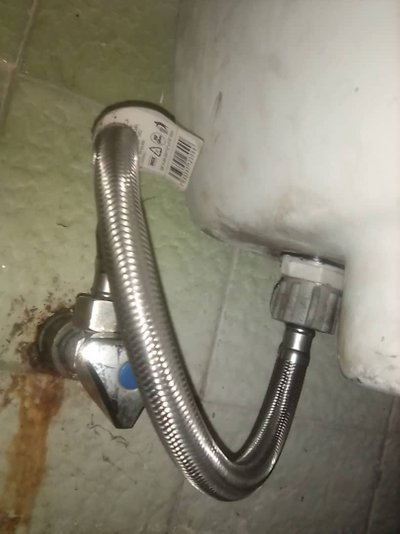
Step 8: We place the tap that goes from the stop or stopcock to the water dispenser. / Paso 8: colocamos la canilla que va de la llave de arresto o de paso al dispensador de agua.
Before attaching the tap, we put Teflon coated on the threaded tube where the nut that holds the water dispenser will go, as well as to the thread of the stopcock.
Antes de colocar la canilla, colocamos teflón tanto en el tubo enroscado donde va a ir la tuerca que sostiene el dispensador de agua, así como a la rosca de la llave de paso.
At this point we must take into account that many times the tap route becomes complicated for some people.
En este punto debemos tomar en cuenta que muchas veces el recorrido de la canilla se hace complicado para algunas personas.
So that they do not have problems with the stroke of the tap, they must first place it in the water dispenser, and without squeezing, make the stroke of the tap and place the other end to the stopcock.
Para que no tengan problemas con el recorrido de la canilla, deben colocarla primero en el dispensador de agua , y sin apretar, hacer el recorrido de la canilla y colocar la otra punta a la llave de paso.
Once they do this, they will tighten the nut of the dispenser with their hand, until they give it their strength.
Una vez que hagan esto, van a apretar con la mano la tuerca del dispensador, hasta donde le den sus fuerzas.
In the case of the nut that goes to the stopcock, if it will be tightened with the plumber's wrench or the mechanical pliers or spanner.
En el caso de la tuerca que va a la llave de paso, si será apretada con la llave de plomero o el alicate mecánico o llave inglesa.
Once the tap is placed, the water is turned on and it is verified that there is no loss of water, neither by the dispenser, nor by the nut of the valve key.
Una vez colocada la canilla, se abre el agua y se verifica que no exista pérdida de agua, ni por el dispensador, ni por la tuerca de la llave de la paso.
Step 9: We graduate the water inlet with the screw that is on the top of the water dispenser.
Paso 9: Graduamos la entrada de agua con el tornillo que está en la parte superior del dispensador de agua.
We make sure, that once we graduate the water flow, the float closes the water inlet where we want.
Nos aseguramos, que una vez que graduemos el flujo de agua, el flotante cierra la entrada de agua donde queremos.
Personally, when I finish, I perform three tests by lowering the toilet and after verifying that after the tests, everything works fine, I close the tank lid and give the job for done.
Yo, en lo personal al terminar, realizo tres pruebas bajando el inodoro y después de verificar que después de las pruebas, todo funciona bien, cierro la tapa del tanque y doy el trabajo por terminado.


I hope this step-by-step tutorial will be useful to you and allow you to do this work yourself at home.
Espero este tutorial pasoa a paso, les sea de utilidad y les permita poder realizar esta labor a ustedes mismos en sus hogares.
Any questions, please leave them in the comments and I will gladly answer them.
Cualquier duda, por favor la dejan en los comentarios y con gusto se las responderé.
My best wishes to all of you and your relatives in this 2023.
Mis mejores deseos para todos ustedes y sus familiares en este 2023.
https://twitter.com/267463901/status/1611834194296012800
The rewards earned on this comment will go directly to the people( @osomar357 ) sharing the post on Twitter as long as they are registered with @poshtoken. Sign up at https://hiveposh.com.
Hola, te dejo algunos tokens para apoyar tu gran contenido y tu esfuerzo de traer nuevas ideas cada vez que se te es posible, te deseo exitos en cada uno te tus post ya que eres muy importante para nosotros. !HUESO !PGM !MEME !GIF ABRAZO
Haz click sobre el banner, para ser dirigido al Discord de Mundo Virtual y conocer más sobre nuestro proyecto de curación.
Click on this banner, to be directed to the Virtual World Discord and learn more about the curation project.
@nahueldare3627, @bot-bdbhueso(5/10) sent you LUV. | tools | discord | community | HiveWiki | NFT | <>< daily
BUY AND STAKE THE PGM TO SEND A LOT OF TOKENS!
The tokens that the command sends are: 0.1 PGM-0.1 LVL-0.1 THGAMING-0.05 DEC-15 SBT-1 STARBITS-[0.00000001 BTC (SWAP.BTC) only if you have 2500 PGM in stake or more ]
5000 PGM IN STAKE = 2x rewards!
Discord
Support the curation account @ pgm-curator with a delegation 10 HP - 50 HP - 100 HP - 500 HP - 1000 HP
Get potential votes from @ pgm-curator by paying in PGM, here is a guide
I'm a bot, if you want a hand ask @ zottone444
Via Tenor
Credit: memess
Earn Crypto for your Memes @ HiveMe.me!
Gracias por compartir paso a paso como cambiar un herraje, pensé que el proceso era más difícil, un post muy completo para trabajar en casa. Saludos!
Hola @virgilio07, gracias por el comentario.
Realmente no es difícil, lo que pasa es que al cambiar la estructura de dos piezas uno se pierde, más cuando uno no tiene experiencia y se confunde con la forma de colocar la válvula de desagüe, ya que muchos no tienen ni idea de como se coloca y de eso se aprovechan para cobrar un dineral a personas que muchas veces no lo tienen.
Yo realmente no conocía esta comunidad, ahora intentaré compartir todos los arreglos, reparaciones y remodelaciones que haga.
Me legra te haya gustado.
Mis mejores deseos.
Yay! 🤗
Your content has been boosted with Ecency Points, by @osomar357.
Use Ecency daily to boost your growth on platform!
Support Ecency
Vote for new Proposal
Delegate HP and earn more
Thank you for sharing this post on HIVE!
Your content got selected by our fellow curator sharminmim & you just received a little thank you upvote from us for your great work! Your post will be featured in one of our recurring compilations which are aiming to offer you a stage to widen your audience within the DIY scene of Hive. Stay creative & HIVE ON!
Please vote for our hive witness <3
Post votado por la Curación de la Comunidad de Mundo Virtual. Recibes algunos Huesos
Te invitamos a que conozcas nuestra Comunidad de Hive