[EN/PT] Are Multi-Element Summoners Useful?
[EN]
Hello Splinter Fanatics
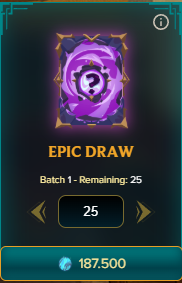
I think the most eagerly awaited moment for all Splinterlands players is the end of the season (EOS), when anxiety runs high about unlocking the Glints tokens. At this stage, great expectations arise about the items we can get in the Shop. Each player usually follows their own purchasing strategy - in my case, I'm focusing on obtaining epic cards through Epic Draw, with the aim of getting them to the maximum level.
Last season, I finished with a balance of 224,771 Glints. Of this total, I used 187,500 Glints to acquire 25 Epic Draws. With the rest, I chose to invest in Major Chests, trying my luck in the chests. You can see the result of this journey by clicking on the image below!
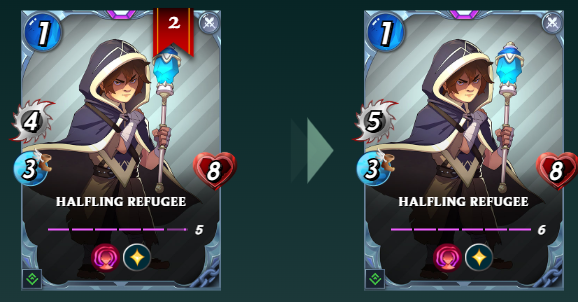
With these cards, I managed to take one more to the maximum level: **Halfling Refugee. This is one of the epic cards I use the most, mainly because it requires very little mana and has very aggressive melee damage. That makes two epic reward cards from this set at maximum level!
Maybe in another season or two I'll be able to reach the maximum level on practically all the epic cards. From there, my next goal will be to upgrade the rare cards to the maximum level. One of the decisions I regret is investing too much in Ultimate Chests. The cost is high and the rewards are often not worth it. I think this has contributed to my Reward Soulbound collection lagging behind that of other players.
Having a good Reward Rebellion collection up to date and at the maximum level is the desire of many players, as it will make a big difference when the Chaos Legion collection is rotated to the Wild format.
With CL's departure in mind, I've been following the Splinterlands card market more closely, looking for affordable options, especially summoners from the Rebellion Collection, which are essential for maintaining a good performance in the Modern format.
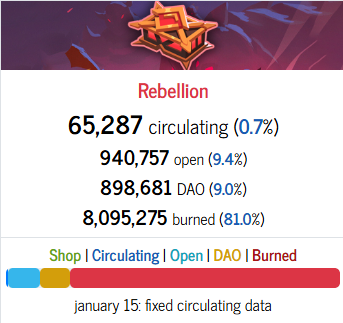
The Rebellion collection has more expensive cards, mainly because around 80% of the packs have been burned, drastically reducing the available supply. This naturally pushes up prices on the market, since the supply is much smaller.
The scenario is very different from the Chaos Legion cards, which had a huge supply, which generated a great deal of inflation within Splinterlands and ended up making these cards much more accessible to players.
Returning to my summoner purchases, I decided to buy them mainly because the rental market is very high - and the trend is set to get worse when Chaos Legion is rotated to the Wild format. That's why I decided to anticipate this move and buy some summoners while they were still priced below the market average. I believe this rotation should happen in the middle of the second semester.
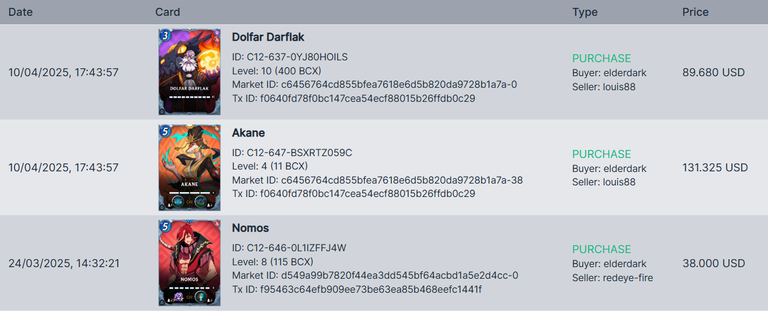
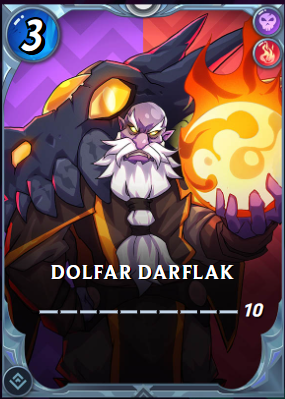
I took the opportunity and invested in cards that will strengthen my collection. It was a wise decision. I've been using Dolfar Darflak, a common multi-element summoner, and the dragon summoner Akane, which offers very interesting tactical abilities.
I used to be a fan of buying cards to increase the power of my collection, but now I think twice before making any purchases. Even so, I believe that these summoners are likely to remain highly valued, especially given the low inflation in the Rebellion collection card market.
Dolfar Darflak
In this post, I will present a battle using Dolfar Darflak, a common multi-element summoner that allows the use of Fire and Death Splinters. Although he doesn't grant abilities to allied monsters, his low mana cost makes him an excellent choice for battles with low mana limits.
Another situation in which Dolfar Darflak stands out is when the ruleset Silenced Summoners is used.  Silenced Summoners is available.
In this case, all summoners lose their abilities, which levels the playing field and makes Dolfar a smart choice, as it unleashes two Splinters (Fire and Death), in addition to the neutral one, at a very affordable cost.
Even without active abilities, this summoner significantly expands strategic options, making it extremely useful in situations like these. Sometimes simplicity is synonymous with efficiency!

This battle was played with a 15 mana limit, and all Splinters were available except Life and Dragon. The battle conditions (rulesets) added even more challenge and required careful strategy:
Noxious Fumes: all monsters start the battle poisoned, which increases the importance of monsters with Immunity or healing abilities.
Melee Mayhem: monsters with melee attacks can attack from any position, making room for more aggressive formations.
Lost Magic: magic monsters cannot be used, which greatly limits ranged attack options and forces the use of physical damage or projectiles.
Given this scenario, the use of Dolfar Darflak made perfect sense. Its low mana cost made it possible to assemble a solid team even with limited resources, and the versatility between Fire and Death gave flexibility to adapt the strategy to the situation.
In this battle, the choice was practically obvious: low mana and the Fire and Death Splinters were available, a perfect combination for using Dolfar Darflak as a summoner. Its versatility and low cost made it the ideal choice for this match. From there, all I had to do was select the right monsters to put together an efficient formation adapted to the rulesets. Interestingly, my opponent also opted for a multi-element summoner: Brewmaster Abraxas, which combines Fire and Earth Splinters, and which was clearly chosen for the same strategic purpose.
This promises to be an epic battle!
Click Here to Watch the Full Battle!
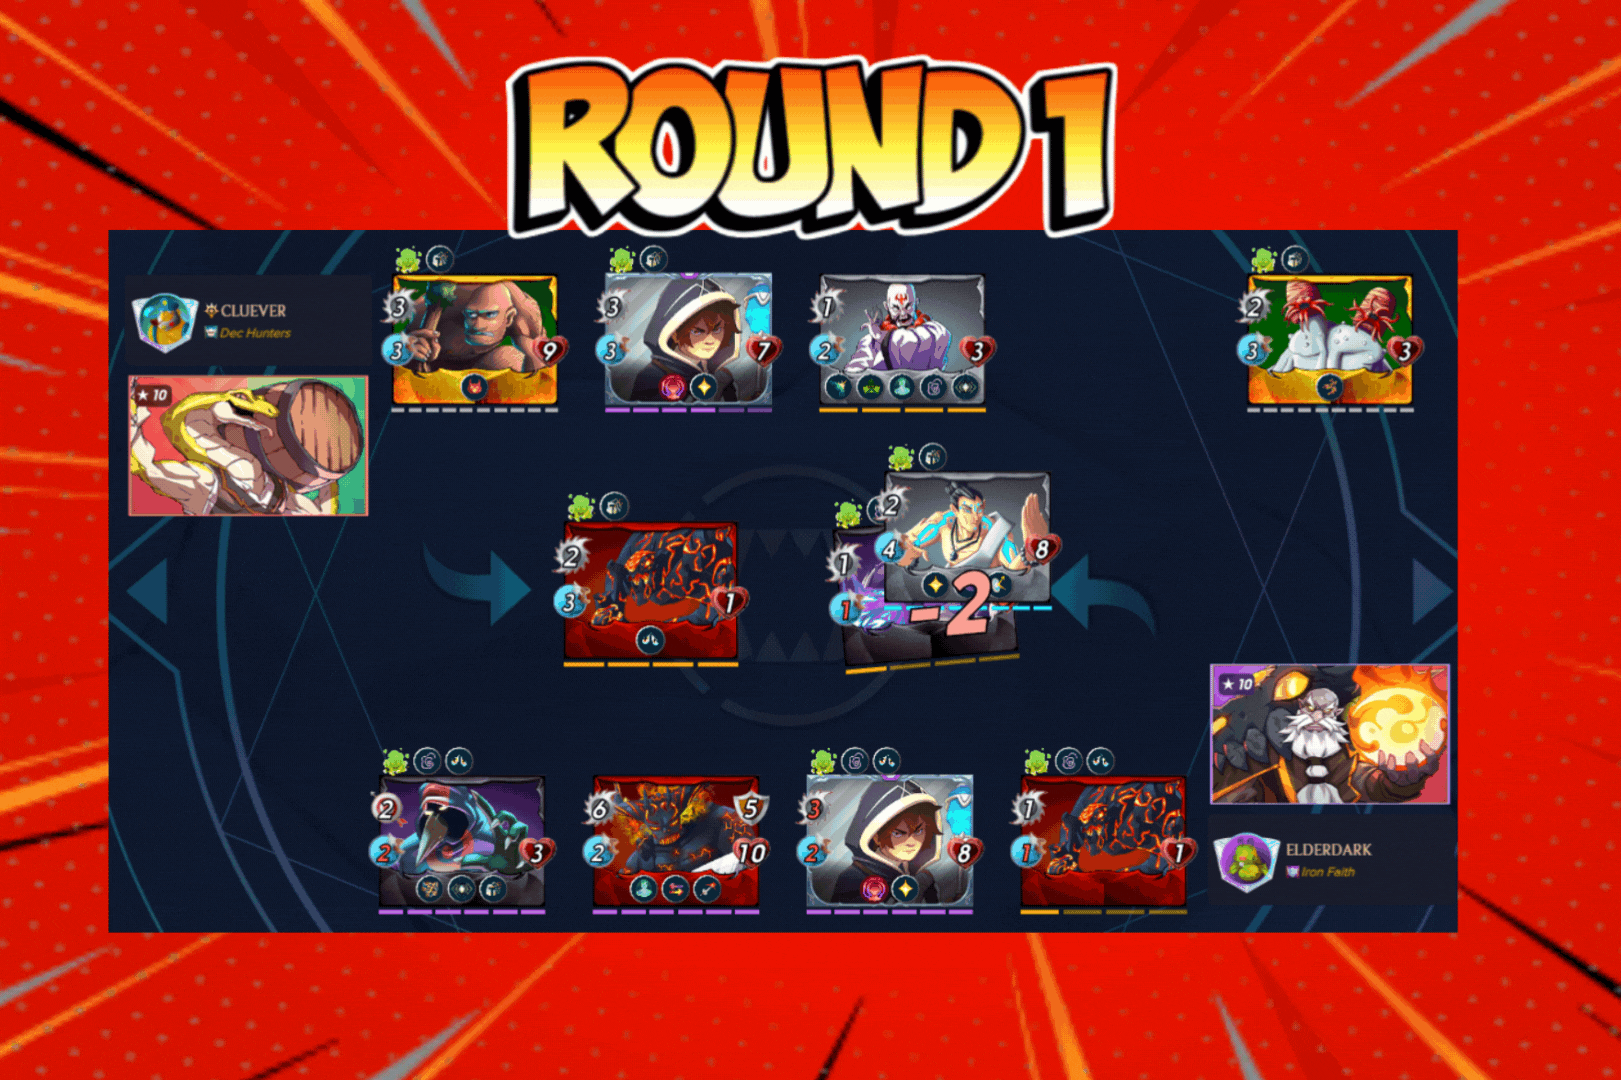
A great advantage of using multi-element summoners is that you can choose the best monsters from each Splinter. In this case, I was able to draw two monsters with zero, from each Splinter, that were placed in the top positions only as discard cards and make the opponent waste attacks.
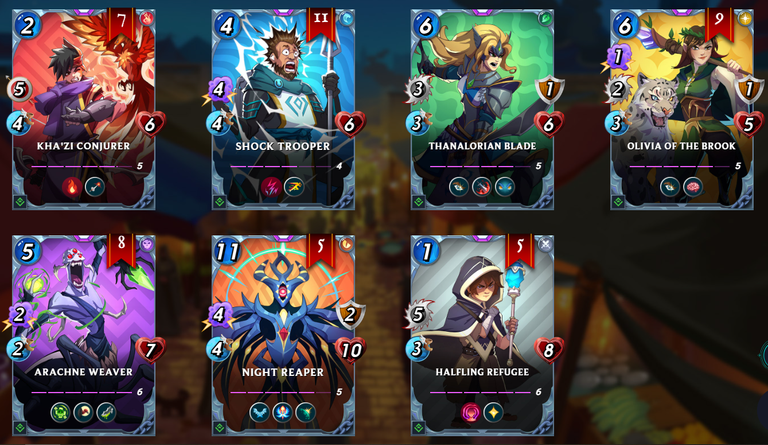
For a moment I thought the battle was lost, as several of my monsters were quickly defeated by the opponent's monsters. From the first round, only two monsters remained: Forgotten One and Weirding Warrior, both epic cards.
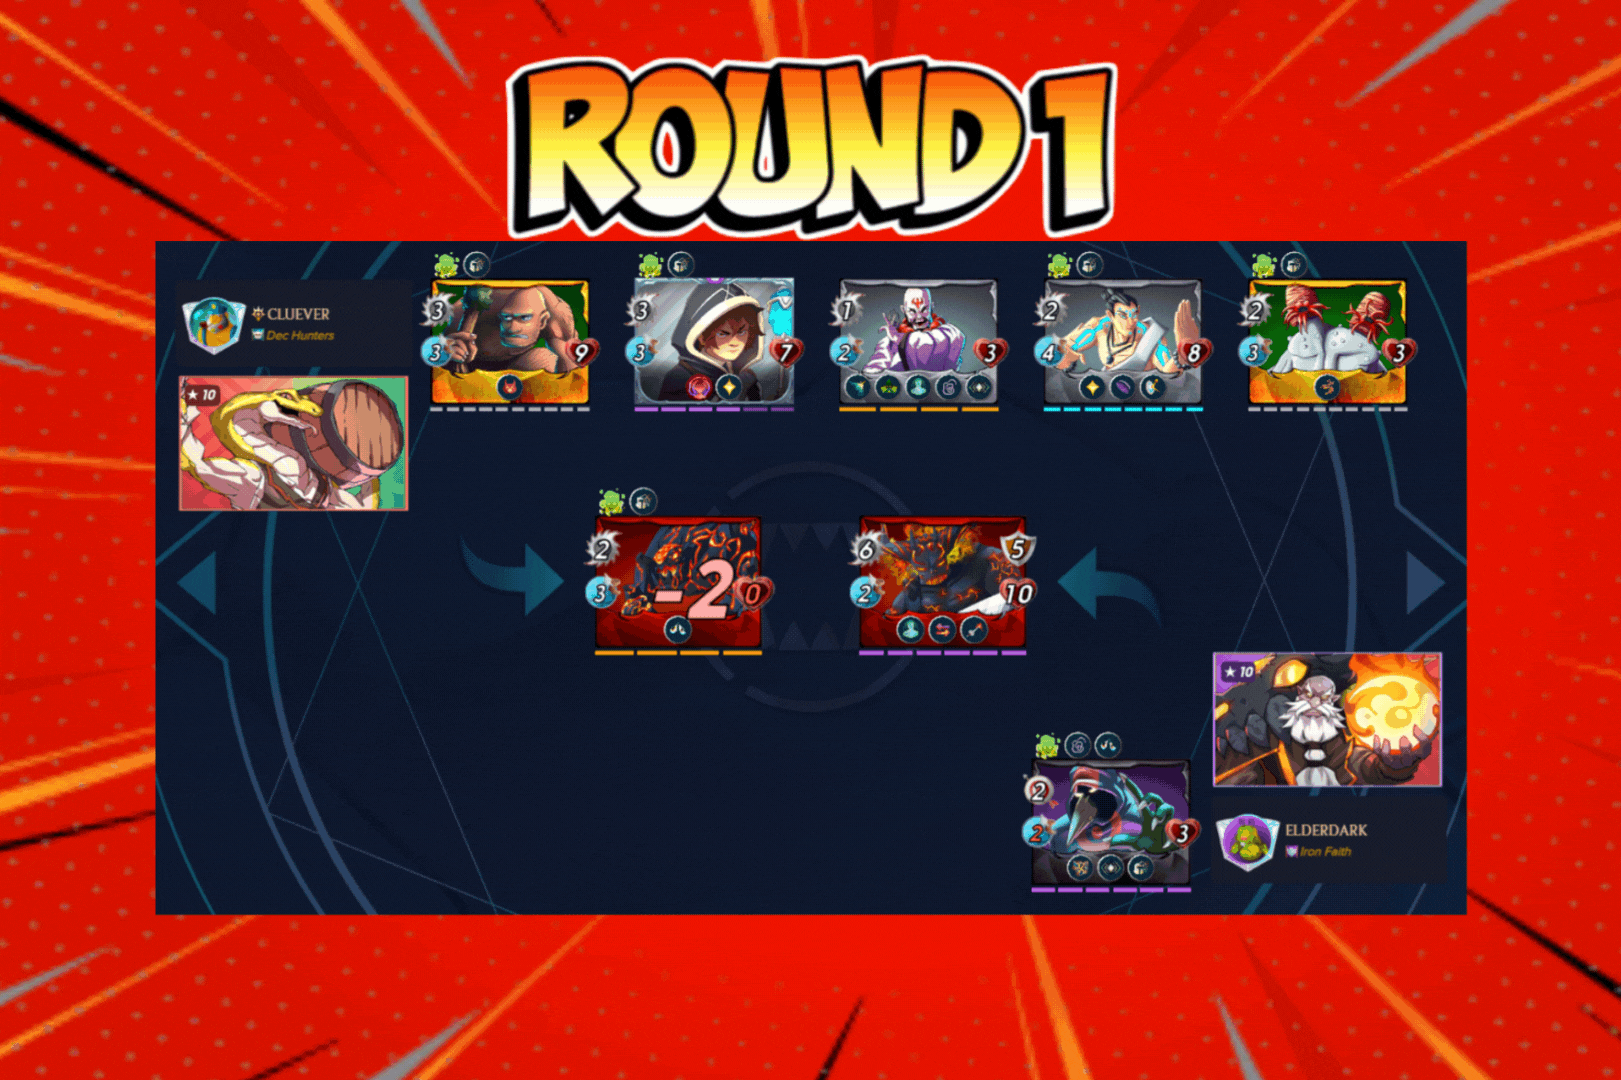
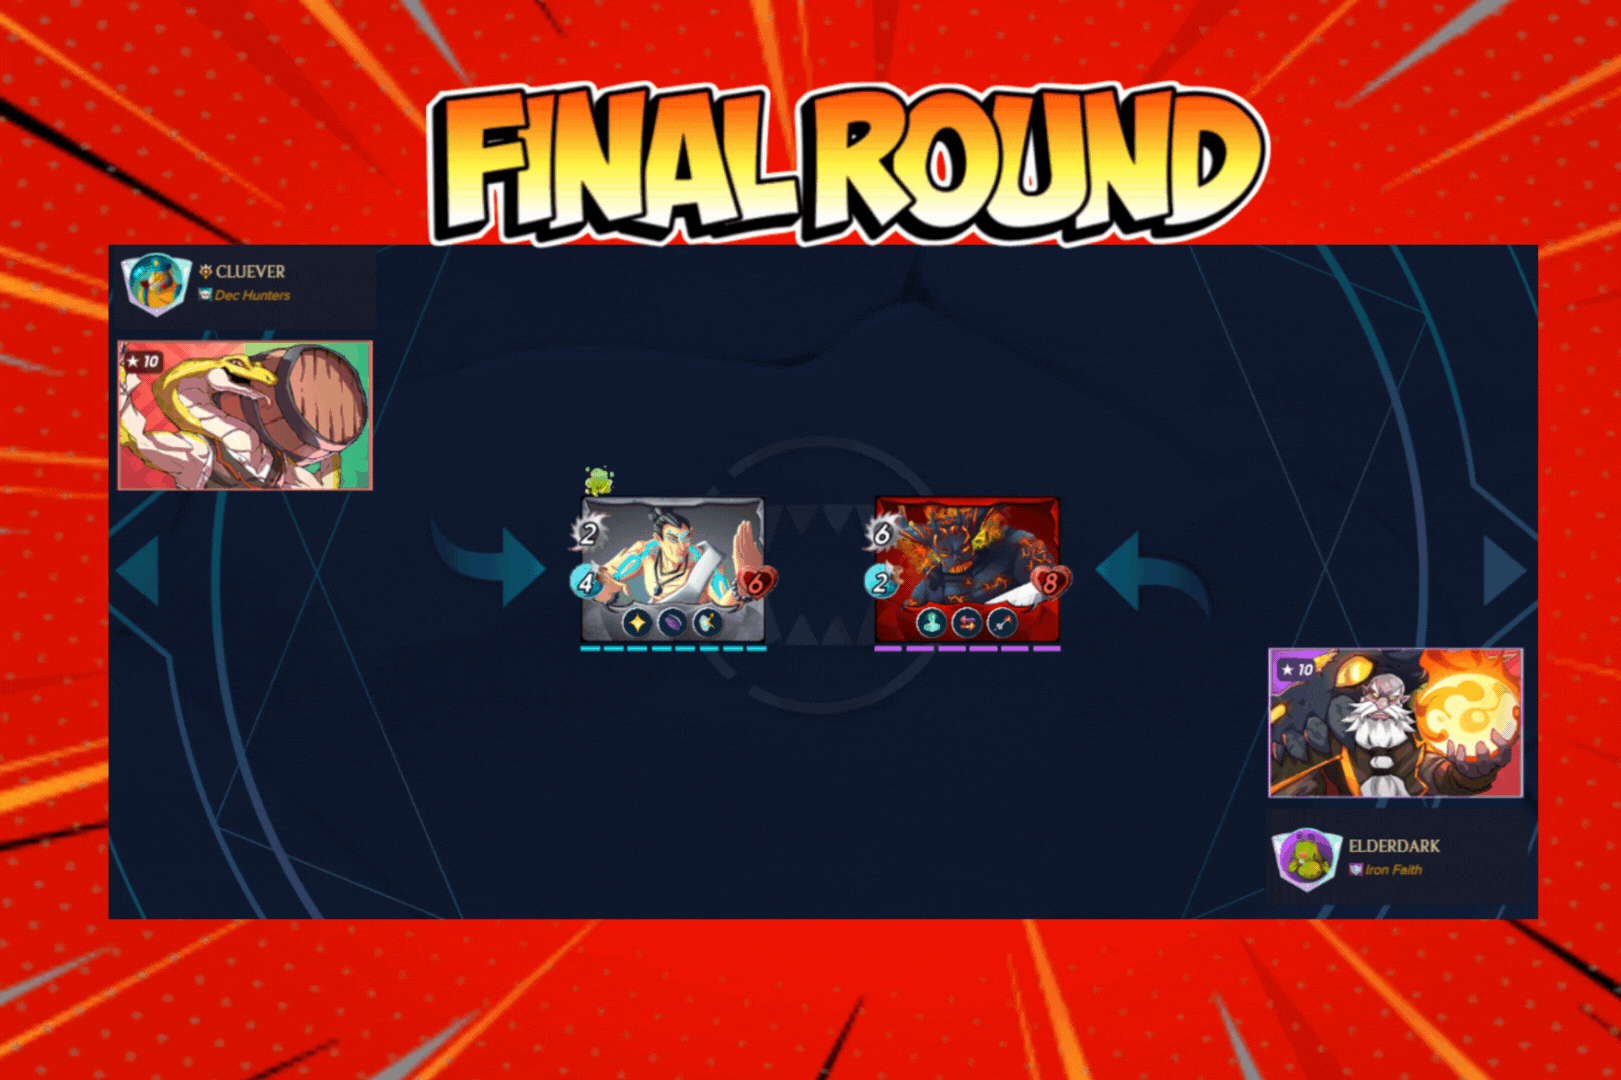
In the end, only Forgotten One versus Xenith Monk remained. While our monster has the Immunity skill, the opposing monster has the Heal skill, and our monster has very offensive melee damage. So you should know the result!
So in Splinterlands it's important to always improve your collection to get better results. My goal is to focus on Reward cards and, as often as possible, buy a few summoners to keep my results consistent. I hope you enjoyed it!
**If you've made it this far, thank you very much for your time and if in any way this content has been useful, please leave your upvote and reblog!

[PT]
Olá Splinter Fanáticos
Acho que o momento mais aguardado por todos os jogadores de Splinterlands é o final de temporada (EOS), quando a ansiedade bate forte para desbloquear os tokens Glints. Nessa fase, surgem grandes expectativas sobre os itens que poderemos conseguir no Shop. Cada jogador costuma seguir sua própria estratégia de compras — no meu caso, estou focando em obter cartas épicas por meio do Epic Draw, com o objetivo de levá-las ao nível máximo.
Na última temporada, finalizei com um saldo de 224.771 Glints. Desse total, usei 187.500 Glints para adquirir 25 Epic Draws. Com o restante, optei por investir em Major Chests, tentando a sorte nos baús. O resultado dessa jornada você pode conferir clicando na imagem abaixo!
Com essas cartas, consegui levar mais uma para o nível máximo: Halfling Refugee. Essa é uma das cartas épicas que eu mais uso, principalmente por exigir pouca mana e ter um dano melee bem agressivo. Agora, já são duas cartas épicas de recompensas desse conjunto no nível máximo!
Talvez em mais uma ou duas temporadas eu consiga alcançar o nível máximo em praticamente todas as cartas épicas. A partir daí, meu próximo objetivo será evoluir as cartas raras até o nível máximo. Uma das decisões das quais me arrependo foi ter investido demais nos Ultimate Chests. O custo é elevado e, muitas vezes, as recompensas não compensam. Acredito que isso tenha contribuído para que minha coleção Reward Soulbound esteja um pouco atrasada em relação à de outros jogadores.
Ter uma boa coleção Reward Rebellion atualizada e no nível máximo é o desejo de muitos jogadores, já que isso fará uma grande diferença quando a coleção Chaos Legion for rotacionada para o formato Wild.
Pensando na saída da CL, tenho acompanhado mais de perto o mercado de cartas de Splinterlands, em busca de opções acessíveis, especialmente invocadores da coleção Rebellion, que são fundamentais para manter um bom desempenho no formato Modern.
A coleção Rebellion possui cartas mais caras principalmente porque cerca de 80% dos pacotes foram queimados, reduzindo drasticamente o supply disponível. Isso naturalmente eleva os preços no mercado, já que a oferta é muito menor.
O cenário é bem diferente das cartas da Chaos Legion, que tiveram um supply enorme, o que gerou uma grande inflação dentro do Splinterlands e acabou tornando essas cartas muito mais acessíveis para os jogadores.
Voltando às minhas aquisições de invocadores, decidi comprá-los principalmente porque o mercado de alugueis está com valores bem altos — e a tendência é piorar quando a Chaos Legion for rotacionada para o formato Wild. Por isso, resolvi antecipar essa movimentação e adquirir alguns invocadores enquanto ainda estavam com preços abaixo da média de mercado. Acredito que essa rotação deva acontecer em meados do segundo semestre.
Aproveitei a oportunidade e investi em cartas que vão fortalecer minha coleção. Foi uma decisão certeira. Tenho usado bastante o Dolfar Darflak, um invocador comum multi-elemento, e o invocador de dragão Akane, que oferece habilidades táticas bem interessantes.
Antigamente, eu era fã de sair comprando cartas para aumentar o poder da minha coleção, mas hoje penso duas vezes antes de fazer qualquer compra. Mesmo assim, acredito que esses invocadores tendem a continuar valorizados, especialmente pela baixa inflação no mercado de cartas da coleção Rebellion.
Dolfar Darflak
Neste post, irei apresentar uma batalha utilizando o Dolfar Darflak, um invocador comum multi-elemento que permite o uso dos Splinters Fogo e Morte. Embora ele não conceda habilidades aos monstros aliados, seu baixo custo de mana o torna uma excelente escolha para batalhas com limite de mana reduzido.
Outra situação em que o Dolfar Darflak se destaca é quando o ruleset Silenced Summoners Silenced Summoners está disponível.
Nesse caso, todos os invocadores perdem suas habilidades, o que nivela as condições e faz do Dolfar uma escolha inteligente por liberar dois Splinters (Fogo e Morte), além do neutro e ainda com um custo muito acessível.
Mesmo sem habilidades ativas, esse invocador amplia significativamente as opções estratégicas, sendo extremamente útil em situações como essas. Às vezes, simplicidade é sinônimo de eficiência!
Essa batalha foi disputada com um limite de 15 de mana, e estavam disponíveis todos os Splinters, exceto Vida e Dragão. As condições de batalha (rulesets) adicionaram ainda mais desafio e exigiram uma estratégia cuidadosa:
Noxious Fumes: todos os monstros começam a batalha envenenados, o que aumenta a importância de monstros com Imunidade ou habilidades de cura.
Melee Mayhem: monstros com ataque melee podem atacar de qualquer posição, abrindo espaço para formações mais agressivas.
Lost Magic: monstros mágicos não podem ser usados, o que limita bastante as opções de ataque à distância e força o uso de dano físico ou de projéteis.
Diante desse cenário, o uso do Dolfar Darflak fez total sentido. Seu baixo custo de mana permitiu montar uma equipe sólida mesmo com os recursos limitados, e a versatilidade entre Fogo e Morte deu flexibilidade para adaptar a estratégia à situação.
Nessa batalha, a escolha foi praticamente óbvia: mana baixa e os Splinters Fogo e Morte estavam disponíveis, uma combinação perfeita para utilizar o Dolfar Darflak como invocador. Sua versatilidade e custo reduzido o tornaram a opção ideal para essa partida. A partir daí, bastava selecionar os monstros certos para montar uma formação eficiente e adaptada aos rulesets. Curiosamente, meu oponente também optou por um invocador multi-elemento: o Brewmaster Abraxas, que combina os Splinters Fogo e Terra, e que claramente foi escolhido com o mesmo objetivo estratégico.
Essa promete ser uma batalha épica!
Clique Aqui para Assistir a Batalha Completa!
Uma grande vantagem de utilizar invocadores multi-elemento é o fato que você pode escolher os melhores monstros de cada Splinter. No caso eu pude escalar dois monstros com zero, de cada Splinter, que foram colocados nas primeiras posições apenas como cartas de descartes e fazer com que o oponente desperdiçasse ataques.
Por um momento achei que a batalha estava perdida, pois vários dos meus monstros foram rapidamente derrotados pelos monstros adversários. Restando, desde a primeira rodada, apenas dois monstros Forgotten One e Weirding Warrior, ambos cartas épicas.
Ao final apenas sobraram Forgotten One versus Xenith Monk. Enquanto nosso monstro possui a habilidade Immunity o monstro adversário possui a habilidade Heal, além disso nosso monstro possui dano melee bastante ofensivo. Então, o resultado você jap deve saber!
Portanto, em Splinterlands é importante sempre melhorar a coleção, para obter melhores resultados. Minha meta é focar nas cartas Reward e ao mesmo tempo que sempre que possível comprar alguns invocadores, para se manter com resultados consistentes. Espero que tenham gostado!
Se chegou até aqui muito obrigado pelo seu tempo e se de alguma forma este conteudo foi útil, deixe seu upvote e reblog!
Imagens: @splinterlands

Posted Using INLEO
Obrigado por promover a comunidade Hive-BR em suas postagens.
Vamos seguir fortalecendo a Hive
Bzzzrrr, Elderdark! Parabéns por alcançar o nível máximo em mais uma carta épica! É um sonho de muitos jogadores! Importante lembrar que é fundamental adaptar a estratégia de compras às necessidades do jogo e não se apequenar ao gastar Glints. Buuuuz, é importante aprender com erros e ajustar o curso!
#hivebr
AI generated content
Commands: !pixbee stop | !pixbee start | !pixbee price
Your post was manually curated by @michupa.
Delegate your HP to the hive-br.voter account and earn Hive daily!
🔹 Follow our Curation Trail and don't miss voting! 🔹