Leofinance Wallet and How to Use It
.png)
A wallet is a physical or digital device used to store and keep one's valuables. You probably have one with you, either in the pockets of your pants, in your purse, or as a software programme on your mobile device or PC. Wallets do more than just help us store valuables; they also help us manage them.
One thing the crypto revolution has popularized once again are wallets, but this time, the focus is on software wallets. With software crypto wallets, we can easily manage our crypto assets as well as perform important operations. The Leofinance team also believes in the importance of a wallet, which is why you have a wallet built on the Leofinance outpost (leofinance.io). How do you find this wallet, and what can you do with it? This and more will be explored in this post.
To make the best of this guide, I have labelled most screenshots with numbers. I make reference to these numbers time and again within the post, so the numbering are not cosmetic, but functional, make the best of it.
Finding Your Wallet on Leofinance
To find your wallet, simply visit the Leofinance web outpost on Leofinance.io, after which you must be logged in with your preferred log-in method. If you're logged in, you should see your user profile image and your username clearly placed in the top-right corner of the page. There you will also find a drop-down menu. Click on the dropdown:

In the screenshot above, I have blurred out other parts of the page to highlight key areas, such as the user profile area in the top right of the page. I've also highlighted the drop-down menu.
On clicking on the drop-down menu, you should be presented with a plethora of options. In their particular order, these options are: Profile, Posts, Replies, Activities, Wallet, Settings and Logout.
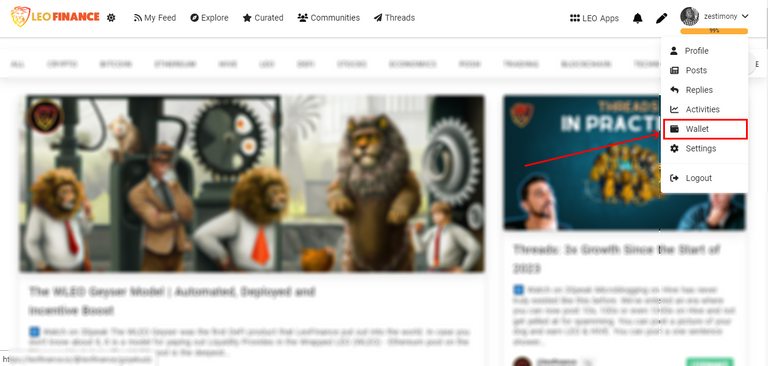
As you can see, the Wallet is clearly the fifth option. So, simply click on it to view your wallet. Clicking on it should take you to this link: leofinance.io/@yourusername/wallet.
For example, my wallet is assessible via https://leofinance.io/@zestimony/wallet.
With the above in mind, you can easily view a user's wallet by editing the link above and adding their username to it, e.g. https://leofinance.io/@leo.tasks/wallet. Visiting this link will take you to the user's wallet page to view his or her assets, but it won't allow you to perform any activity on the wallet because, of course, you don't have the permissions!
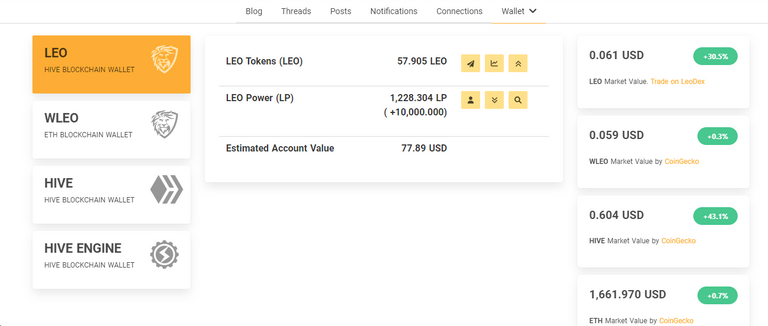
Back to business. If you followed all the processes correctly, you should be brought to your Leofinance wallet, which should look like the one below:
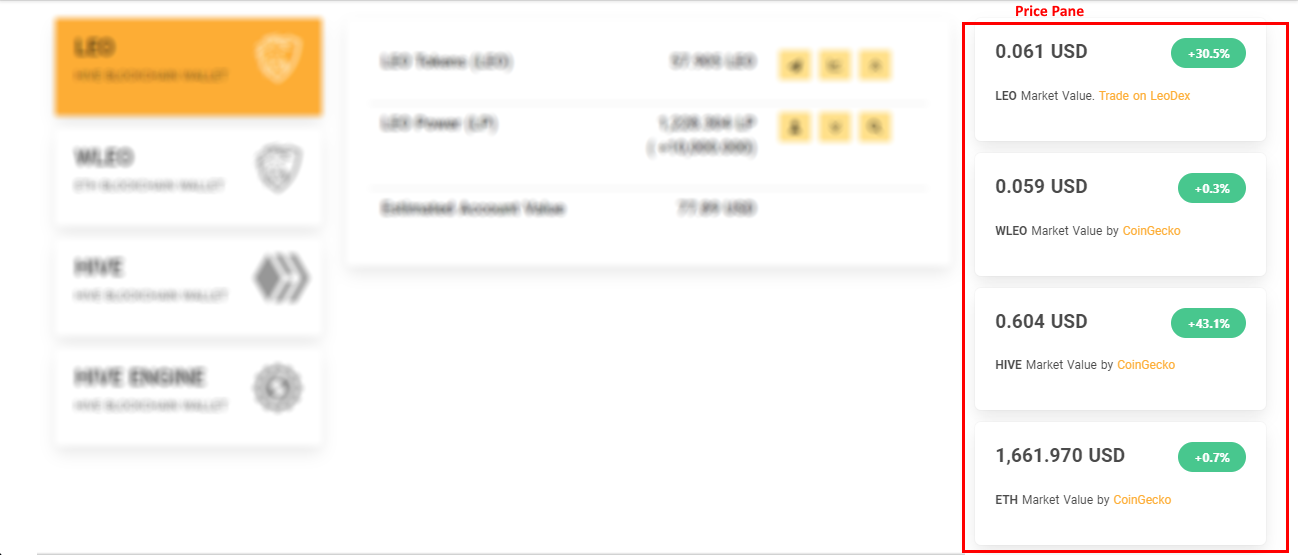
Different Parts of the Wallet Page (Visual Overview)
Now let's describe the different sections of the Leofinance wallet page. Visually, we can divide the Leofinance wallet into the following parts:
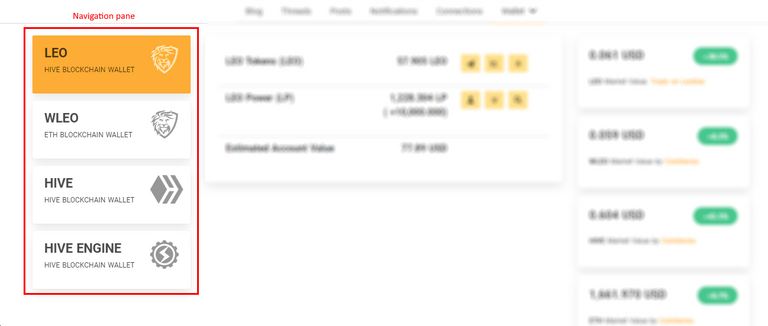
- The Navigation Pane/Tab: This section helps you navigate through the different sections of the Leofinance wallet page, namely: LEO, WLEO, HIVE, and HIVE ENGINE.
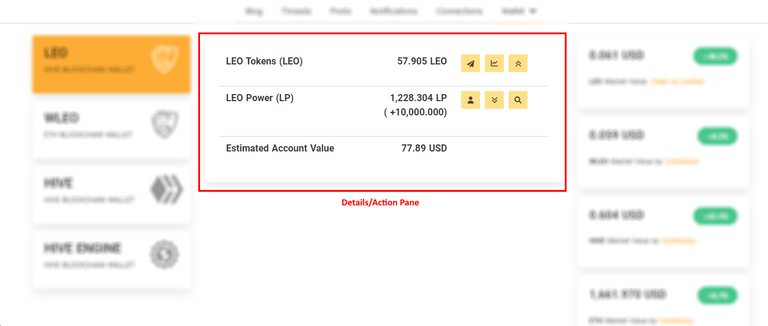
- Details and Action Tab/Pane: This section contains details of the tokens in your wallet and actions that can be carried out on the wallet.
- Price Tab/Pane: This section lists the current price of important assets related to Leofinance such as the current price of LEO (LEO is the native token for Leofinance), Wrapped Leo (WLEO), Hive, and Ethereum, all in USD.
A More Functional Look (Function over Form)
We have carefully analyzed the visual sections of the Leofinance wallet, and it is clear that the wallet page has been designed intuitively from the ground up to make it easy to navigate and find things. Now, let's take a more functional look at the wallet. This time, we will be exploring key sections, and rudimentary functions. Let's dwell more on aspects of the wallet you are most likely to use.
For simplicity, we will be dividing the wallet into the following distinct parts/sections:
- 1-LEO
- 2-WLEO
- 3-HIVE
- 4-HIVE ENGINE
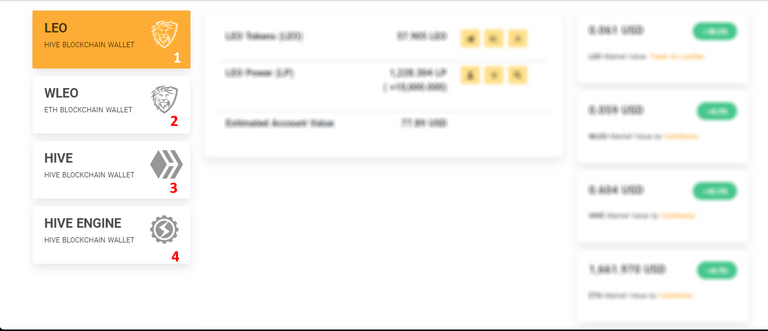
LEO (Hive Blockchain Wallet)
This is the first aspect of the wallet you will be greeted with once you visit the wallet page. This aspect of the wallet is designed specifically to help you manage and keep track of your Leofinance tokens (LEO). Through your LEO wallet section, you can do LEO transfers, Power-ups, Delegations, and generally manage your LEO tokens. Let's take a deeper look.
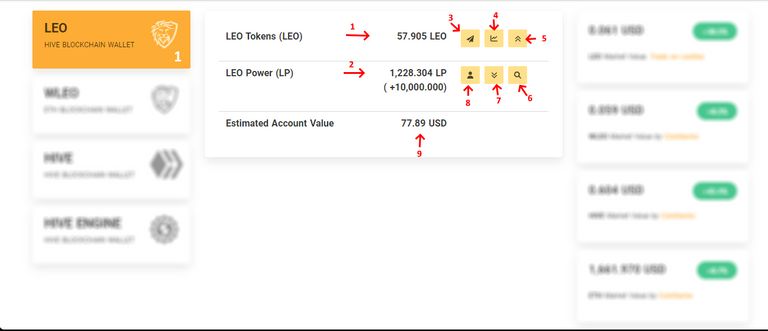
In the screenshot above, I've highlighted several aspects of LEO (Hive Blockchain Wallet):
- 1: LEO Tokens (LEO): This part shows the total amount of LEO tokens you have as a user. These are liquid LEO, which means you can expend them instantly by either transferring them (3) to another user, or Powering them up (5).
- 2: LEO Power (LP): LEO Power refers to the amount of LEO tokens you've staked as a user (in the screenshot above, the user in question have about 1228 LEO staked). Staking more LEO increases your strength/presence/authority on Leofinance. Just below the LEO Power in brackets is the amount of Leo Power a person has received from another through a partial sharing process known as "delegation".
- 3: Transfer/Send LEO: Use this option to transfer some liquid LEO to other users that own a Hive account. Clicking on this option should open a transfer window as shown here:
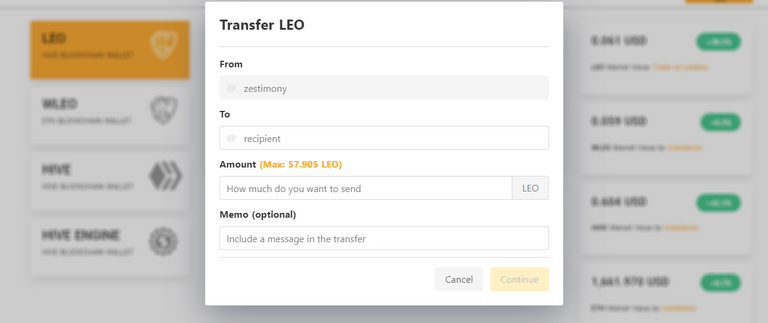
Simply input the Hive username of the recipient, the amount to be sent, and a memo which is a message/note to be included (this is not always required unless the recipient demands in, with or without a memo, your transfer would be fulfilled).
After providing all necessary details, you can click on "continue" to proceed and validate your transaction. - 4: Trade on Leodex: Clicking on this option brings you to the Leofinance Decentralized Exchange (LeoDEX) through which you can trade LEO against other tokens on Hive. You may not need to do much here. LeoDEX is definitely a huge topic on it's own.
- 5: Power Up: Clicking on this option allows you to Power Up some Leo tokens. Powering up is basically staking (locking up some of your LEO tokens) your LEO tokens which would help you increase your presence on Leofinance as well as earn more curation rewards. Clicking on the "Power Up" menu should reveal the window below:
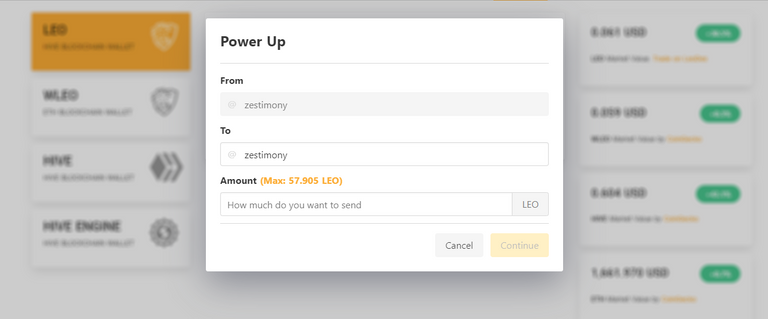
Simply Power Up by inputting the amount of LEO you wish to power up, and thereafter, sign the transaction as necessary. Powering Up should effectively increase the amount of your LEO Power.
- 6: Delegation Details: Delegation as I stated earlier is a form of partial borrowing of LEO power. To see details of who have delegated to you, simply click on the delegation details icon which is basically a search icon and the details surrounding your delegations should be revealed just as mine is shown below:
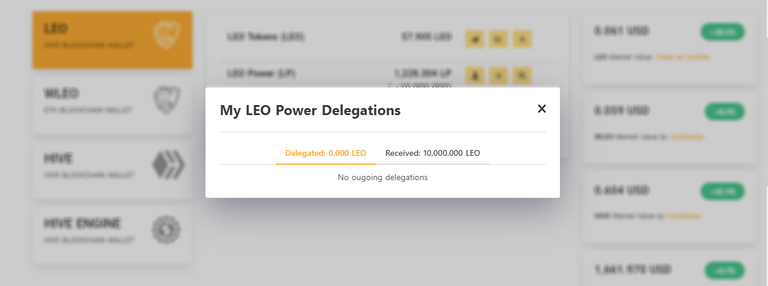
Based on the screenshot above, it is clearly seen that I have not delegated any LEO to anyone yet, but I have received a 10,000 LEO delegation. - 7: Power Down: Power Down is the opposite of Powering Up. When you power down, you are bringing down/removing your staked LEO power, thereby converting it to Liquid LEO. Powering Down is a simple process with the only drawback being that it takes a longer time to complete (about some weeks). Clicking on the power down option should reveal the power down window below:
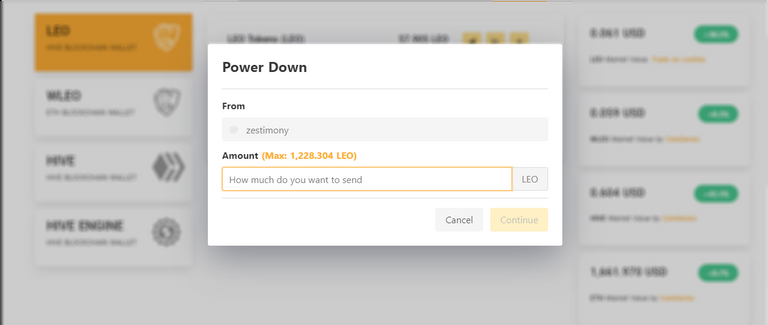
In the power down window, you will find the total amount of staked LEO, click on it if you wish to power down everything or simply type in the amount of LEO you wish to power down. Click on continue to sign your transaction. - 8: Delegate: Do you wish to partially borrow out some of your LEO power (not LEO tokens) to help someone else boost their LEO power? Simply delegate some LEO power to them. Delegating would reduce your effective LEO power, as the recipient is made to share a portion of the LEO power you allow through the delegation you give. Clicking on the delegation icon here would show the delegation window below:
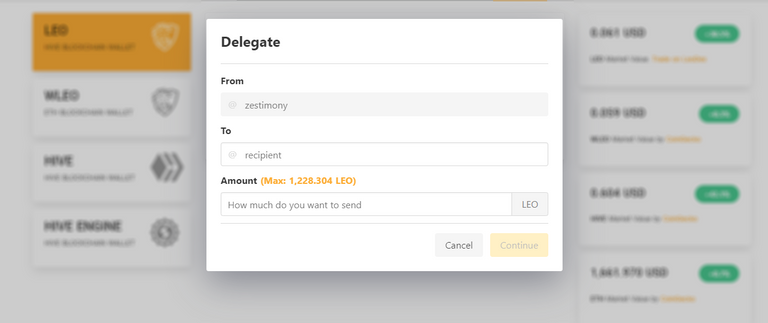
Simply Delegate by inputting the username of the recipient, and the amount of LEO power you wish to delegate to the said user. Click on Continue to sign the transaction.
- 9: Estimated Account Value: This is the total value of your account in USD in relation to your Leo Power and LEO tokens.
WLEO (ETH Blockchain Wallet)
As a newbie, you're less likely to use this part of the wallet. However, a little detail on it won't do no harm. WLEO means Wrapped LEO token. If you notice, unlike other aspects of the wallet that has the tag "Hive Blockchain Wallet", the WLEO section has the tag "ETH Blockchain Wallet". Thus, the WLEO is LEO token but this time linked to/housed in an Ethereum wallet.
HIVE (Hive Blockchain Wallet)
This aspect of the wallet contains information and operations related to Hive in general such as your Hive Power, amount of Hive token in your account, Hive Power delegations, details on Hive Backed Dollars (HBD) and more.
This aspect of the wallet allows you to carry out some operations on your Hive tokens. Let's take a more detailed look.
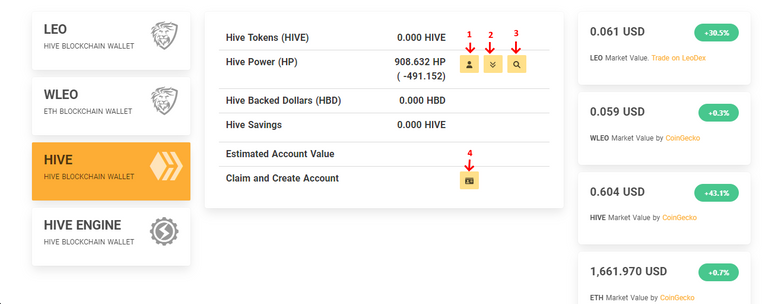
The icons are basically the same as it is in LEO section of the wallet, with the main difference here being you are working with Hive blockchain native tokens (Hive and HBD) rather than LEO. So, the first option (1) allows you to delegate your Hive Power to someone else (maybe to help them have a bit more resource credits to perform several activities within Hive), the second option/operation (2) allows you to power down your Hive Power (HP) to liquid Hive, the third (3) search icon option shows you your Hive Power delegations (both incoming and outgoing), and the final option (4) allows you to create Hive accounts from the Leofinance outpost using your resource credits. You need to have a lot of this before you can use this feature (you're less likely to use this).
Hive Engine (Hive Blockchain Wallet)
Hive blockchain has a lot of tokens, these are commonly referred to as "Layer 2 tokens, Community tokens, or Tribe tokens". They are usually created to support different projects here on Hive. LEO is a layer 2 token, as well as other tokens such as BRO, LGN, INCOME, POB, and more. With these tokens, Hive Blockchain operates a multi-layered reward system that allows the distribution of these tokens through votes. How do you view and manage this tokens? Simply visit the Hive Engine section of your wallet.
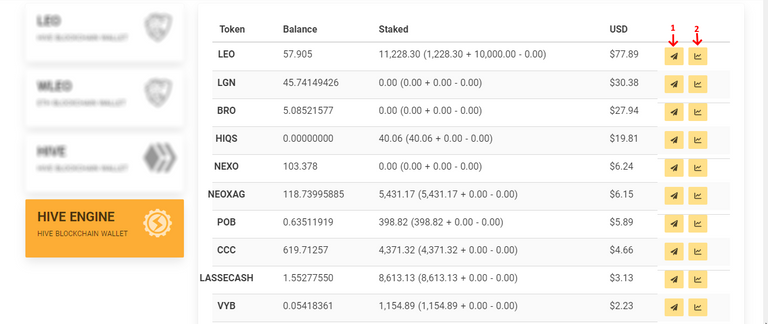
The above screenshot is a preview of what this section of the wallet looks like. As you can see, the page is tabulated with the first row containing the names of the tokens, next the balance (which is the token in liquid form) and finally the staked amount of the token. Two basic operations are available here:
- 1: Transfer/Send: With this option, you can quickly and easily transfer or send a portion of your tokens to another Hive user using their username as address.
- 2: Trade: With this option, you can trade some of these layer two tokens on LeoDEX. LeoDex is a decentralized exchange built by the Leofinance team to facilitate trading of most tokens here on Hive.
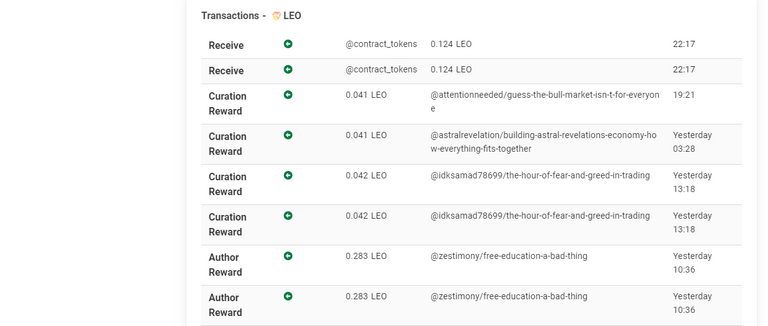
Finally, Histories!
One good thing about digital wallets, which gives it a strong advantage over other types of wallets is that you can always keep/view history of your activities, and Leofinance wallet takes history seriously. To view history in any section of the wallet, simply scroll down to the end of the wallet view for that section. This applies for all sections of the wallet.
The history view known as "Transactions" contains a list of all recent wallet activities ordered by date with the most recent appearing first.
Example of History view for LEO
Example of History View for WLEO

As shown here, I haven't performed any WLEO transactions.
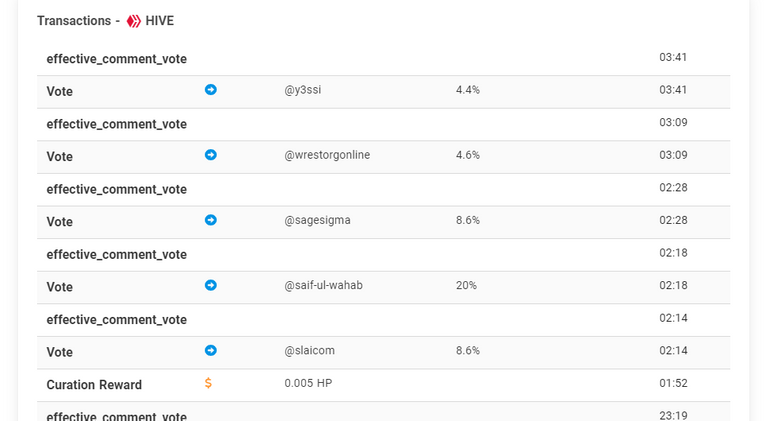
Example of History View for HIVE
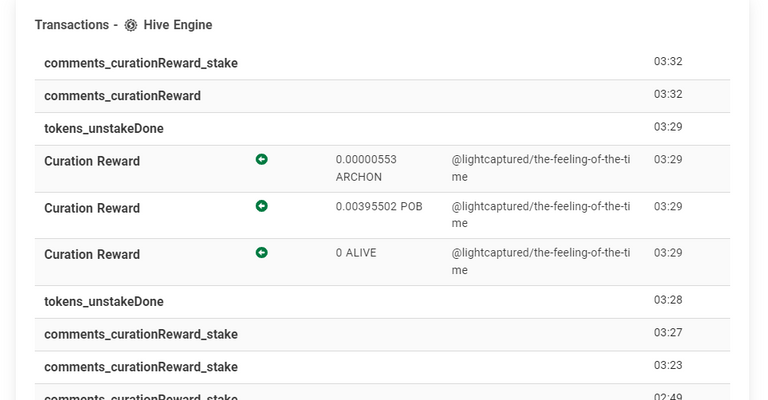
Example of History View for HIVE ENGINE
Bottom-line
Leoefinance wallet is a feature-packed wallet built on the Leofinance outpost (Leofinance.io). With this wallet, you can manage your LEO, Hive, HBD, and a variety of Layer 2 tokens. This post has so far detailed extensively on the different aspect of this wallet and functions/operations that can be performed. Do you have some questions or suggestions, just drop a comment or two, and I'll swiftly give it attention.
Thanks for reading to this point!
Posted Using LeoFinance Beta
Congratulations @zestimony! You have completed the following achievement on the Hive blockchain And have been rewarded with New badge(s)
Your next target is to reach 14000 upvotes.
You can view your badges on your board and compare yourself to others in the Ranking
If you no longer want to receive notifications, reply to this comment with the word
STOPTo support your work, I also upvoted your post!
Check out our last posts:
Support the HiveBuzz project. Vote for our proposal!