| CREIAMO UN GIOCO INSIEME | pt.1 eng ita
ho deciso di creare questo progetto insieme a voi perché mi sembra molto interessante, dividerò il progetto in 2 parti, ovviamente è una beta, la cosa importante sarà sempre la prima la parte informatica, e dopo viene la grafica, iniziamo subito.
Come prima cosa ci dirigiamo verso questo sito https://www.construct.net/en/make-games/free-trial e creiamo un nuovo progetto, abbiamo d'avanti il nostro file vuoto, la cosa da sapere di construct 3 è che è formato da layout, noi andremo a lavorare su un solo layout.
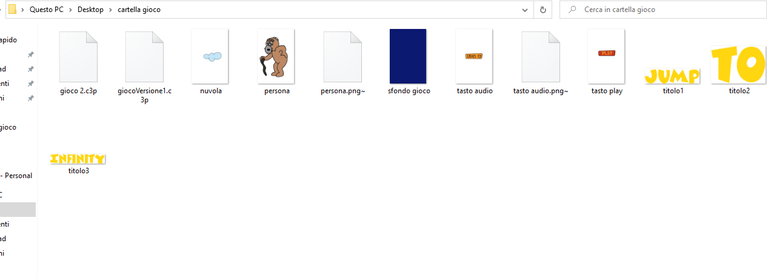
Per lavorare in modo comodo vi conviene per come fatto con gli NFT, creerarvi una cartella con tutti i vostri disegni, in modo da non perdere tempo dopo durante la programmazione.
Vi ricordo che i disegni che ho fatto io sono solo delle bozze, la versione con la grafica ufficiale la vedremo nellla seconda parte.
Una volta creato la nostra cartella ci dirigiamo su construct e iniziamo a giocare!!
Per inserire un qualsiasi cosa all'interno del nostro layer basta cliccare 2 volte, apparirà un elenco e selezionare quello da aggiungere.
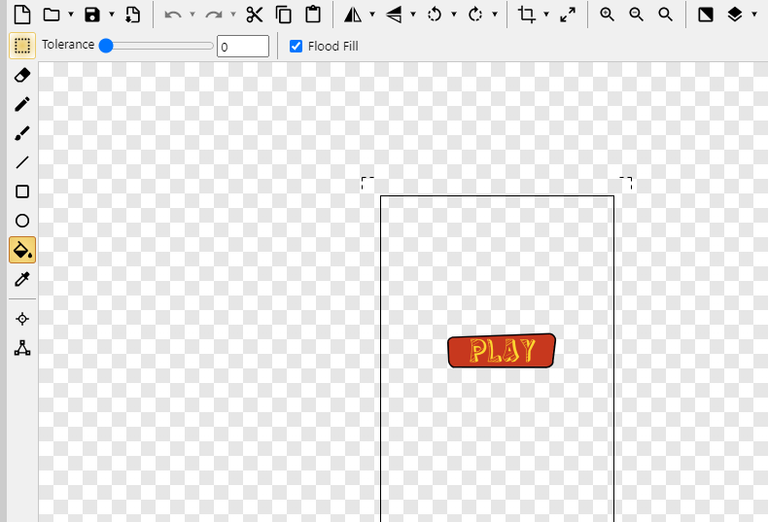
Per inserire il nostro sfondo, clicchiamo due volte sulla parte bianca e andiamo a selezionare l'oggetto chiamato "SPRITE" e clicchiamo dove possiamo inserirlo, dopo di che in alto a sinistra clicchiamo sulla cartellina e selezioniamo il nostro sfondo, abbiamo inserito il nostro sfondo.
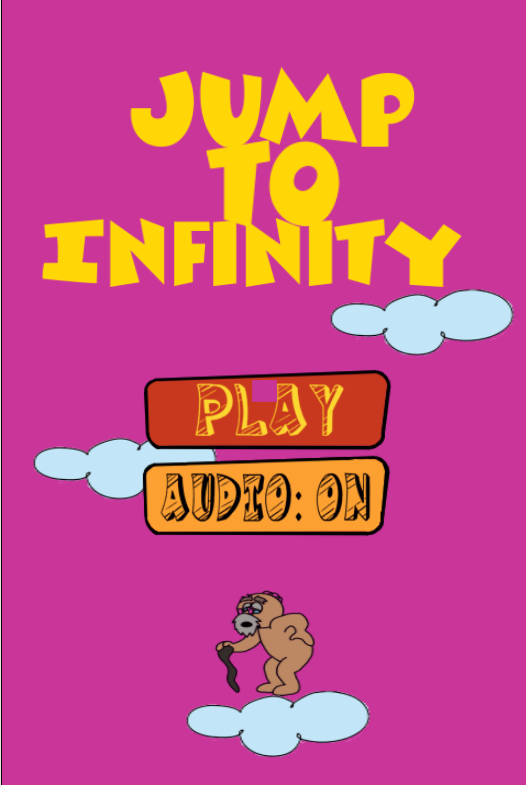
Dopo di che eseguiamo lo stesso passaggio per tutto il resto del nostro menù. Il nostro menù deve avere obbligatoriamente un tasto star per dare vita alla nostra creatività e almeno un altro tasto, per creare i tasti usiamo sempre uno "sprite".
Per dare vita al nostro bottone bisogna programmare il primo pezzettino di codice, procediamo!!
Prima di fare il tutto facciamo un doppo clic come per lo sprite ma inseriamo l'oggetto "touch"...
ci dirigiamo nel file in alto a destra affianco a "buy now" e iniziamo a programmare.
In questo file è presente una struttura molto particolare, andremo a inserire un'azione, che al verificarsi, farà scaturire altre cose.
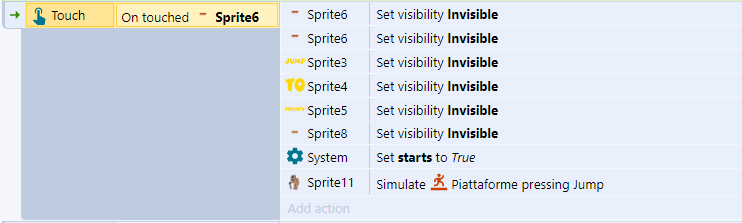
(il nostro scopo è che dopo aver cliccato il bottone star,tutto quelle cose inutili sullo schermo devono sparire)quindi...
Ci dirigiamo in basso dove c'è scritto add event e selezioniamo l'evento touch, dopo di che dovremo scegliere cosa succederà quando cliccheremo il bottone star, quindi tra le varie opzioni selezioniamo l'evento da nascondere e selezioniamo il comando "se visibily" e sbarriamo la casella invisible",facciamo tutto questo tutte le cose da nascondere e il gioco è fatto, il nostro programma sta prendendo forma.
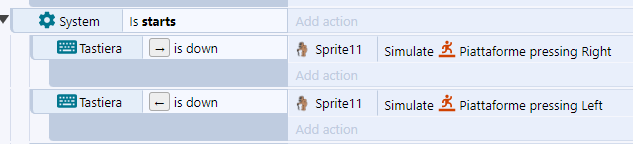
per dare vita al nostro personaggio i passaggi sono molto semplici, come prima cosa torniamo nel file presente e aggiungiamo un nuovo oggetto che si chiama "tastiera", quindi ci dirigiamo nel file programma e creiamo un nuovo evento, selezioniamo l'oggetto tastiera e gli diciamo "SE PREMI IL SEGUENTE TASTO,ALLORA L'OGGETTO DA TE SCELTO ANDRA' VERSO QUELLA DIREZION"E, ovviamente dovremmo far andare il nostro personaggio sia verso destra che verso sinistra.
Per rendere il nostro pavimento che nel mio caso è una nuvoletta(voi potrete dare vita alla vostra immaginazione) ci dirigiamo sul primo file, selezioniamo l'oggetto e a sinistra ci appariranno una serie di caratteristiche di quel oggetto e andremo a sbarrare la casella "corpo fisico", questo permetterà al nostro personaggio di muoversi.
Come avrete ben notato, non abbiamo selezionato il comando di salto, poiché dovrà saltare in automatico ogni volta che andrà a toccare il pavimento...quindi ci dirigiamo sul file programma e inseriamo un nuovo evento, all'interno selezioniamo il nostro personaggio e scegliamo il comando "IS ON FLOOR" ovviamente sulla nostra base, e nell'azione inseriamo il comando salto, questo per far saltare in automatico il personaggio.

Nella seconda parte andremo ad aggiungere alcune funzioni, vedremo come far generare le piattaforme successive ma soprattutto la telecamera che seguirà il nostro personaggio...Spero molto questo progetto vi piaccia, mi sono impegnato molto per la realizzazione di questo post, e nulla ci vediamo al prossimo :))
I decided to create this project together with you because it looks very interesting to me, I will divide the project into 2 parts, of course it is a beta, the important thing will always be first the computer part, and after that comes the graphics, let's start now.
As first thing we head to this site https://www.construct.net/en/make-games/free-trial and create a new project, we have in front of us our empty file, the thing to know about construct 3 is that it consists of layouts, we are going to work on one layout.
To work comfortably you'd better for as done with NFTs, create yourself a folder with all your drawings, so you don't waste time later during programming.
I remind you that the drawings I made are just drafts, we will see the version with the official graphics in part 2.
Once we have created our folder we head to construct and start playing!!!
To insert anything inside our layer just click 2 times, a list will appear and select the one you want to add.
To insert our background, we double click on the white part and go to select the object called "SPRITE" and click where we can insert it, after that in the top left corner we click on the folder and select our background, we have inserted our background.
After that we perform the same step for all the rest of our menu. Our menu must mandatorily have a star key to bring our creativity to life and at least one other key, we always use a "sprite" to create the keys.
To bring our button to life we need to program the first bit of code, let's proceed!!!
Before we do the whole thing we do a double click as for the sprite but we insert the "touch" object...
we head into the top right file next to "buy now" and start programming.
In this file there is a very particular structure, we are going to insert an action, which upon occurrence, will trigger other things.
(our purpose is that after clicking the star button,all those useless things on the screen should disappear)so...
We head down to the bottom where it says add event and select the touch event, after that we will have to choose what will happen when we click the star button, then among the various options we select the event to hide and select the command "if visibily" and tick the invisible box",we do all this all the things to hide and that's it, our program is taking shape.
to bring our character to life the steps are very simple, as first we go back into the present file and add a new object which is called "keyboard", then we head into the program file and create a new event, select the keyboard object and tell it "IF YOU PRESS THE FOLLOWING KEY,THEN YOUR CHOSEN OBJECT WILL GO IN THAT DIRECTION "E, of course we should make our character go either to the right or to the left.
To make our floor which in my case is a little cloud(you can bring it to life in your imagination) we head to the first file, select the object and on the left a number of characteristics of that object will appear and we will go and check the box "physical body", this will allow our character to move.
As you may have noticed, we didn't select the jump command, as it will have to jump automatically whenever it goes to touch the floor...so we head to the program file and insert a new event, inside we select our character and select the "IS ON FLOOR" command obviously on our base, and in the action we insert the jump command, this is to make the character jump automatically.
In the second part we are going to add some functions, we will see how to make the next platforms generate but especially the camera that will follow our character...I hope very much you like this project, I put a lot of effort into the realization of this post, and nothing see you at the next one :))
Ma che figata! Appena trovo un pó di tempo devo provare! No vedo l'ora esca la seconda parte. Lunedì prossimo sono libero e mi sa che lo passerò a smanettare dehihi
va benissimo :)) fammi sapere
Certo, Ti aggiorno! 🤗
@tipu curate
!PGM
!LUV
!LOLZ
Upvoted 👌 (Mana: 11/41) Liquid rewards.
BUY AND STAKE THE PGM TO SEND A LOT OF TOKENS!
The tokens that the command sends are: 0.1 PGM-0.1 LVL-0.1 THGAMING-0.05 DEC-15 SBT-1 STARBITS-[0.00000001 BTC (SWAP.BTC) only if you have 2500 PGM in stake or more ]
5000 PGM IN STAKE = 2x rewards!
Discord
Support the curation account @ pgm-curator with a delegation 10 HP - 50 HP - 100 HP - 500 HP - 1000 HP
Get potential votes from @ pgm-curator by paying in PGM, here is a guide
I'm a bot, if you want a hand ask @ zottone444
grazie mille davvero!!
Congratulations @fraaaaa! You have completed the following achievement on the Hive blockchain And have been rewarded with New badge(s)
Your next target is to reach 700 upvotes.
You can view your badges on your board and compare yourself to others in the Ranking
If you no longer want to receive notifications, reply to this comment with the word
STOPCheck out the last post from @hivebuzz:
Support the HiveBuzz project. Vote for our proposal!