| CREAZIONE APPLICAZIONE CALCOLATRICE |pt.2
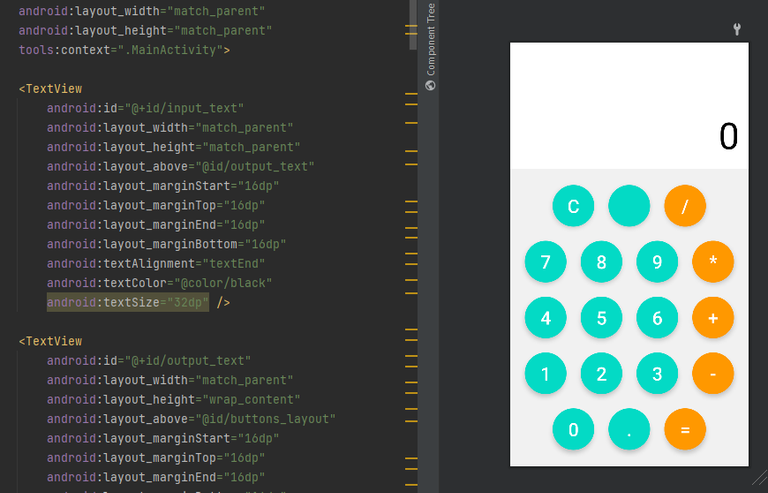
Bentornati a tutti!! siamo ritornati con l'appuntamento riguardante la calcolatrice, l'ultima volta eravamo rimasti alla parte grafica, come potete notare ho fatto delle piccole modifiche rispetto all'ultima volta, ma nel complesso il succo è lo stesso, oggi andremo a programmare la parte "informatica", non perdiamo tempo e iniziamo!!
Come prima cosa ci dirigiamo all'interno del nostro "MAIN ACTIVITY", è li che andremo a lavorare...
Dopo di che dobbiamo procedere con la creazione del nostro materiale,quello che ci servirà a noi saranno i vari bottoni e le aree di testo,per creare un bottone basta scrivere il tipo quindi "var",il nome del bottone e il tipo quindi bottone:
private lateinit var button8: Button
Poichè ci serviranno molti bottoni,il mio consiglio è quello di mettere sempre nomi che non fanno confondere,ad esempio io ho messo ai bottin dei numeri il loro numero,mentre ai bottoni con le operazioni da eseguire,l'operazione che loro eseguono.
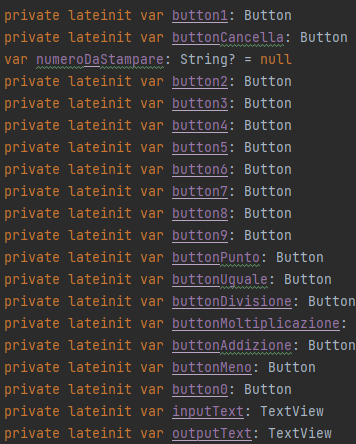
Oltre ai vari bottoni abbiamo le aree di testo, principalmente ne abbiamo 2
-nella prima appariranno tutti i numeri che l'utente inserisce, mentre nella seconda apparirà il risultato della nostra operazione, per la creazione di un area di testo bisogna digitare il seguente comando:
private lateinit var outputText: TextView
Vale lo stesso discorso del bottone,quindi mettiamo il tipo quindi var,il nome e l'oggetto...quindi textView.
Come secondo step, secondo me quello che vi potrebbe creare più problemi abbiamo il passaggio del valore,ovvero quello che andremo a passare premendo il bottone,se vi ricordate dell activity main abbiamo messo ad ogni bottone un "ID",quello che andremo a fare è associare a ogni bottone corrispondete l'id del bottone dell'activity main.

Come vedete nella foto, per l'associazione bisogna inserire prima il nome del bottone creato in precedenza dopo utilizziamo il seguente comando :
findViewById(R.id.button_1)
Nella quale andremo a inserire al suo interno l'id del bottone nell'activity main.
fatto tutto ciò,procediamo con l'avvenimento del bottone, ovvero cosa succede se clicco questo bottone?
Per farlo abbiamo bisogno di un determinato comando:
buttonCancella.setOnClickListener {
            inputText.text = ""
            outputText.text = ""
        }
In questo comando gli stiamo dicendo che nel caso l'utente cliccasse il bottone cancella, allora scomparirebbe tutto quello scritto, facciamo questo procedimento con tutti i bottoni...
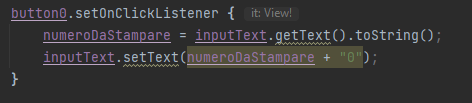
Per farvi capire meglio vi mostro questo esempio, per prima cosa scegliamo quale bottone settare, dopo di che digitiamo l'on click e all'interno gli diciamo cosa fare, in questo caso di far apparire a schermo il numero 0,facciamo questo con tutti i bottoni fino ai bottoni degli operatori.
NOTA BENE:
Per memorizzare tutte le cifre che l'utente scrive, in alto dove abbiamo creato i bottoni inseriamo una variabile di tipo string,ed ogni volta che l'utente clicca un bottone...andrà a salvare il numero apparso, questo ci servirà più avanti per eseguire il calcolo.
Nell'ultima parte vi farò vedere come si esegue un operazione e quindi i vari calcoli, inoltre andremo a migliore la nostra applicazione inserendo un logo, un logo e magari dei caricamenti...fatemi sapere cosa ne pensate :))
Welcome back everyone!!! we are back with the appointment regarding the calculator, last time we were left with the graphical part, as you can see I made some small changes from last time, but overall the gist is the same, today we are going to program the "computer" part, let's not waste time and start!!!
As first thing we head inside our "MAIN ACTIVITY", that's where we are going to work...
After that we need to proceed with the creation of our material,what we will need will be the various buttons and text areas,to create a button just write the type so "var",the name of the button and the type so button:
private lateinit var button8: Button
Since we will need a lot of buttons,my advice is to always put names that are not confusing,for example I put to the number bottins their number,while to the buttons with operations to be performed,the operation they perform.
Besides the various buttons we have the text areas, mainly we have 2 of them
-in the first one will appear all the numbers that the user enters, while in the second one will appear the result of our operation, for the creation of a text area we need to type the following command:
private lateinit var outputText: TextView
The same as the button applies,so we put the type so var,the name and the object...so textView.
As the second step, in my opinion the one that could give you the most problems we have the value passing,that is what we are going to pass by pressing the button,if you remember the activity main we put to each button an "ID",what we are going to do is to associate to each button correspond the id of the button of the activity main.
As you see in the picture, for the association we have to enter first the name of the previously created button after we use the following command :
findViewById(R.id.button_1).
In which we are going to insert inside it the id of the button in the activity main.
All that done,let's proceed with the occurrence of the button, i.e. what happens if I click this button?
To do this we need a certain command:
buttonCancel.setOnClickListener {
            inputText.text = ""
            outputText.text = ""
        }
In this command we are telling them that in case the user clicks the delete button, then everything written will disappear, we do this process with all the buttons...
To make you understand better I show you this example, first we choose which button to set, after that we type the on click and inside we tell it what to do, in this case to make the number 0 appear on the screen,we do this with all the buttons up to the operator buttons.
PLEASE NOTE:
To store all the digits that the user types, at the top where we created the buttons we insert a variable of type string,and every time the user clicks a button...it will go and save the number that appeared, we will need this later to perform the calculation.
In the last part I will show you how to perform an operation and then the various calculations, also we are going to improve our application by inserting a logo, a logo and maybe some uploads...let me know what you think :))
Mi piacciono tanto questi post sulla programmazione perchè mi riportano indietro nel tempo.
Mi piace molto anche il fatto che traspare la tua passione per la programmazione!
Bravo!
!PGM
!PIZZA
!discovery 30
@tipu curate
Upvoted 👌 (Mana: 34/44) Liquid rewards.
graiz mille,sono davvvero felice che ti piacciano!!
BUY AND STAKE THE PGM TO SEND A LOT OF TOKENS!
The tokens that the command sends are: 0.1 PGM-0.1 LVL-0.1 THGAMING-0.05 DEC-15 SBT-1 STARBITS-[0.00000001 BTC (SWAP.BTC) only if you have 2500 PGM in stake or more ]
5000 PGM IN STAKE = 2x rewards!
Discord
Support the curation account @ pgm-curator with a delegation 10 HP - 50 HP - 100 HP - 500 HP - 1000 HP
Get potential votes from @ pgm-curator by paying in PGM, here is a guide
I'm a bot, if you want a hand ask @ zottone444
I gifted $PIZZA slices here:
@libertycrypto27(2/10) tipped @fraaaaa (x1)
Learn more at https://hive.pizza!
This post was shared and voted inside the discord by the curators team of discovery-it
Join our community! hive-193212
Discovery-it is also a Witness, vote for us here
Delegate to us for passive income. Check our 80% fee-back Program