(PT-EN) Restoring Headlights
Hello my friends in the Hive DIY community!
Despite having joined a while ago, this is my first post in the community. This is due to the fact that I usually remember to capture images of the results of the work done, forgetting the initial steps.
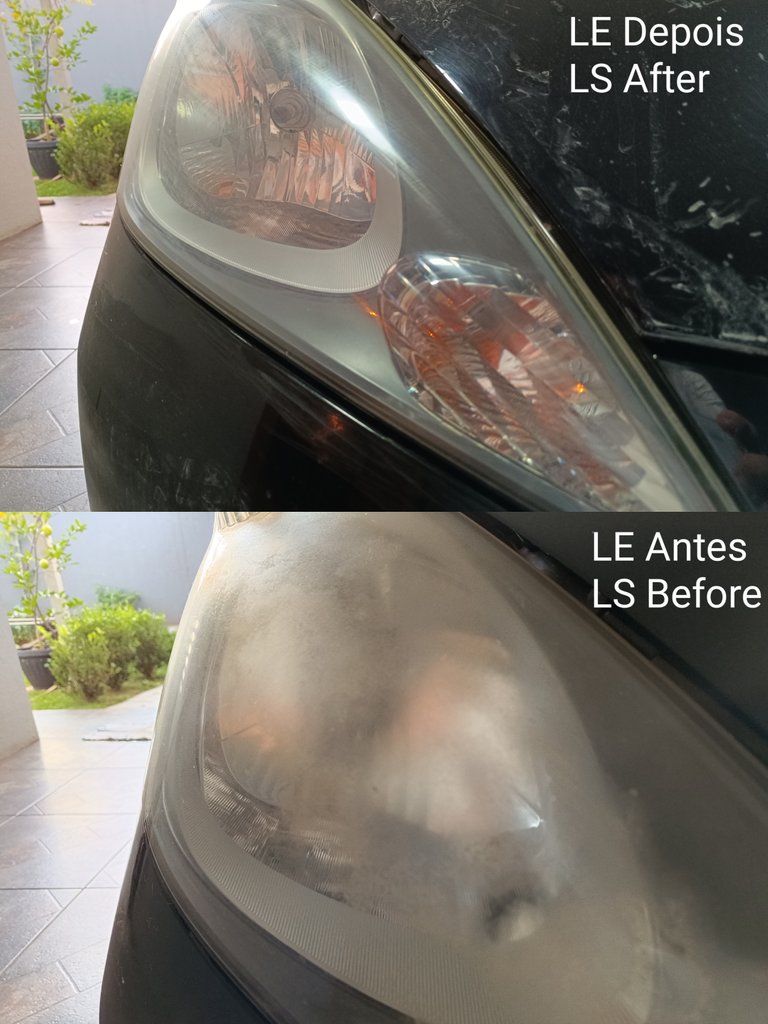
One thing that bothered me at a certain time was the headlights of my car, whose yellowish appearance aged the vehicle, giving the impression that it was older than it really is.
I know that there is a service performed in specialized clinics that promises the recovery of headlights.

I don't understand anything about automotive aesthetics. When I learned that sandpaper was used to remove the damaged surface of the headlight's acrylic, I was in disbelief.
How can it be possible to use a rudimentary abrasive to achieve a "scratch free" result?

Because I live in the interior of the state, the best price was to buy the complete kit through MercadoLivre.
Necessary materials
To carry out this task at home, I needed to buy the following materials:
Sandpaper: 4 sizes: 800, 1200, 2000 and 3000. Can be replaced with toothpaste.
Solvent: revealing imperfections, can be replaced by isopropyl alcohol.
Vitrifier: specific product for recovering headlights.

Procedure
I started using the coarsest sandpaper, 800, with the help of water I started cleaning the surface. To remove the residue, I washed both the sandpaper and the headlight several times.
I chose to carry out horizontal movements, and switch to vertical ones when there was a change of sandpaper.
I progressively moved to the finer sandpaper until I reached 3000.

I removed the sediment with water and a regular cloth.
I applied the solvent, spreading it with the cloth. I let it evaporate, 2 to 3 minutes.
Finally, 15 to 20 drops of the specific headlight restoration product, in a small foam. The effect is instantaneous! It looks like magic! The lighthouse seemed impossible to go back to transparent, but it gets instant glow!
Result

I was extremely satisfied with the result. The cost of the service is estimated at BRL 200. The cost of the material is enough for at least five procedures BRL 130.
Olá meus amigos da comunidade Hive DIY!
Apesar de ter entrado há algum tempo, este é meu primeiro post na comunidade. Isso se deve ao fato de que geralmente me lembro de capturar imagens dos resultados do trabalho feito, esquecendo-me das etapas iniciais.
Uma coisa que me incomodou em determinado momento foram os faróis do meu carro, cujo aspecto amarelado envelhecia o veículo, dando a impressão de que era mais velho do que realmente é.
Sei que existe um serviço realizado em clínicas especializadas que promete a recuperação de faróis.
Não entendo nada de estética automotiva. Quando soube que a lixa foi usada para remover a superfície danificada do acrílico do farol, fiquei incrédulo.
Como é possível usar um abrasivo rudimentar para obter um resultado "livre de arranhões"?
Materiais Necessários
Para realizar esta tarefa em casa, precisei comprar os seguintes materiais:
Lixa: 4 tamanhos: 800, 1200, 2000 e 3000. Pode ser substituída por pasta de dente.
Solvente: revelador de imperfeições, pode ser substituído por álcool isopropílico.
Vitrificador: produto específico para recuperação de faróis.
Por eu morar no interior do estado, o melhor preço foi comorar kit completo atraves do MercadoLivre.
Procedimento
Comecei usando a lixa mais grossa, 800, com a ajuda de água comecei a limpar a superfície. Para tirar o resíduo, lavei várias vezes tanto a lixa quanto o farol.
Optei por realizar movimentos horizontais, e passar para verticais quando havia troca de lixa.
Fui progressivamente passando para a lixa mais fina até chegar a 3000.
Retirei o sedimento com água e um pano normal.
Apliquei o solvente, espalhando com o pano. Deixei evaporar, 2 a 3 minutos.
Por fim, 15 a 20 gotas do produto específico para restauração de faróis, em uma pequena espuma. O efeito é instantâneo! Parece mágica! O farol parecia impossível voltar ao transparente, mas ganha brilho instantâneo!
Resultado
Fiquei extremamente satisfeito com o resultado. O custo do serviço é estimado em R$ 200. O custo do material é suficiente para pelo menos cinco procedimentos R$ 130.

CrazyPhantomBR apoia o projeto PGM
Uma comunidade voltada para gamers de todas as gerações!
Se você ainda não joga Splinterlands utilize meu link de recomendação:
https://splinterlands.com?ref=crazyphantombr

CrazyPhantomBR apoia as curadorias brasileiras
@Hive-BR e @Brazilians
@Hive-BR e @Brazilians
Delegue HP para conta hive-br.voter e ganhe Hive líquida diariamente!
| 50 HP | 100 HP | 200 HP | 500 HP | 1000 HP |

!HBIT
!DHEDGE
Success! You mined 1.0 HBIT on Wusang: Isle of Blaq. Sorry, but you didn't find a bonus treasure token today. Try again tomorrow...they're out there! | tools | wallet | discord | community | daily <><
Check for bonus treasure tokens by entering your username at an H-E explorer or take a look at your wallet.
Read about Hivebits (HBIT) or read the story of Wusang: Isle of Blaq.
This post has been selected for upvote from our token accounts by @crazyphantombr! Based on your tags you received upvotes from the following account(s):
- @dhedge.bonus
- @dhedge.pob
@crazyphantombr has 7 vote calls left today.
Hold 10 or more DHEDGE to unlock daily dividends and gain access to upvote rounds on your posts from @dhedge. Hold 100 or more DHEDGE to unlock thread votes. Calling in our curation accounts currently has a minimum holding requirement of 150 DHEDGE. The more DHEDGE you hold, the higher upvote you can call in. Buy DHEDGE on Tribaldex or earn some daily by joining one of our many delegation pools at app.dhedge.cc.
Obrigado por promover a comunidade Hive-BR em suas postagens.
Vamos seguir fortalecendo a Hive
Your post was manually curated by @michupa.
Delegate your HP to the hive-br.voter account and earn Hive daily!
🔹 Follow our Curation Trail and don't miss voting! 🔹
Wait oo, so you only washed the outer part of it?
The result is wonderful. That's lovely
incredible, isn't it?
I heard about this procedure and did not believe in the result.
at least until yesterday..
I thought the result was wonderful and because it was my first attempt, it was worth it!
!luv
@marajah, @crazyphantombr(1/5) sent you LUV. | tools | discord | community | HiveWiki | <>< daily
! help(no space) to get help on Hive. InfoYay! 🤗
Your content has been boosted with Ecency Points, by @crazyphantombr.
Use Ecency daily to boost your growth on platform!
Support Ecency
Vote for new Proposal
Delegate HP and earn more
Excelente. Quedó genial, es súper útil
Thank you my friend!
Gracias !luv
@fixie, @crazyphantombr(2/5) sent you LUV. | tools | discord | community | HiveWiki | <>< daily
! help(no space) to get help on Hive. InfoParabéns pelo trabalho! Os produtos Vonixx são os melhores na area de limpeza e estetatica automotiva. Eu tenho alguns deles para realizar lavagens e proteção das partes plásticas do meu veiculo.
Excelente post!