Newbie task 2: The Dos and Don'ts on the Hive Space|| Markdowns|| Canva tutorial|| [ENG/ ESP]
Greetings to all my fellow newbies and hiveans, I would like to specially welcome you all to this week's task Week 2 which was initially conducted on the SMILE Discord Space by @starstrings01, newbies also got to learn and share thoughts on this week’s prompt. Would like to thank the organizers of this amazing program @starstrings01 and my team leader @moremoney28 THANK YOU
Now for this week’s newbie initiative task, I'm gonna be sharing some Dos and Donts in the Hive space and also Markdown that would aid your hive post, and lastly a quick and well-detailed Canva tutorial. I hope you gain something from this post and most importantly take something from here.
So before Fuda Adu let's jump right into it

The Dos And Donts On Hive Space
This is the first section of the this tasks and basically the most important thing every newbie should know if he or she wanna thrive on Hive, this section basically covers some of the info below as regards to rules and regulations;
- Read every community you desire rules and guild line
There’s no you’ll know the way of a certain without the guardians of the desired place you’re in, so basically it’s necessary for every newbie to read the rule and guild lines of whatever community you wanna be part of because there you will see the things that are needed for you to thrive in the community. Some communities might want you to write 500 words some might not mind the amount, so it is important to read every community you desire to participate in.
Still on the Dos, secondly we have;
- Sourcing any added things to support your post
We cannot create an amazing post without getting some data created by other creators, it could be Pictures or an information you got on the web, it is a must that you source them to reduce the risk of Plagiarism which I would be explaining in the next section which is the Donts section;
Donts
This section is very critical because if they aren't taken seriously you could be punished and could be hurtful, but not to worry once you follow these guidelines you wouldn't have to go through any punishment, the Donts as follows;
Plagiarism
Generally, plagiarism is wrong, and also here in the hive space, in the section earlier I talked about sources and any external info that isn't yours but apart from this, don't copy any post and bring it into your own post, if you're caught you'll get punishedlastly, the misuse of Tags
There are tons of communities on Hive and all of them have their special tags that must be attached to some kind of post, and if misused you'll get punished and just so you don't get punished it's very important to read the community’s guidelines so you dont make mistakes.
In the next section, I will give a tutorial on Markdown
MARKDOWN
Markdown is a simple markup language that is used with plain text to add formatting elements (headings, bulleted lists, URLs, embedded YouTube links) without using a formal text editor or HTML tags. Markdown is device independent and displays the writing format consistently across all devices.
The first on our list is;
Heading
A heading is the title of a piece of writing that appears at the top of the page. And they come in different sizes (six different sizes) and ill be showing you how to execute them.
Step
You type # (hashtag) then you give a space before you insert you text I.e markdown # [space] Hi I am a newbie. NB the number of # (hashtag) you used determines the size of the header. 1 hashtag (# ) is the largest and 6 (hashtags) is the smallest ( #, #, #, #, #, #, )
Example
#  Header one (biggest)
##  Header two
###  Leader three
####  Header four
#####   Header five
######   Header six  (smallest)
Result
Header one (biggest)
Header two
Header three
Header four
Header five
Header six (smallest)
TEXT
There’s are different types of text styles and I’ll be explaining a few
- ITALIC
If you want make your text to be in an italic form, you’ll add one asterisk BEFORE and AFTER your text
I.e
*ITALIC*
- BOLD
if you want to make your text in a Bold form, you'll add two asterisks BEFOE and AFTER your text
I.e.
**BOLD**
- STRIKE THROUGH
if you want to make your text in a STRIKE THROUGH form, you'll add two asterisks BEFOE and AFTER your text
I.e
~~STRIKE THROUGH~~
LINK
I'll be explaining a way to add a click-through link to your post, it's a great way to add a link to your post with a description of what the link is, here is how;
First, you will have to create this bracket [] around your description text and then this () bracket around the link you want to insert.
I.e
[My first newbie initiative post](https://ecency.com/hive-153850/@cleevesh/setting-up-my-hive-goals)
Result
My first newbie initiative post
Images
A lot of times we wanna add images to our blog posts to either give more information or for beautification, here Is how to go about it;
First, would have to get the link for the proposed image you want to use then afterward you'll add the exclamation sign ! Then this bracket [] followed by these brackets () around the link of the picture you download from a free site and then take the picture to ecency and then a link will be generated
I.e

Result
NB: Always remember to source your pictures
Links
YOUTUBE VIDEO (embedded)
There are times some communities want you to insert an embedded YouTube video from a content you posted and this could be really challenging but I’ll show you how to go out it.
Firstly, if you’re using a phone and you don’t have a laptop, you’ll have go to YouTube web then search for your desired video and after words they you’ll click on share
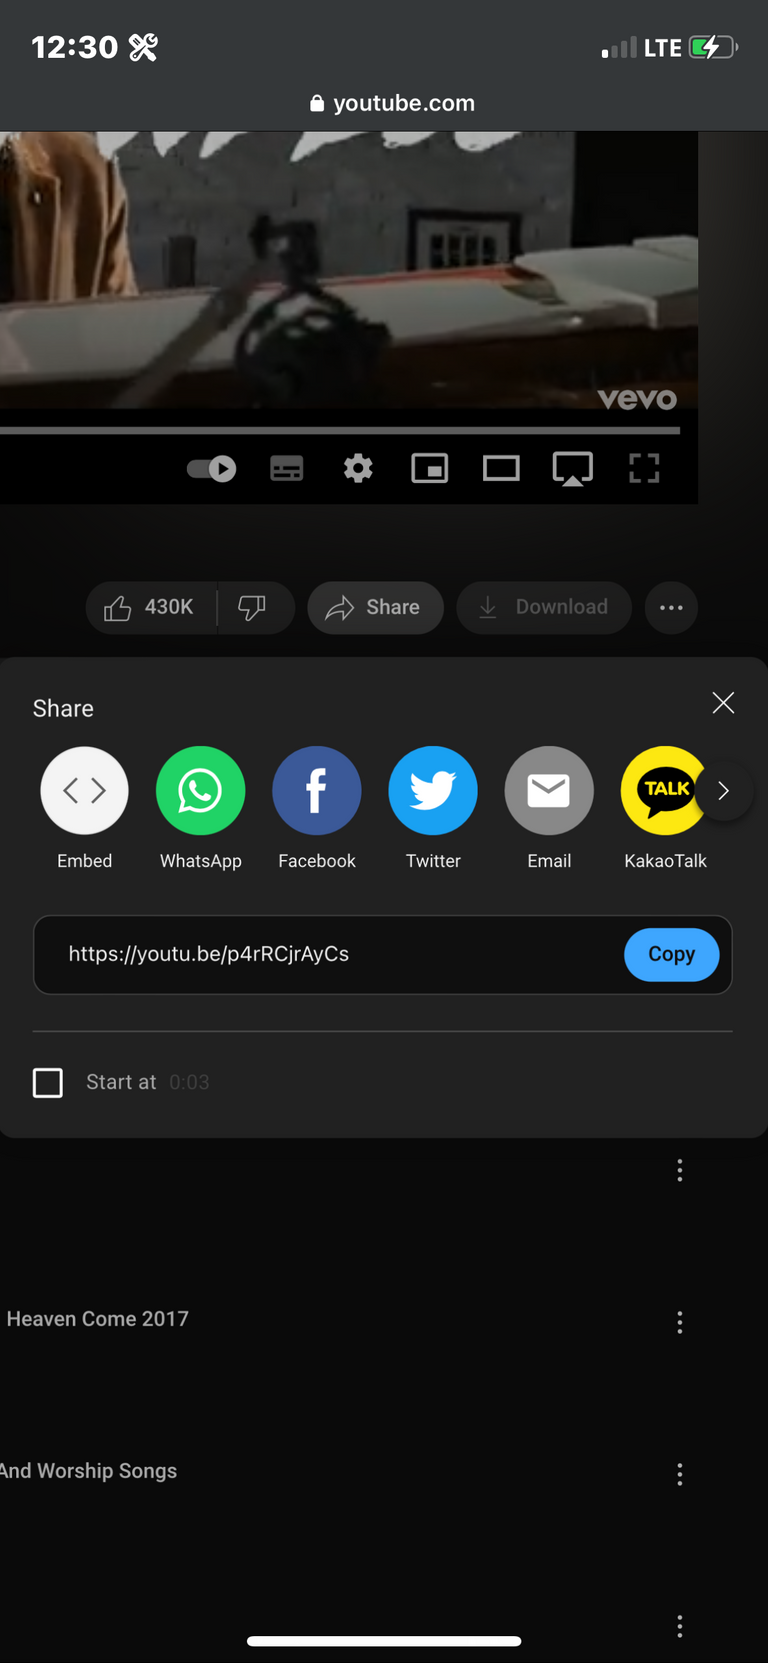
Then you copy the embedded link as shown and paste it in your blog post, you don’t need to worry about the end result, as long you do what’s right, you will get a good result.
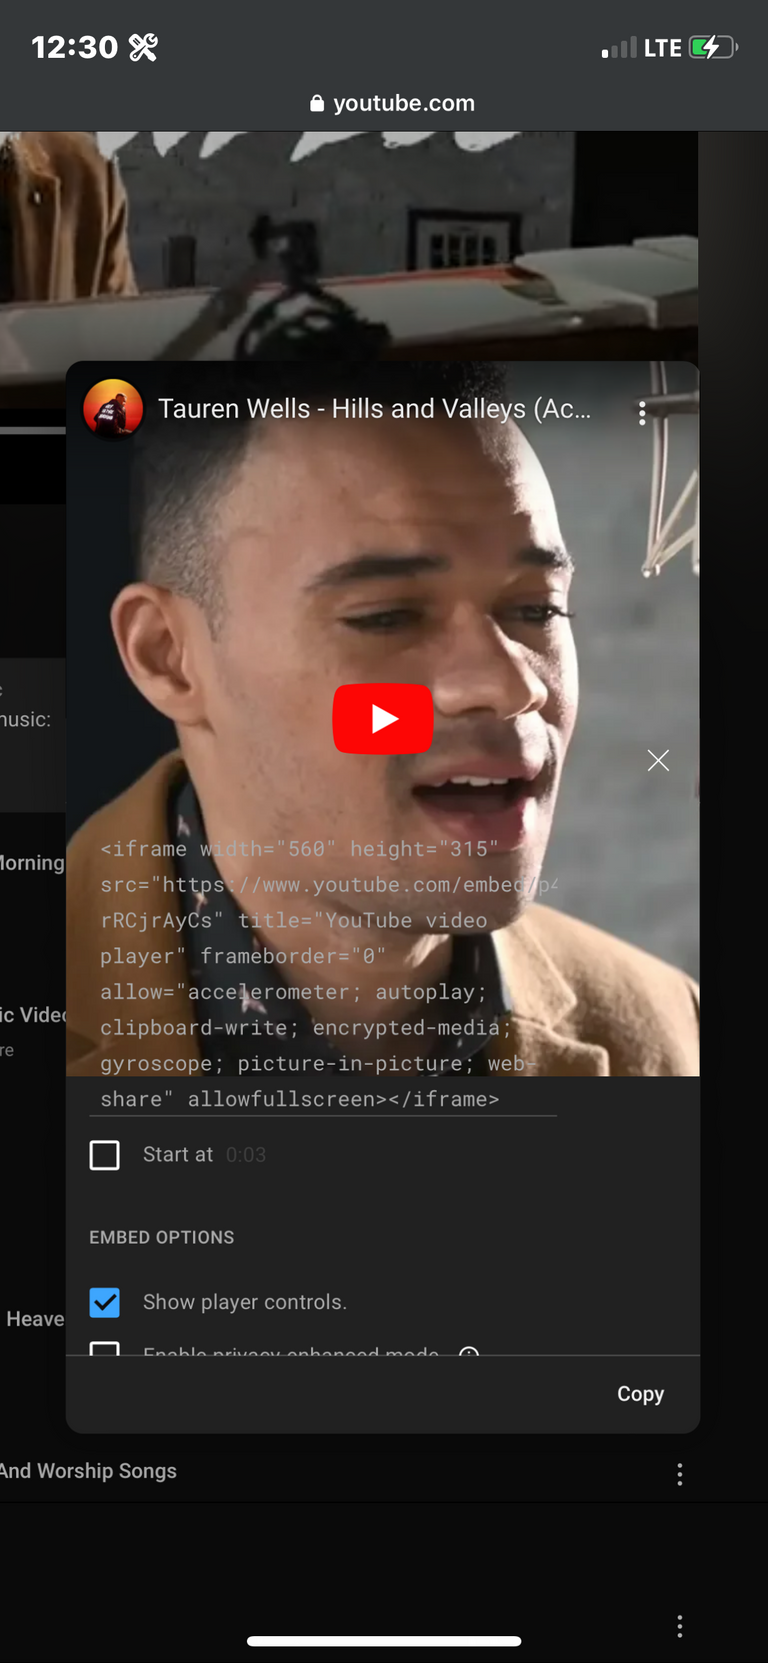
I.e
<iframe width="560" height="315" src="https://www.youtube.com/embed/p4rRCjrAyCs" title="YouTube video player" frameborder="0" allow="accelerometer; autoplay; clipboard-write; encrypted-media; gyroscope; picture-in-picture; web-share" allowfullscreen></iframe>
Result
Canva Tutorial
Here is the final segment of this week’s task and the most entertaining of them all 😁. I’ll be guarding you through steps to take you make a beauty Canva design for your blog.
We’re going to be designing the thumbnail for this post together, exciting right? Let’s jump right into it.
STEP 1
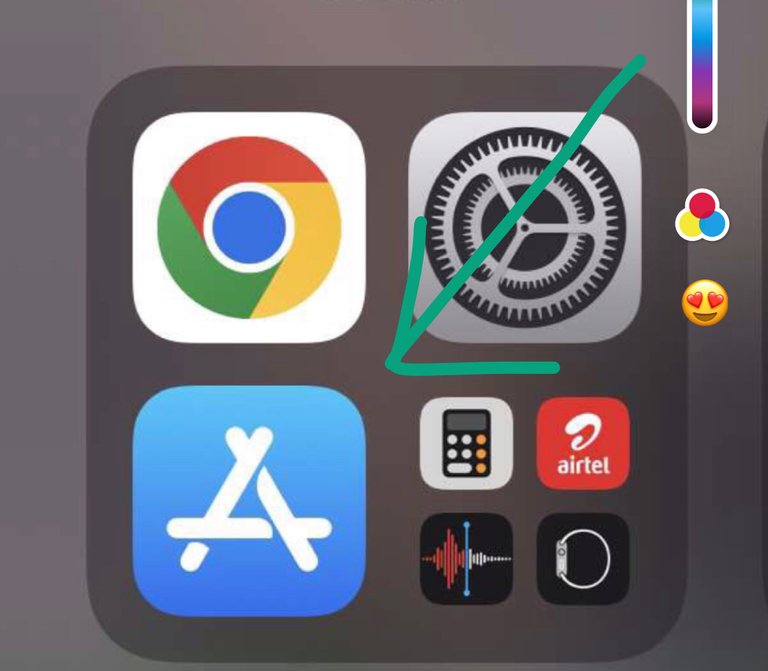
If you use an iPhone go to your App Store and if you use an andriod go to your play store
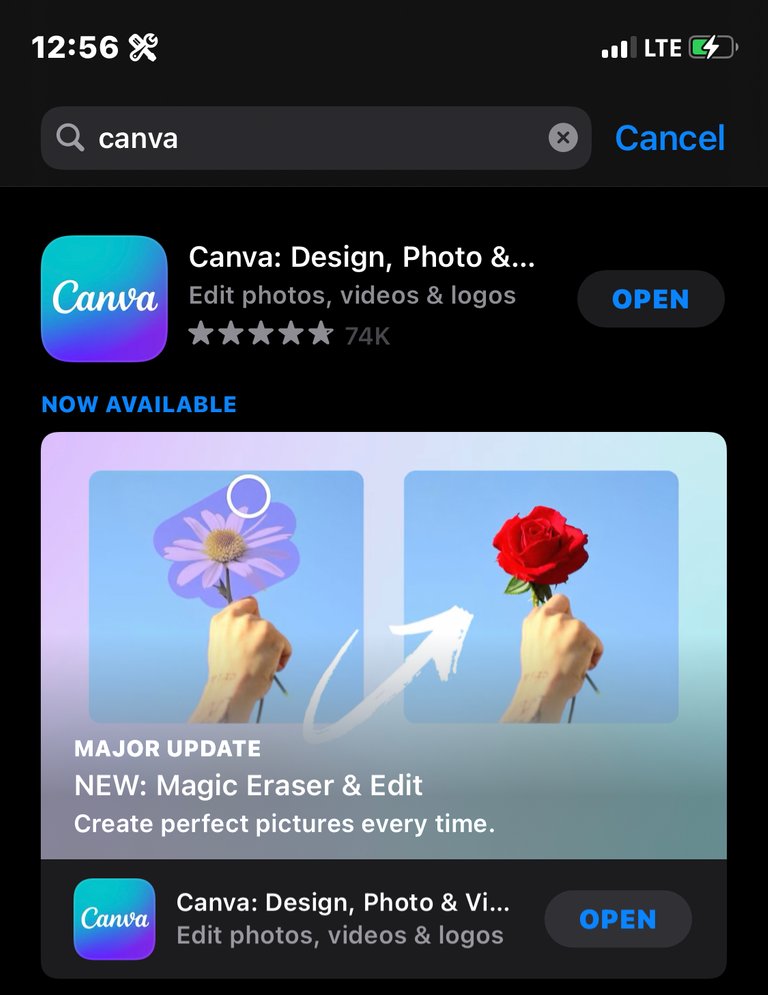
Next you search for Canva and then download the app into your phone
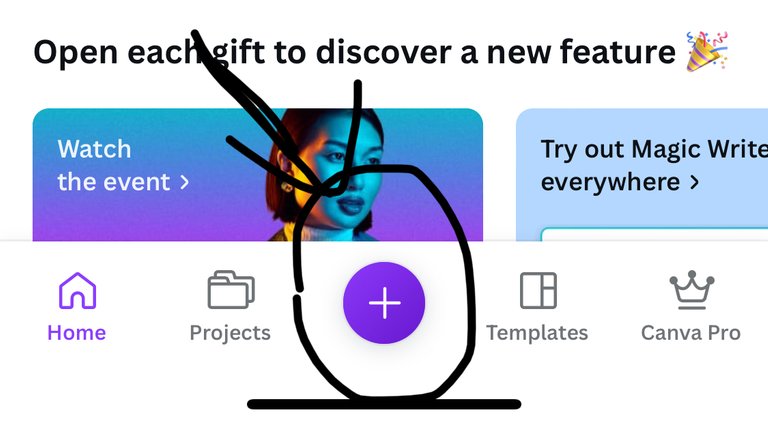
Then open the app and then create an account, afterwards we are going to create the thumbnail. The first thing you do it to click on the plus button below
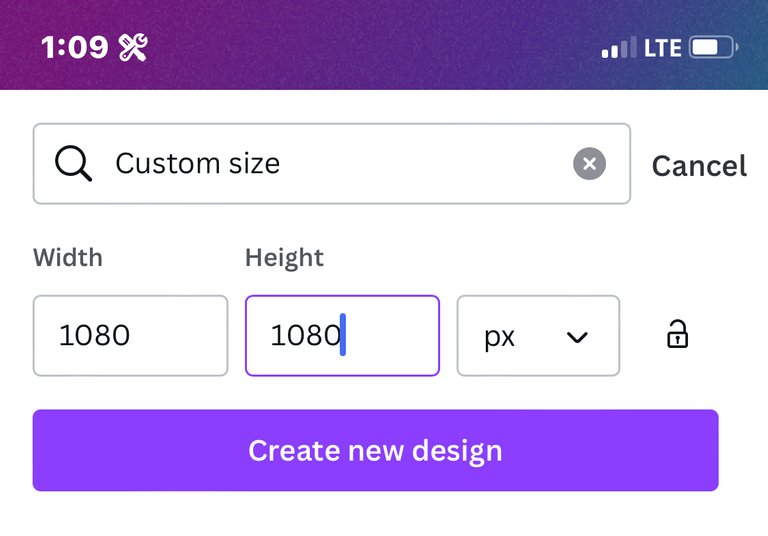
Then afterward click on custom size and type 1080px x 1080px (what this means is thumbnail width and height would be of that range 1080px x 1080px, and px is the short form for pixels)
Next, you click on the new design and this is where the fun starts. Firstly you'll be provided with a blank page like this
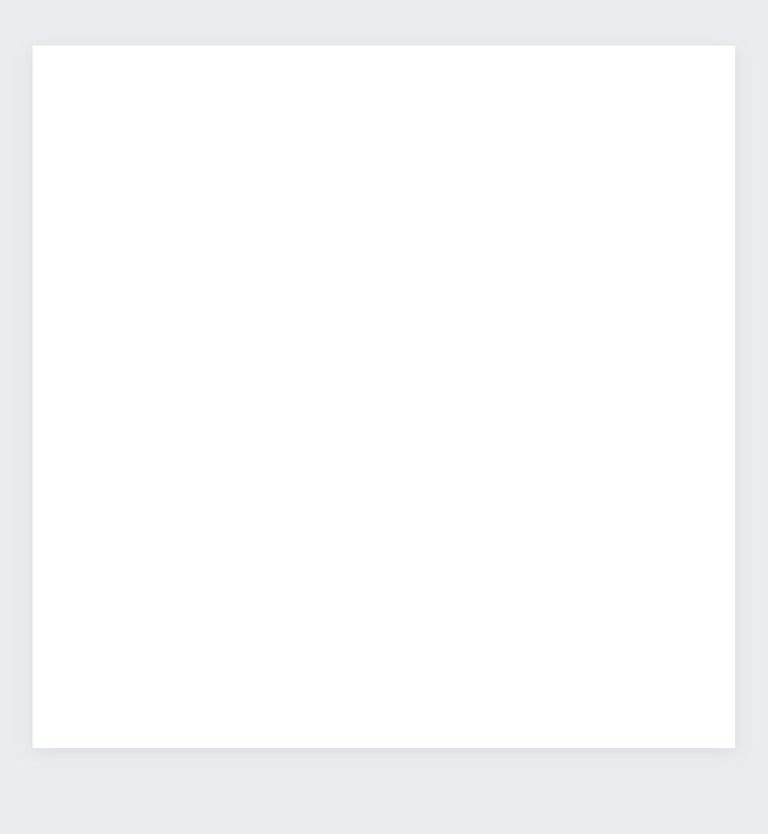
And the first thing we do is to head to the design palette where you will find different shapes, text, tools, etc to design with
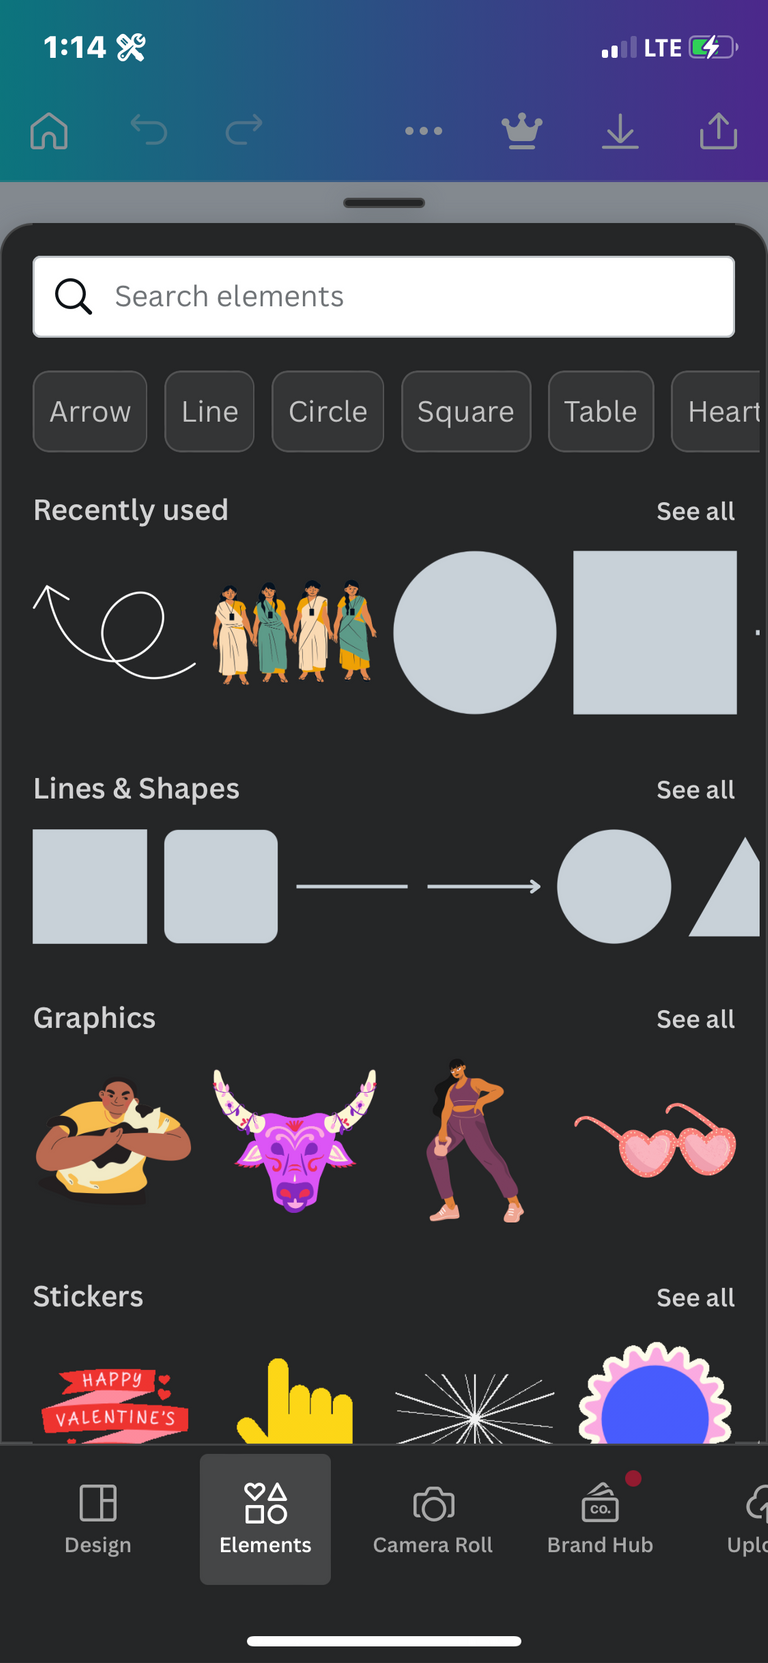
For this video, we are going to get a square-shaped and then color it brown, and fit it to our desired position
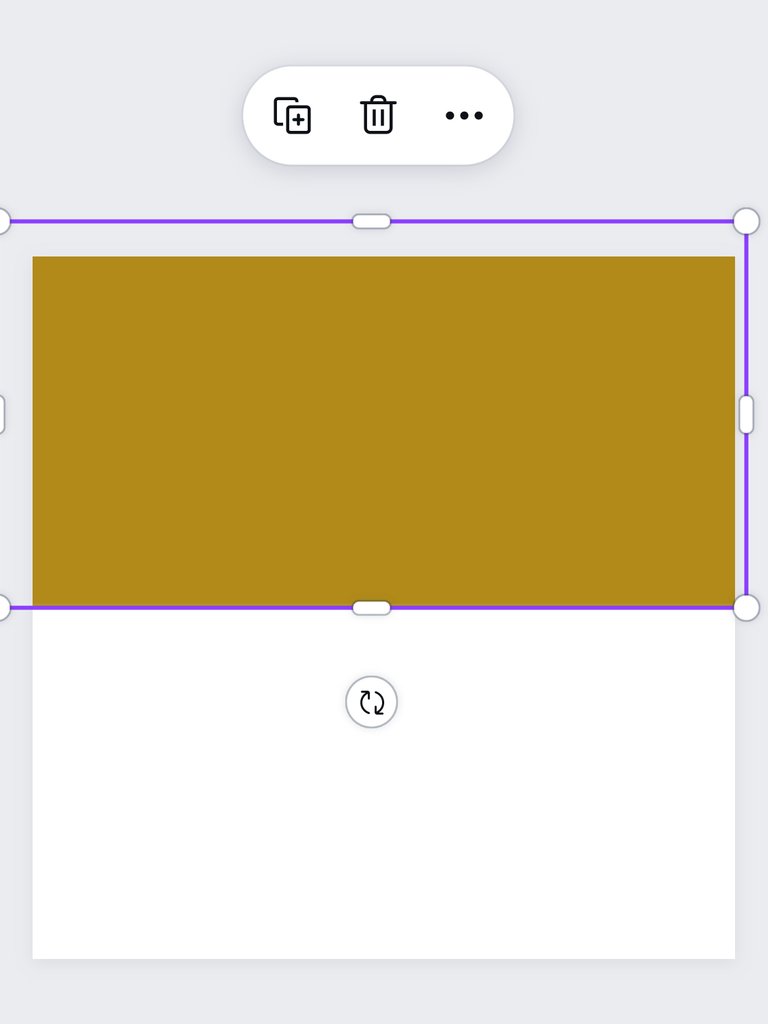
Then we go to the same palette and get a circle shape with the same color as the background and fit it to our desired position, then you'll see the design is starting to form

Next, we are going to fix our text into our design to give it meaning, the text we are going to be using is “The Dos and Don'ts on the Hive Space, Markdowns, Canva tutorial” and for this we are going to look for a font that is bold and visible the next text will be “@cleevesh and Hive learner” these two will be of the same font and the last text will be “newbie team 2” all these texts will be group together and will have different fonts for beautification
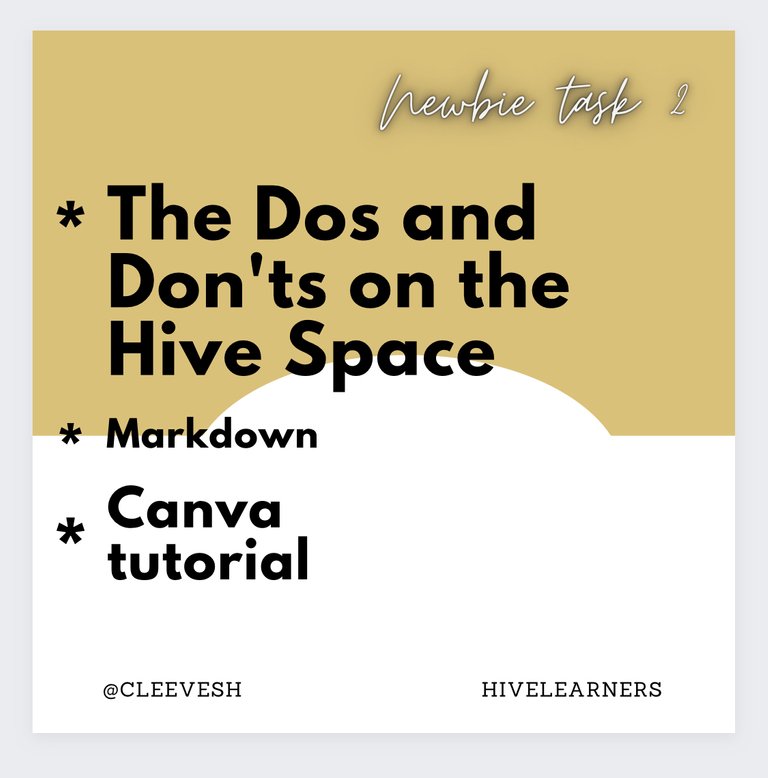
Lastly the finishing touch, we are just basically going to be adding some. designs and shapes to beautify the thumbnail, and the only place to these are in the design palette
And that's all, I hope you enjoy the process and see it wasn't hard. NB; if you use any picture in this design make sure you source it as well.
If you are reading this that means you're a real one, thank you so much for reading and until I see you in the next task remain blessed and stay fresh.

SPANISH
Saludos a todos mis compañeros novatos y colmenas, me gustaría darles la bienvenida a todos a la tarea de esta semana Semana 2 que se llevó a cabo inicialmente el el SMILE Discord Space de @starstrings01, los novatos también pudieron aprender y compartir pensamientos sobre el aviso de esta semana. Me gustaría agradecer a los organizadores de este increíble programa @starstrings01 y al líder de mi equipo @moremoney28 GRACIAS
Ahora, para la tarea de la iniciativa para novatos de esta semana, voy a compartir algunas Qué hacer y qué no hacer en el espacio de Hive y también Markdown que ayudaría a su publicación de Hive y, por último, una rápida y bien detallada ** Tutorial de Canva**. Espero que obtenga algo de esta publicación y, lo que es más importante, saque algo de aquí.
Entonces, antes de Fuda Adu, saltemos directamente a eso
Lo que se debe y no se debe hacer en Hive Space
Esta es la primera sección de estas tareas y básicamente lo más importante que todo novato debe saber si quiere prosperar en Hive, esta sección básicamente cubre parte de la información a continuación con respecto a las reglas y regulaciones;
- Lea las reglas y la línea del gremio de cada comunidad que desee
No sabrás el camino de un cierto sin los guardianes del lugar deseado en el que te encuentras, así que básicamente es necesario que cada novato lea las reglas y las líneas del gremio de cualquier comunidad de la que quieras ser parte porque allí verá las cosas que se necesitan para prosperar en la comunidad. Algunas comunidades pueden querer que escribas 500 palabras, a otras puede que no les importe la cantidad, por lo que es importante leer cada comunidad en la que desees participar.
Todavía en el Dos, en segundo lugar tenemos;
- Obtención de elementos adicionales para respaldar su publicación
No podemos crear una publicación increíble sin obtener algunos datos creados por otros creadores, podrían ser Imágenes o una información que obtuvo en la web, es imprescindible que los obtenga para reducir el riesgo de * Plagio* que estaría explicando en la siguiente sección que es la sección de Donts;
No hacer
Esta sección es muy crítica porque si no se toman en serio, podría ser castigado y podría ser hiriente, pero no se preocupe, una vez que siga estas pautas, no tendrá que pasar por ningún castigo, los no hacer de la siguiente manera;
Plagio
En general, el plagio está mal, y también aquí en el espacio de la colmena, en la sección anterior hablé sobre las fuentes y cualquier información externa que no sea suya, pero aparte de esto, no copie ninguna publicación y tráigala a su propia publicación. si te atrapan te castiganpor último, el mal uso de las etiquetas
Hay toneladas de comunidades en Hive y todas tienen sus etiquetas especiales que deben adjuntarse a algún tipo de publicación, y si se usa mal, serás castigado y, para que no te castiguen, es muy importante leer las pautas de la comunidad. para que no cometas errores.
En la siguiente sección, daré un tutorial sobre Markdown
MARKDOWN
Markdown es un lenguaje de marcado simple que se usa con texto sin formato para agregar elementos de formato (encabezados, listas con viñetas, URL, enlaces de YouTube incrustados) sin usar un editor de texto formal o etiquetas HTML. Markdown es independiente del dispositivo y muestra el formato de escritura de manera uniforme en todos los dispositivos.
El primero en nuestra lista es;
Título
Un encabezado es el título de un escrito que aparece en la parte superior de la página. Y vienen en diferentes tamaños (seis tamaños diferentes) y les mostraré cómo ejecutarlos.
Paso
Escribes # (hashtag) y luego das un espacio antes de insertar el texto, es decir, markdown # [espacio] Hola, soy un novato. NB: el número de # (hashtag) que utilizó determina el tamaño del encabezado. 1 hashtag (#) es el más grande y 6 (hashtags) es el más pequeño (#, #, #, #, #, #,)
Ejemplo
# Encabezado uno (más grande)
## Encabezado dos
### Líder tres
#### Encabezado cuatro
##### Encabezado cinco
###### Encabezado seis (más pequeño)
Resultado
Encabezado uno (más grande)
Encabezado dos
Encabezado tres
Encabezado cuatro
Encabezado cinco
Encabezado seis (más pequeño)
TEXTO
Hay diferentes tipos de estilos de texto y explicaré algunos
- CURSIVA
Si desea que su texto esté en formato cursiva, agregará un asterisco ANTES y DESPUÉS de su texto
Es decir
*ITÁLICO*
- ATREVIDO
si desea que su texto esté en formato Negrita, agregará dos asteriscos ANTES y DESPUÉS de su texto
Es decir.
**ATREVIDO**
- TACAR A TRAVÉS
si desea hacer que su texto tenga la forma TACADA, agregará dos asteriscos ANTES y DESPUÉS de su texto
Es decir
~~ ATACAR A TRAVÉS ~~
ENLACE
Estaré explicando una forma de agregar un enlace de clic a su publicación, es una excelente manera de agregar un enlace a su publicación con una descripción de qué es el enlace, así es como;
Primero, deberá crear este corchete [] alrededor del texto de su descripción y luego este () corchete alrededor del enlace que desea insertar.
Es decir
[Mi primera publicación de iniciativa para novatos](https://ecency.com/hive-153850/@cleevesh/setting-up-my-hive-goals)
Resultado
Mi primera publicación de iniciativa para novatos
Imágenes
Muchas veces queremos agregar imágenes a las publicaciones de nuestro blog para brindar más información o para embellecerlas, así es como se hace;
Primero, tendría que obtener el enlace para la imagen propuesta que desea usar y luego agregará el signo de exclamación. Luego, este corchete [] seguido de estos corchetes () alrededor del enlace de la imagen que descargue de un sitio gratuito y luego lleve la imagen a ecency y luego se generará un enlace
Es decir

Resultado
NB: Recuerde siempre buscar sus imágenes
Enlaces
VIDEO DE YOUTUBE (incrustado)
Hay momentos en que algunas comunidades quieren que insertes un video de YouTube incrustado de un contenido que publicaste y esto podría ser realmente desafiante, pero te mostraré cómo hacerlo.
En primer lugar, si está usando un teléfono y no tiene una computadora portátil, deberá ir a [YouTube web] (https://www.youtube.com/?themeRefresh=1) y luego buscar el video deseado. y después de las palabras, harás clic en compartir
Luego, copie el enlace incrustado como se muestra y péguelo en la publicación de su blog, no necesita preocuparse por el resultado final, siempre que haga lo correcto, obtendrá un buen resultado.
Es decir
<iframe width="560" height="315" src="https://www.youtube.com/embed/p4rRCjrAyCs" title="Reproductor de video de YouTube" frameborder="0" allow="acelerómetro; reproducción automática; portapapeles- escribir; medios cifrados; giroscopio; imagen en imagen; compartir en la web" allowfullscreen></iframe>
Resultado
Tutorial de Canva
Aquí está el segmento final de la tarea de esta semana y la más entretenida de todas 😁. Te guiaré a través de los pasos para que hagas un hermoso diseño de Canva para tu blog.
Vamos a diseñar juntos la miniatura de esta publicación, emocionante, ¿verdad? Saltemos directamente a eso.
PASO 1
Si usas un iPhone ve a tu App Store y si usas un andriod ve a tu play store
A continuación, busque Canva y luego descargue la aplicación en su teléfono.
Luego abra la aplicación y luego cree una cuenta, luego vamos a crear la miniatura. Lo primero que haces es hacer clic en el botón más de abajo
Luego, haga clic en el tamaño personalizado y escriba 1080 px x 1080 px (lo que esto significa es que el ancho y la altura de la miniatura serían de ese rango 1080 px x 1080 px, y px es la forma abreviada de píxeles)
A continuación, hace clic en el nuevo diseño y aquí es donde comienza la diversión. En primer lugar, se le proporcionará una página en blanco como esta
Y lo primero que hacemos es dirigirnos a la paleta de diseño donde encontrarás diferentes formas, texto, herramientas, etc con las que diseñar.
Para este video, vamos a obtener una forma cuadrada y luego la colorearemos de marrón, y la ajustaremos a la posición deseada.
Luego vamos a la misma paleta y obtenemos una forma de círculo con el mismo color que el fondo y lo ajustamos a la posición deseada, luego verá que el diseño comienza a formarse
A continuación, vamos a arreglar nuestro texto en nuestro r diseño para darle significado, el texto que vamos a usar es "Lo que se debe y no se debe hacer en el tutorial Hive Space, Markdowns, Canva" y para esto vamos a buscar una fuente que esté en negrita y visible en el el próximo texto será "@cleevesh y Hive learner" estos dos tendrán la misma fuente y el último texto será "novato equipo 2" todos estos textos se agruparán y tendrán diferentes fuentes para embellecer
Por último, el toque final, básicamente vamos a agregar algunos. diseños y formas para embellecer la miniatura, y el único lugar para estos es en la paleta de diseño
Y eso es todo, espero que disfruten el proceso y vean que no fue difícil. NÓTESE BIEN; si usa alguna imagen en este diseño, asegúrese de obtenerla también.
Si estás leyendo esto, eso significa que eres real, muchas gracias por leer y hasta que te vea en la próxima tarea, mantente bendecido y mantente fresco.
https://leofinance.io/threads/@cleevesh/re-leothreads-czfmdm97
The rewards earned on this comment will go directly to the people ( cleevesh ) sharing the post on LeoThreads,LikeTu,dBuzz.
I have been expecting your entry and now that it’s here, it was worth the worth.🤌
The strike through markdown is one of the formatting I always admire when I see in people’s posts. Thanks for showing how it’s done.
Thanks for stopping by Chief
I really appreciate the your words 💯
That was a very well done post! You even include embedding videos from youtube which can be really helpful.
Thank you boss
¡Por supuesto que todo el que lea sacará algo de aquí! Está muy bien explicado y amplio en su contenido. Tengo que decir gracias a la versión en español, pues para quienes trabajamos desde el teléfono nos es más difícil hacer la traducción. Muchas gracias por este regalo. 🙏
Estoy tan contento de que hayas tomado algo de aquí, gracias por las amables palabras, realmente lo aprecio. te deseo lo mejor
🥳🥳🥳
Weldone brother I love the fact that you translate your work so that other so that other people will find it easier to read, Also I love your complete tutorial on how to use Canva. It's top-notch Weldon for the good work I'm proud of you.
Thank you my boss❤️