Mastering NestJS: From Installation to Coding Best Practices

The Nest JS framework is a tool that you can use to develop your web and server-side applications. Nest JS was created based on the Node JS backend platform, and the prominent features of this framework include high performance in developed programs, scalability and reliability.
What is Nest JS?
Nest.js is a tool and framework for developing back-end web applications, with which you can develop server-side codes and APIs with the help of Node.js.
In simple terms, you can consider Nest JS as a framework that is written and developed based on Node JS as well as Express JS. This tool is closely related to the JavaScript programming language, and especially, when you want to develop your web applications with TypeScript, it can be very useful and facilitate this work for you.
Web application design and development has become very important these days. In fact, these elements help organizations to attract more users and in addition, they play an effective role in facilitating their tasks and work processes. With these details, it is not surprising that we see many companies and organizations turning to developing their own web applications to take advantage of it.
If you have previously worked in the field of front-end programming and with the web application framework based on Angular typescript, it is very likely that you can learn and use the basic principles and concepts of Nest JS much more easily. Because Nest JS is largely inspired and influenced by Angular.
In the design and development of the Nest JS framework architecture, various components of different programming paradigms have been considered, including the following.
- Object oriented programming
- Functional programming
- Reactive functional programming
Also, by benefiting from the best features available in these paradigms, Nest JS can now be a very powerful and efficient framework for developing your web applications.
If you intend to do projects and develop scalable applications, the NEST JS framework is one of the best options offered to you. Working with this framework is simple due to its nature and structure, and you can start developing your desired programs very quickly with it.
The language used in the Nest JS framework is normally TypeScript, and you can also use JavaScript if necessary.
What is the importance of learning Nest JS?
NestJS is a powerful tool that is gradually increasing in popularity. Because it provides developers with the right flexibility. For example, it supports the following.
- REST architecture
- GraphQL query language
- Web Socket Protocol
- Cron job
Another reason for Nest JS's popularity is its easy and hassle-free integration with third-party libraries.
- Support and compatibility with TypeScript language: As mentioned earlier, NEST JS is created using TypeScript language, and for this reason, you can benefit from the "Static Typing" feature. This feature is actually a type system, according to which, variables are assigned to a certain "data type" during the compilation process and before execution, and this situation remains the same during the execution of the program. This way, you'll not only have better code, but you'll be able to find and fix program errors much faster and at an early stage.
- Modular architecture: NEST JS has a modular architecture and this feature makes the application development process easy. Because the application is developed in the form of modules, it is easier to manage and create each of these modules, and then the application can be easily expanded. This can be very useful for large and complex applications.
- Support for REST architecture and GraphQL query language: As mentioned earlier, the NEST JS framework supports GraphQL and REST. Thus, you will not need additional tools to build your APIs.
- Dependency injection technique: In this framework, you are faced with a powerful dependency injection system that makes software code testing much easier.
- Programming community and its ecosystem: When using this framework, you can rest easy because of the support of its programming community because NEST JS has an active community, and in addition, it provides you with a variety of tools and libraries.
What is a module in the NEST JS framework architecture?
Modules in programming refer to small, independent pieces of code that can be reused.
In modular architecture, applications are developed using these modules. Just like the LEGO game, we make meaningful objects by putting together small pieces, and you may have fun with it as a child. The NEST JS framework is designed and built using such an architecture. Just like LEGO blocks put together, NEST JS modules combine and interact to make your app build and perform properly. Thus, in NEST JS, we can build larger and more complex web applications using various modules. These web applications are like the same structure that we create with LEGO blocks, and you as a developer can shape the functionality of your application according to your opinion and project requirements by adding appropriate modules.
Modules in NEST JS can include:
- Controller
- Service
- Provider
What is controller in NEST JS module?
The Controller component in NEST JS modules can be visualized as an interface between the server and the client. In this way, they receive the requests sent by the user and also provide the corresponding response. In fact, the controller handles the user request and the response. Controllers also have different endpoints that need to use special addresses to communicate with them. These endpoints correspond to the HTTP methods listed below.
-
GETmethod -
POSTmethod -
PUTmethod -
DELETEmethod
What is service in NEST JS module?
The Service component in NEST JS modules performs tasks related to the business logic of the application and helps the controller to provide correct performance by doing some work. So it can be said that the service is considered as a kind of controller supplement. The controller has a direct relationship with the users, and on the other hand, the service helps the controller by managing tasks such as connecting to the database and ensuring the correct operation of the program. Tasks such as querying the database, processing data and communicating with APIs are among the tasks performed by services to help the controller component. Among the characteristics of services, it can be mentioned that they can be used in different parts of the application, which in this case will lead to easier code management. In short, by taking over the overall performance of the application, the services make the controllers only manage the requests, and with this division of work, the application management becomes simpler.
What is a provider in a NEST JS module?
You can simply consider the Provider component in NEST JS modules as an interface that is placed between your application and an external resource such as a database, and enables interaction and benefit from it for the purpose of improving the application.
To install this framework, just enter the terminal of your system and type and execute the following command.
npm install -g @nestjs/cliYou can easily create or manage NEST JS projects through the Nest CLI tool. After running the said command, you can type and run the following command to ensure its correct installation.
nest --versionRunning this command will actually show you the CLI version number and this output means that the CLI is installed correctly.
Create a new NEST JS project
To be able to create a new NEST JS project, you need to use the Nest CLI again and type and execute the commands mentioned below.
nest new nest-gfg
Note that nest is one of the commands used to manage projects. The word new after it creates a new project and finally nest-gfg is the name of the project to be created.
Running this command will prompt you with a message asking you to select your package manager, for example NPM or YARN, to install the necessary dependencies for the application. After specifying the relevant Package Manager and confirming it, the overall structure of your NEST JS project will be created and the necessary packages for the application will be installed. Project dependencies are things like modules, libraries, tools, and packages that your project needs to run.
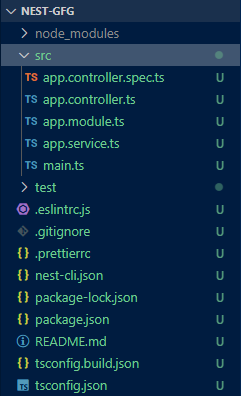
The image below shows a view of the folder structure of the Nest JS project.

By opening the package.json file and from the dependencies section of this file, which includes the items mentioned below, you can see the resources required by the application.
 "dependencies": {
      "@nestjs/common": "^10.0.0",
      "@nestjs/core": "^10.0.0",
      "@nestjs/platform-express": "^10.0.0",
      "reflect-metadata": "^0.2.0",
      "rxjs": "^7.8.1"
  }
Nest JS application codes
The codes related to the "controller" of the NEST JS application located in the app.controller.ts file:
import { Controller, Get } from '@nestjs/common';
import { AppService } from './app.service';
@Controller()
export class AppController {
    constructor(private readonly appService: AppService) { }
    @Get()
    getHello(): string {
        return this.appService.getHello();
    }
}
Below, you can see the NEST JS application service code located in the app.service.ts file.
import { Injectable } from '@nestjs/common';
@Injectable()
export class AppService {
    getHello(): string {
        return 'Hello, NestJS!';
    }
}
In the following, I have brought the codes related to the "module" of the NEST JS application, which is located in the app.module.ts file.
import { Module } from '@nestjs/common';
import { AppController } from './app.controller';
import { AppService } from './app.service';
@Module({
    imports: [],
    controllers: [AppController],
    providers: [AppService],
})
export class AppModule { }
Below, you can see the codes related to the starting point of the NEST JS application, or Main, which is located in the main.ts file.
import { NestFactory } from '@nestjs/core';
import { AppModule } from './app.module';
async function bootstrap() {
    const app = await NestFactory.create(AppModule);
    await app.listen(3000);
}
bootstrap();
How to run the application
For this purpose, type the following command in the terminal and run it.
npm run start
By doing this, your application will run on http://localhost:3000. Also, if you want to run your program in development mode, you should write the following command.
npm run start:devIn this case, "Live Reloading" feature is also provided to you. That means, with any changes made to the file, the server will be restarted automatically and you will see the result.
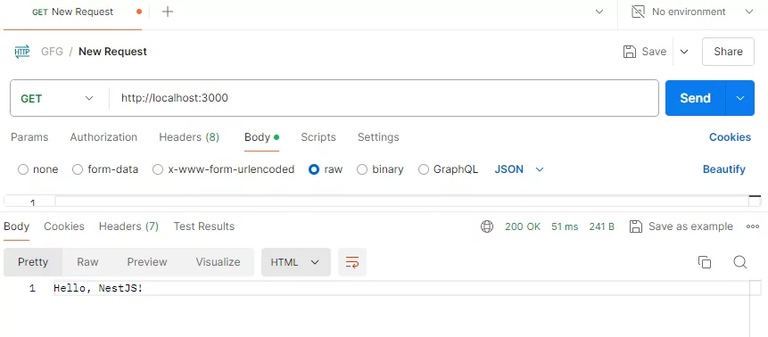
The following image shows a view of the program execution.


Thanks for your contribution to the STEMsocial community. Feel free to join us on discord to get to know the rest of us!
Please consider delegating to the @stemsocial account (85% of the curation rewards are returned).
You may also include @stemsocial as a beneficiary of the rewards of this post to get a stronger support.