Splinterlands - A Strategy with Armor as a strong Attack Type [ENG/DE]


Hello Splinterlandians! Do you know that feeling when you find a battle and, looking at the active ruleset or rulesets, immediately have a strategy in mind that could work well? For me, that's the case with the Equal Opportunity ruleset, for example. I immediately think of playing a strategy with the Life Splinter with a lot of armor. You'll find out why in today's blog. Incidentally, this strategy also works well with the Melee Mayhem ruleset and, to some extent, Super Sneak, as long as melee attackers can attack from rear positions.
| Equal Opportunity | Melee Mayhem | Super Sneak |
|---|---|---|
 |  |  |
Today, as part of this week's Splinterlands Social Media Challenge, I would like to introduce you to this strategy with the Life Splinter and, of course, show you a corresponding battle in Ranked Modern format with this ruleset. Enjoy reading! 😊
Rulesets, Manacap and Splinters:

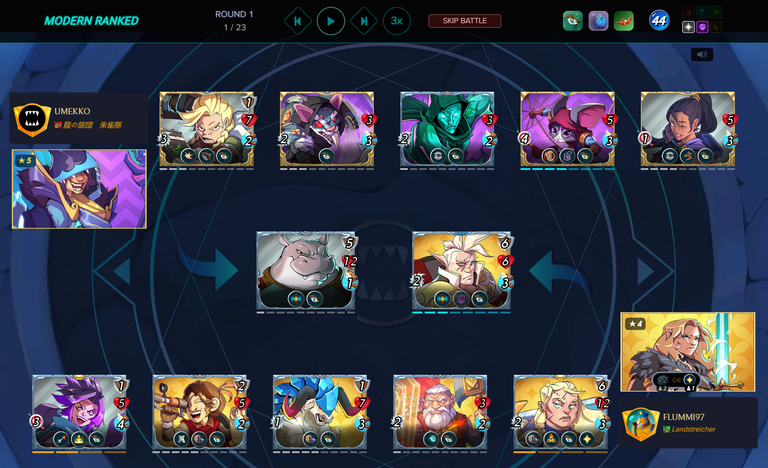
Three rulesets were active in my battle: Equal Opportunity, Lost Magic, and Close Range. As already mentioned, the Equal Opportunity ruleset is essential for my strategy of attacking from the rear positions as a melee attacker. Lost Magic also helps my strategy, as I will be playing a lot on armor. I will probably benefit little or not at all from the Close Range ruleset, but it doesn't hurt either.
The Manacap is 44, which is quite high. This is necessary because the cards I will be playing are, at least in part, not exactly cheap. However, there are also some variations on the strategy of playing cheaper cards.
Only the Life and Death Splinters are playable. This is also essential for my strategy, of course, and I can possibly predict my opponent's strategy, at least in part, based on only two available Splinters.
Lineup and Strategy:
| Position | Card | Explanation |
|---|---|---|
| Archon | 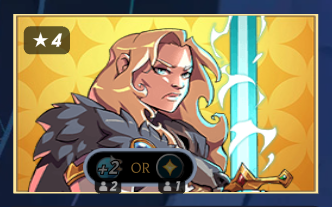 | As an Archon, I didn't have much choice and decided on Avina of the Wolf. But that's not a bad thing at all, because I think she's a pretty strong Archon and both variants can help my strategy. Speed is always good, and the Heal ability is a real game changer in many situations. |
| #1 |  | I have placed Silverblade Fighter at the front. Even though the two abilities Void Armor and Flank are unlikely to be of assistance in this case, this card is well suited as a tank in the first position due to its stats and high armor. |
| #2 | 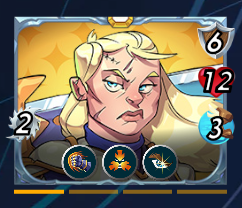 | Right behind it, I have positioned Bera Dallin, one of the most important cards in this strategy. On the one hand, she is supposed to deal heavy damage to the opponent's monsters thanks to her Armored Strike ability, and on the other hand, she is supposed to protect my own monsters with the help of her Taunt ability. |
| #3 | 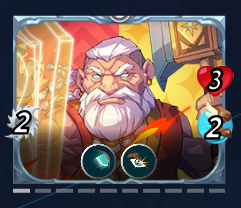 | In the third position, I play Mana Warden. The main reason I play him here is his ability Shield Ward, which gives Bera Dallin the ability Shield. And since there are no magic attackers playable in this battle, that's an incredibly important ability. Furthermore, thanks to the active ruleset, Mana Warden can attack from there. |
| #4 | 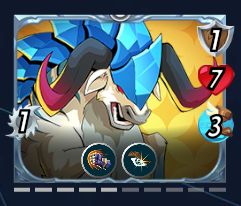 | Another important card for this strategy is Skyspire Yak. This is obviously due to its Armored Strike ability, which allows the card to attack with armor and melee attack thanks to the active ruleset. The card is also cheap to play. |
| #5 |  | Almost more important is Nimbledook Explorer in fifth position. The combination of Armored Strike and, above all, Protect is essentially the core of this strategy. This allows Nimledook Explorer to improve its own armor attack and that of my other monsters. |
| #6 |  | I placed Chaos Battle Mage in the last position. This doesn't necessarily have anything to do with my strategy, but I still had mana and a slot left. The card also benefits from the Close Range ruleset, as it can theoretically attack from the first position. |
Why am I playing these cards and using this strategy in the Equal Opportunity ruleset? Some of you may have already noticed that I am playing three monsters with the Armored Strike ability. Attacking with armor behaves like a melee attack, which means that these cards can normally only attack from the first position. However, thanks to Equal Opportunity, my cards can attack from any position. The Protect ability is intended to further strengthen these attacks with armor. In addition, the Taunt ability of Bera Dallin is intended to protect my weaker monsters. And since there are no Magic Attackers available, Bera Dallin, in combination with Mana Warden, becomes a powerful shield.
Battle:
It was quite clear to me before I saw my opponent's lineup that I would use the second variant of Avina of the Wolf. I did it and gave Bera Dallin the Heal ability so that she can survive longer and endure more attacks.
When I saw my opponent's lineup, I have to honestly say that I don't know exactly what the goal was behind it. The cards are looking a bit tapped up and I assumed that I will probably have no big problems to win the battle. Only Grimbardun Fighter counters my strategy thanks to the abilities Shield and Corrosive Ward something.
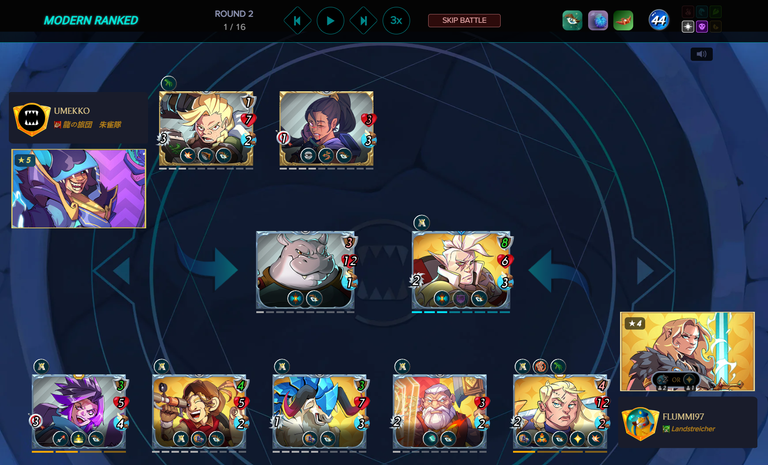
After the first round I was able to eliminate three monsters from my opponent. I succeeded, among other things, through my attacks with the armor thanks to the ability Armored Strike. My monsters, on the other hand, hardly hurt, only the armor of Bera Dallin is a bit scratched, but I think that is to be cope with.
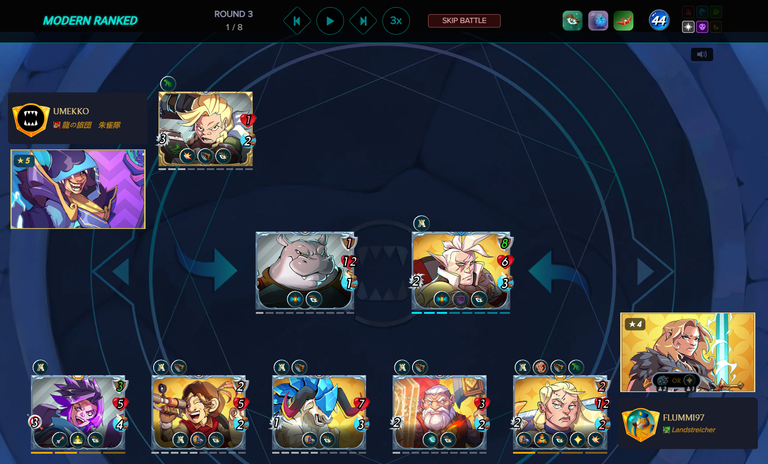
After the second round there is not much left of my opponent's monsters. The opposing Grimbardun Fighter has only one point of life and will be eliminated next and the opposing Ulundin Overseer has no attack and is therefore not a threat to me. My monsters have now lost a lot of armor, which is due to the Corrosive Ward ability and is a counter for my strategy.

The battle then took a while until I was able to reduce the last life of Ulundin Overseer. Ultimately, I won the battle at very endangered.
GG to my opponent @umekko!
The victory was not really in danger, I have to admit. Nevertheless, I think this battle was perfect to present my strategy and therefore didn't want to withhold it from you.
I also learned from this battle that the ability Corrosive Ward, which I usually don't think is very good, has a real use in this case.
Last Words:
I am a big fan of the Armored Strike ability, which is essential for this strategy. I also like the strategy, because in my opinion it is rather less played by other players and is therefore not so well known. It is still important to mention that the strategy has some counters in the current meta, especially teams with Eternal Tofu. And since it is a Life Archon, Eternal Tofu will almost always be playable, even if this strategy is playable.
I wrote enough for today, now you are asked. What do you think of this strategy and the lineup? Do you perhaps even play a similar strategy? I would be very happy to hear from you in the comments. As always, the @commentrewarder service is activated. Thanks for reading this far and have a great time! 😊

Hallo Splinterlandians! Kennt ihr das, wenn ihr ein Battle findet und beim Blick auf das aktive Ruleset bzw. die aktiven Rulesets direkt eine Strategie im Kopf habt, die gut funktionieren könnte? Bei mir ist das zum Beispiel so beim Ruleset Equal Opportunity. Da denke ich direkt daran eine Strategie mit dem Life Splinter mit viel Armor zu spielen. Warum werdet ihr im heutigen Blog erfahren. Die Strategie ist übrigens auch mit dem Ruleset Melee Mayhem und teilweise auch Super Sneak gut spielbar, Hauptsache Melee Attacker können von den hinteren Positionen angreifen.
| Equal Opportunity | Melee Mayhem | Super Sneak |
|---|---|---|
| | |
Ich möchte euch heute im Rahmen der dieswöchigen Splinterlands Social Media Challenge diese Strategie mit dem Life Splinter vorstellen und euch selbstverständlich auch ein entsprechendes Battle im Ranked Modern Format mit diesem Ruleset zeigen. Viel Spaß beim Lesen! 😊
Rulesets, Manacap und Splinters:
In meinem Battle waren drei Rulesets aktiv: Equal Opportunity, Lost Magic und Close Range. Wie bereits angesprochen ist das Ruleset Equal Opportunity essentiell für meine Strategie, um von den hinteren Positionen als Melee Attacker angreifen zu können. Lost Magic hilft meiner Strategie ebenfalls weiter, da ich sehr viel auf Armor spielen werde. Vom Ruleset Close Range werde ich vermutlich kaum bzw. gar nicht profitieren, jedoch schadet es auch nicht.
Das Manacap liegt bei 44 und ist damit eher im hohen Bereich anzusiedeln. Das ist auch erforderlich, da meine Karten die ich spielen werde, zumindest teilweise, nicht ganz billig sind. Allerdings gibt es auch einige Varianten der Strategie billigere Karten zu spielen.
Es ist lediglich das Life und das Death Splinter spielbar. Auch das ist natürlich essentiell für meine Strategie und ich kann eventuell aufgrund nur zwei verfügbarer Splinter die Strategie meines Gegners, zumindest teilweise, voraussagen.
Lineup und Strategie:
| Position | Karte | Erklärung |
|---|---|---|
| Archon | | Als Archon hatte ich keine große Auswahl und habe mich für Avina of the Wolf entschieden. Das ist aber alles andere als schlimm, weil ich sie für einen ziemlich starken Archon halte und beide Varianten meiner Strategie helfen können. Geschwindigkeit ist immer gut und die Ability Heal ist in vielen Situationen ein echter Game Changer. |
| #1 | | Ganz vorne habe ich Silverblade Fighter positioniert. Auch wenn mir die beiden Abilities Void Armor und Flank in diesem Fall vermutlich nicht weiterhelfen, ist diese Karte allein aufgrund der Stats und der hohen Armor sehr gut als Tank in der ersten Position geeignet. |
| #2 | | Direkt dahinter habe ich mit Bera Dallin eine der wichtigsten Karten dieser Strategie positioniert. Zum einen soll sie dank der Ability Armored Strike großen Schaden an den gegnerischen Monstern austeilen und zum anderen soll sie meine eigenen Monster mit Hilfe der Ability Taunt beschützen. |
| #3 | | Auf der dritten Position spiele ich Mana Warden. Der Hauptgrund warum ich ihn hier spiele ist die Ability Shield Ward, welche Bera Dallin die Ability Shield verleiht. Und da in diesem Battle keine Magic Attacker spielbar sind ist das eine unheimlich wichtige Ability. Des Weiteren kann Mana Warden dank dem aktiven Ruleset von dort angreifen. |
| #4 | | Eine weitere für diese Strategie wichtige Karte ist Skyspire Yak. Das liegt offensichtlich an der Ability Armored Strike, wodurch die Karte dank dem aktiven Ruleset mit Armor und mit Melee Attack angreifen kann. Außerdem ist die Karte billig zu spielen. |
| #5 | | Fast noch wichtiger ist da nur Nimbledook Explorer auf der fünften Position. Denn die Kombination aus Armored Strike und vor allem Protect ist quasi das Herzstück dieser Strategie. Dadurch verbessert Nimledook Explorer seinen eigenen Rüstungsangriff und den meiner anderen Monster. |
| #6 | | Auf der letzten Position habe ich Chaos Battle Mage positioniert. Das hat jetzt nicht unbedingt was mit meiner Strategie zu tun, aber ich hatte noch Mana und einen Platz übrig. Außerdem profitiert die Karte vom Ruleset Close Range, da sie dadurch theoretisch auch von der ersten Position aus angreifen kann. |
Warum spiele ich diese Karten bzw. diese Strategie nun in dem Ruleset Equal Opportunity? Ich denke dem ein oder anderen wird es bereits aufgefallen sein, dass ich drei Monster mit der Ability Armored Strike spiele. Der Angriff mit der Rüstung verhält sich wie ein Melee Attack, das heißt normalerweise können diese Karten den Angriff nur von der ersten Position aus ausüben. Dank Equal Opportunity können meine Karten aber von jeder Position angreifen. Die Ability Protect soll diese Angriffe mit der Rüstung nochmal verstärken. Zusätzlich soll die Ability Taunt von Bera Dallin meine schwächeren Monster schützen. Und dadurch dass keine Magic Attacker verfügbar sind wird Bera Dallin in Kombination mit Mana Warden zu einem mächtigen Schutzschild.
Battle:
Mir war schon bevor ich die Aufstellung meines Gegner gesehen habe ziemlich klar, dass ich von der zweiten Variante von Avina of the Wolf Gebrauch machen werde. Das habe ich auch so getan und Bera Dallin die Heal Ability gegeben, damit sie so noch länger überlebt und mehr Angriffe aushalten kann.
Bei der Aufstellung meines Gegners muss ich ganz ehrlich sagen, dass ich nicht genau weiß was das Ziel dahinter war. Die Karte sehen etwas zusammengewürfelt aus und ich ging davon aus, dass ich vermutlich keine großen Probleme haben werde das Battle zu gewinnen. Lediglich Grimbardun Fighter kontert meine Strategie dank der Abilities Shield und Corrosive Ward etwas.
Nach der ersten Runde konnte ich bereits drei Monster meines Gegners eliminieren. Das gelang mir unter anderem durch meine Angriffe mit der Rüstung dank der Ability Armored Strike. Meine Monster dagegen haben kaum Schaden genommen, lediglich die Rüstung von Bera Dallin ist etwas angekratzt, aber ich denke das ist zu verkraften.
Nach der zweiten Runde ist nicht mehr viel von den Monstern meines Gegners übrig. Der gegnerische Grimbardun Fighter hat nur noch einen Lebenspunkt und wird als nächstes eliminiert und der gegnerische Ulundin Overseer hat keinen Angriff und ist somit keine Bedrohung für mich. Meine Monster haben mittlerweile einiges an Rüstung verloren, was an der Corrosive Ward Ability liegt und ein Konter für meine Strategie ist.
Das Battle hat dann noch etwas gedauert, bis ich auch die letzten Lebenspunkte von Ulundin Overseer reduzieren konnte. Letztendlich habe ich das Battle aber wenig gefährdet gewonnen.
GG an meinen Gegner @umekko!
Der Sieg war nicht wirklich in Gefahr, das muss ich zugeben. Trotzdem fand ich dieses Battle perfekt, um meine Strategie vorzustellen und wollte es euch deshalb nicht vorenthalten.
Außerdem habe ich von diesem Battle gelernt, dass die Ability Corrosive Ward, die ich meistens für nicht sehr gut halte, in diesem Fall einen richtigen Usecase hat.
Letzte Worte:
Ich bin ein großer Fan der Armored Strike Ability, welche für diese Strategie unerlässlich ist. Außerdem mag ich die Strategie gerne, da sie meines Erachtens von anderen Spielern eher weniger gespielt wird und somit nicht so bekannt ist. Noch wichtig zu erwähnen ist, dass die Strategie einige Konter in der aktuellen Meta hat, allen voran Teams mit Eternal Tofu. Und da es ein Life Archon ist, wird Eternal Tofu fast immer spielbar sein, wenn auch diese Strategie spielbar ist.
Ich habe für heute genug geschrieben, jetzt seid ihr gefragt. Was haltet ihr von dieser Strategie? Spielt ihr vielleicht sogar eine ähnliche Strategie? Über einen Austausch in den Kommentaren würde ich mich sehr freuen. Wie immer ist der Service von @commentrewarder aktiviert. Vielen Dank fürs Lesen bis hierhin und ich wünsche euch eine gute Zeit! 😊

Why I'm blogging about Splinterlands?
I want to increase the growth of my Hive and Splinterlands account with the rewards of blogging about my experiences, tactics and much more on Splinterlands.
Not playing Splinterlands yet?
You can use my link to sign in. Write me a message or a comment under this post and I will help you to start!

I like this kind of analysis of skills and battle strategies, testing them in combat is very helpful for people who need to learn new combinations
Thanks! :)
I am glad to hear that I can help some people with this kind of blogs.
Yeah, I don't know quite what your opponent was going for with that line up. Kinda seems like they didn't quite get the rule sets.
Yes absolutely. But hey, I take the win. 😁
yeah, overseer is a great card in many situation, but super sneak is not one of them since it's just gonna sit there while other units take the brunt of the damage.
One thing i hadn't thought about much was how much more potent armour is when magic is out of the mix.
A domimating win, nice battle! The armor was just too much for the enemy to handle.
Thanks!
https://www.reddit.com/r/Splinterlands/comments/1mdf37p/a_strategy_with_armor_as_a_strong_attack_type/
This post has been shared on Reddit by @flummi97 through the HivePosh initiative.
[@PowerPaul:]
Hey! Because of your participation in the @CryptoCompany community and your participation in the "Banner for Boost" campaign you received a vote from your CryptoCompany and its trail! Thank you & Hive a great day!
Recent posting from @PowerPaul or the CryptoCompany network:
by @cryptocompany
by @powerpaul
Thanks for sharing! - @mango-juice

@flummi97, I paid out 0.460 HIVE and 0.096 HBD to reward 4 comments in this discussion thread.