| CREAZIONE APPLICAZIONE CALCOLATRICE | FINALE

ben tornati a tutti!!,nello scorso post eravamo arrivati quasi alla fine del nostro progetto, ho notato che vi è piacito molto e quindi sono di nuovo qui per spiegarvi il finale, quello che andremo a fare oggi sarà completare la parte grafica e aggiungere il calcolo finale...non perdiamo tempo e andiamo!!
Dall'ultima volta abbiamo effettuato delle modifiche, che ora vi spiegherò, non preoccupatevi, quello che faremo sarà settare i nostri pulsanti per le operazioni, abbiamo principalmente bottoni, moltiplicazioni, divisione, sottrazione e addizione, tolto ovviamente quello dell'uguale.
Per fare ciò ci tocca creare un array, che contenga le operazioni.
Come abbiamo visto negli scorsi post, l'array non è altro che un contenitore di dati, può essere utilizzato quando abbiamo grandi quantità di dati da gestire, perché per utilizzarlo basta farlo scorrere con dei costruttori.
per la creazione in android studio utilizziamo il seguente comando:
private val arrayNumeri = mutableListOf<Int>()
In questo caso sarà un array di tipo intero, quindi potrà contenere solo un tipo di dato intero.

Dopo aver fatto ciò continuiamo con il nostro progetto, all'interno dei bottoni delle operazioni dovremmo inserire un pò di dati,per prima cosa inseriamo l'array, dopo di che l'operazioni che dovrà eseguire il nostro bottone,per farlo usiamo il comando forEach.
Eseguiamo questi procedimenti per tutti i nostri bottoni delle operazioni,tranne per il bottone equals.
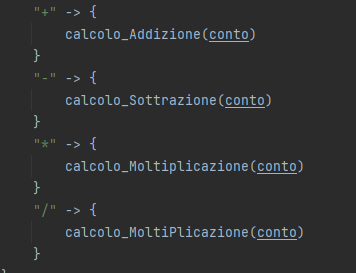
Per il settaggio del bottone equals utilizzeremo un metodo un pò particolare, creeremo uno switch, ed assegneremo dei casi che saranno strutturati così:
-se il bottone è uguale a + allora esegui l'addizione
-se il bottone è uguale a - allora esegui la sottrazione
-se il bottone è uguale a * allora esegui la moltiplicazione
-se il bottone è uguale a / allora esegui la divisione.
 buttonDivisione.setOnClickListener {
        arrayNumeri.add(stringaTemporanea.toInt())
        stringaTemporanea = ""
        calcoli = buttonDivisione.text.toString()
        output.text = buttonDivisione.text
        numeroDaStampare = input.getText().toString()
        input.setText(numeroDaStampare + "/")
    }
Qui sotto ho riportato l'esempio del bottone divisione, nella quale gli diciamo che se il bottone che l'utente andrà a cliccare allora eseguirà l'operazioni dei numeri eseguiti fino ad ora.
bisogna sempre ricordarsi che quando apriamo una parentesi graffa di un setOnClick bisogna sempre chiuderla, altrimenti vi darà errore sia li che nel resto del vostro codice.
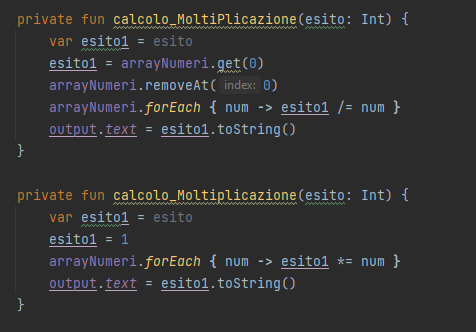
una volta arrivati a questo punto il codice è quasi finito, quello che possiamo fare è riordinarlo attraverso de metodiche non sono altro che delle funzioni utili per rendere il codice più ordinato e più corto,essendo che una volta creato non va fatto altro che richiamarlo.
Per la creazione di un metodo basta selezionare il nostro campo interessando, cliccare il tasto desto ed andare sul tasto "refactor" e dopo di che in "function"...nel quale andremo a inserire il nome del nostro metodo, eseguiamo il tutto con il resto del codice, e il gioco sarò fatto.
A questo punto il nostro codice è finito, non ci resta altro che aggiungere(se volete) un nome alla nostra applicazione e perchè no anche un logo, per provare il tutto basta collegare il telefono con il cavetto usb e andare su "run",vi installare in modo automatico l'applicazione in brevi secondi.
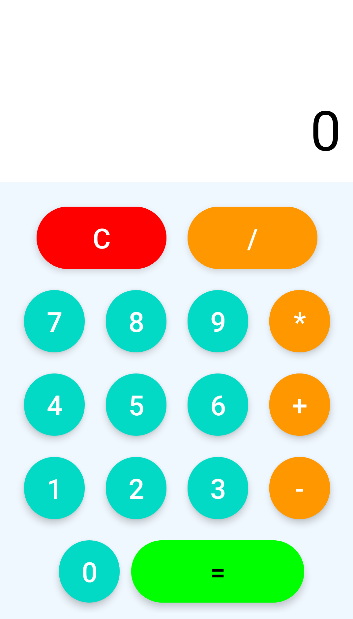
welcome back everyone!!!,in the last post we had almost reached the end of our project, I noticed that you enjoyed it very much and so I am here again to explain the ending, what we are going to do today is to complete the graphic part and add the final calculation...let's not waste time and go!!!
Since last time we have made some changes, which I will now explain, don't worry, what we are going to do is to set our buttons for the operations, we mainly have buttons, multiplication, division, subtraction and addition, removed of course the equal one.
To do this we need to create an array, which will contain the operations.
As we have seen in the past few posts, the array is nothing more than a container of data, it can be used when we have large amounts of data to handle, because to use it we just run it with constructors.
For creation in android studio we use the following command:
private val arrayNumbers = mutableListOf<Int>()
In this case it will be an array of integer type, so it can only contain one integer data type.
After we have done that we continue with our project, inside the operations buttons we should insert some data,first we insert the array, after that the operations that will have to execute our button,to do that we use the forEach command.
We perform these procedures for all our operations buttons,except for the equals button.
For setting the equals button we will use a somewhat special method, we will create a switch, and assign cases that will be structured like this:
-if the button equals + then perform addition
-if the button equals -then perform subtraction
-if the button equals * then perform multiplication
-if the button equals / then perform division.
 buttonDivision.setOnClickListener {
        arrayNumbers.add(stringTemporary.toInt())
        stringTemporary = ""
        calculations = buttonDivision.text.toString()
        output.text = buttonDivision.text
        numberToPrint = input.getText().toString()
        input.setText(numberToPrint + "/")
    }
Below I have given the example of the division button, in which we tell it that if the button the user is going to click then it will perform the number operations performed so far.
you must always remember that when we open a brace of a setOnClick you must always close it, otherwise it will give you an error both there and in the rest of your code.
once we get to this point the code is almost finished, what we can do is tidy it up through de methods are nothing but useful functions to make the code tidier and shorter,being that once created all you have to do is call it.
For the creation of a method all we have to do is select our field of interest, click the right button and go to the "refactor" button and after that to "function"...in which we are going to enter the name of our method, we execute it with the rest of the code, and we are done.
At this point our code is finished, all that's left is to add(if you want) a name to our application and why not even a logo, to try it all just plug in your phone with the usb cable and go to "run",it will automatically install the application in short seconds.
Congratulations @fraaaaa! You have completed the following achievement on the Hive blockchain And have been rewarded with New badge(s)
Your next target is to reach 200 replies.
You can view your badges on your board and compare yourself to others in the Ranking
If you no longer want to receive notifications, reply to this comment with the word
STOPCheck out the last post from @hivebuzz:
Support the HiveBuzz project. Vote for our proposal!