Hosting a Vue 3 application in .NET 6

Intro
Welcome back everyone. I'm going to start a series on Vue.js 3 development not using vue cli, which hides all the configuration from you, which is great but sometimes we want more control. Instead of using Vite or Webpack and Webpack Dev Server for bundling and running our site I'm going to show how you can use Webpack to bundle an application and host it in a .NET 6 application.
Now you may be asking why would I want to host a Vue.js application in .NET? Well there are quite a few good ones but the best ones I will give you are easy integration with Identity Server, simple configuration of the web server hosting environment and the cross platform capabilities of .NET. But wait won't this be slow since .NET is hosting the site? Nope, were going to cut out all the MVC and/or Razor pages, routing and rely on static file serving.
Getting Started
So before we start I should say that I wrote this code on Windows but have also run it on my Mac. I'm not currently running Linux and haven't in a while so the steps and tools needed will be slightly different there since only VS Code is available for compiling .NET on Linux.
Tools
So to get started we are going to need a few different tools
- Visual Studio - this is both available for Windows and Mac. The Mac version is more like the pro version and is 100% free. On Windows you will want the community edition since it is free.
- Node.js - currently I'm using an older version due to work (13.12.0) which can be found on the older releases download page. I haven't tried a newer node version but expect things should work, if you have newer you can use nvm (node version manager) and install multiple versions (I'm not going to cover this).
- npm - npm or Node package manager, this will be installed with node. If you are more familiar with yarn you can use it also but I will be using npm.
- Chrome but any browser other than IE will work.
Creating a new Project
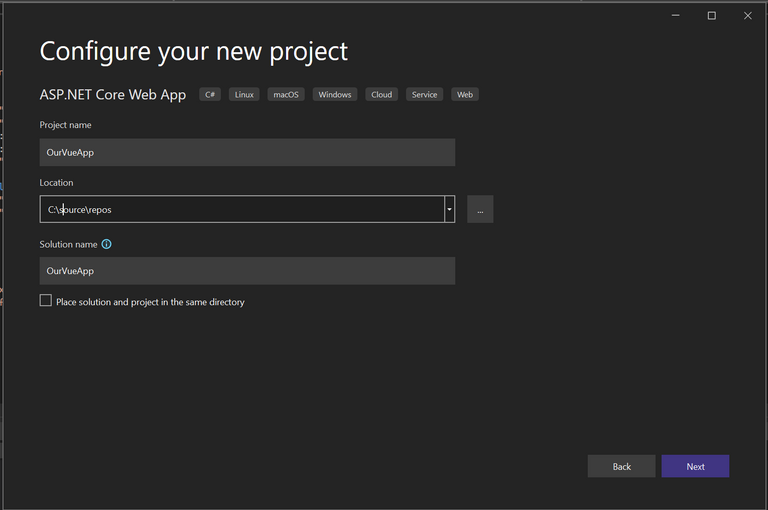
So to get our development started open up visual studio. Were going to use the ASP.NET Core Web App template as the starting point so go ahead and select that and press next.

Next we should be on the Configuration page of project setup. Here enter a name, I used OurVueApp and if your not happy with the default location go ahead and change it. Leave the solution name the same and select next.
Now you should be on the Additional Information page. Here we just leave the defaults, .NET 6 and HTTPS checked.
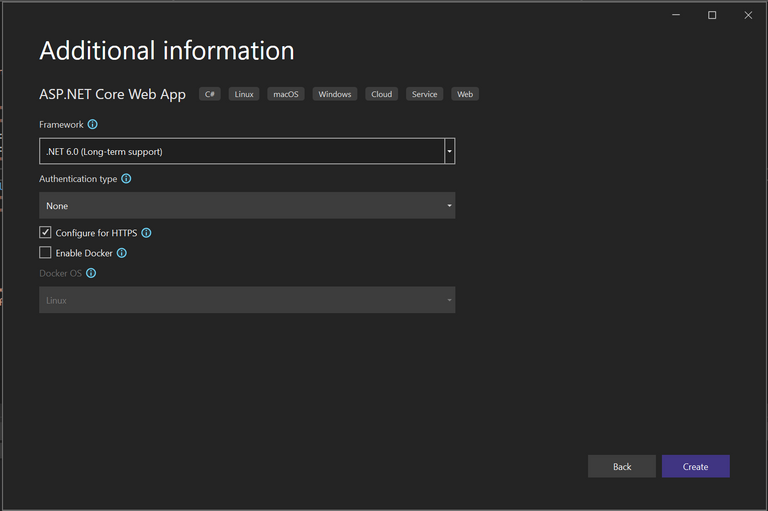
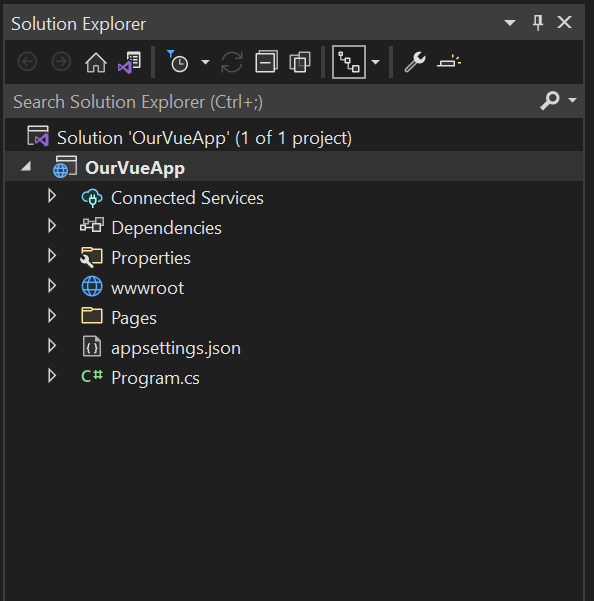
Hit next and our .net project should be bootstrapped! If you expand the solution explorer you should see all the default contents of the project. It contains Connected Services (were not using any), Dependencies (just .net core libraries), Properties, wwwroot where the application is built and served from, kind of like a publishing folder, Pages with .NET Razor pages, an appsettings.json and a Program.cs.
Cleaning Up the Default Project
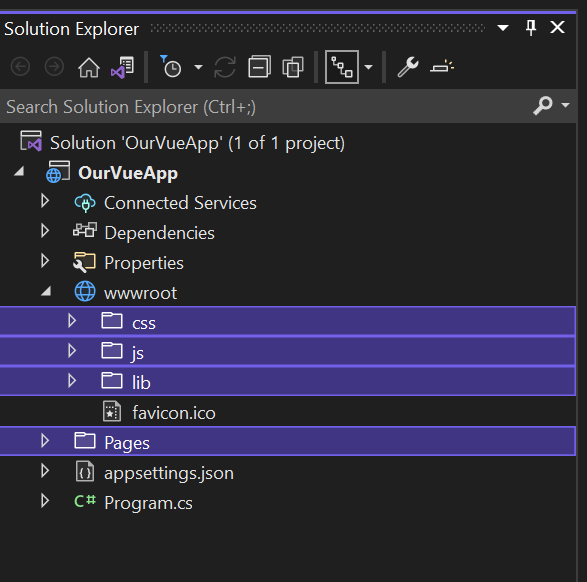
For our purposes the only things we care about right this moment are changing the application startup and behavior in Program.cs and trimming the fat or deleting the Pages folder and everything except the favicon.ico under wwwroot as seen in the next image.
Sweet so now we have a bare bones app, we now need to change the startup so we can add in our client (Vue.js) application.
Changing the Startup and Configuration
So now to the tiny bit of .NET coding were going to do. Open up Program.cs and look it over, its pretty basic and is a combination and optimization of Program.cs and Startup.cs from previous versions of .NET Core.
You can see it adds support for Razor Pages, if not development sets up an error page and turns on HSTS and then turns on a few other basic features. UseHttpsRedirection, as its name implies redirects non https request to https, UseStaticFiles allows the serving of static content, UseRouting turns on mvc routing, UseAuthorization turns on login support and MapRazorPages maps all the pages in the Pages folder to routes while finally app.Run() tells .NET to run the web server.

Deletions
So to start lets go ahead and delete a bunch of stuff, get rid of
app.UseExceptionHandler("/Error");
Followed up by removing
builder.services.AddRazorPages()
Then get rid of
app.UseRouting();

app.UseAuthorization();

app.MapRazorPages();
Additions
So to get things working all we need to do is modify the current static files call which looks like the following code snippet.
app.UseStaticFiles()
However, to give our end users the best experience while using our site we should go ahead and enable a few other features.
Response Compression
Just as its name sounds response compression uses different algorithms to compress the resources requested through a request. Things like javascript, css, html, and images all can be compressed allowing for more data to be transmitted faster.
To enable response compression we can call an add method as well as configure methods which are part of the WebApplicationBuilder class to change the compression we enable.
Just like Javascript .NET supports method chaining so we can tack this call onto the previous builder call to add HSTS and should end up with the following.
builder.AddHsts().AddResponseCompression(options =>
{
    options.EnableForHttps = true;
    options.Providers.Add<BrotliCompressionProvider>();
    options.Providers.Add<GzipCompressionProvider>();
    options.MimeTypes = ResponseCompressionDefaults.MimeTypes.Concat(new[] {
         "image/svg+xml",
         "application/xhml+xml",
         "image/x-icon" });
}).Configure<BrotliCompressionProviderOptions>(options =>
{
    options.Level = CompressionLevel.Optimal;
})
.Configure<GzipCompressionProviderOptions>(options =>
{
    options.Level = CompressionLevel.Optimal;
});
So what iss going on in this code block? Well we start by adding response compression to the .NET pipeline and we use the configuration lambda to customize default behavior. In the configuration lambda we first turn on compression for https traffic (why is this not a default???), add support for two types of compression, Brotli and Gzip and finally we add some additional mime types to the defaults that we would like compressed. Lastly we configure both Brotli and Gzip to optimal compression to get most out of response compression.
To fully turn on compression we also need to instruct the application to turn on support. This is a simple one liner
app.UseResponseCompression();
Response Caching
Another important feature we want to use is response caching. This allows us to cache js, css, html, and other content types in the users browser which helps increase performance on later return visits to the site. We will also use cache busting techniques in our webpack build to ensure that new builds get served when we publish new versions and users shouldn't have to empty their cache.
Just like adding the response compression we use the WebApplicationBuilder to add caching to the pipeline, however we don't need to configure anything so this is a simple one liner.
builder.AddResponseCaching();
Just like with response compression we also need to tell the app to use response caching, this can be chained on the call to AddResponseCompression() or as its own one liner.
app.UseResponseCaching();
Static Files
Now that we have the features we want enabled we can get to the heavy lifting by configuring how we handle static files. First we need to configure a default static file to serve and then what happens on the request of that file.
Default Static File
The default static file is if you haven't guessed the index.html file that our webpack build will produce. By having .NET always serve this file it means all requests go to the client application and not the .NET routing engine. To set this up we need to call a helper method UseDefaultFiles on the WebApplication object, this call takes a list of file names that are considered the default static files, we only have one but still need to initialize the list.
app.UseDefaultFiles(new DefaultFilesOptions
    {
        DefaultFileNames = new List<string> { "index.html" }
    });
UseStaticFiles and Handling the Serers Response
So why do we want to mess with the response? Doesn't it just return the index.html page? Well no, the response actually handles all resources that the request is asking for and in the case of a website this could be one of many js, css, html or other resources. Okay but why do we want to mess with the response? Well remember how we turned on support for response caching? Well we didn't do anything with it so were going to tap into the response to set some headers and change resource caching based on the type of resource requested.
We want to configure a policy that does not allow our index.html page to be cached sine it lists all the js and css resources we are using and should we cache the index page when we do a new build our users will be stuck with the old version of the site unless they clear their browser. Instead we will set cache-control no-cache on the html page and cache-control max-age on everything else. To do this we will change the default call to UseStaticFiles() that was bootstrapped into our application and we will end up with something like the following.
app.UseStaticFiles(new StaticFileOptions()
{
  OnPrepareResponse = ctx =>
  {
      if (ctx.File.Name.EndsWith(".html"))
      {
          ctx.Context.Response.Headers.Add("Cache-Control", "no-cache, no-store");
          ctx.Context.Response.Headers.Add("Expires", "-1");
      }
      else
      {
          ctx.Context.Response.Headers.Append(
              "Cache-Control", $"public, max-age={cachePeriod}"
          );
      }
  }
});
So just like we discussed above we change the UseStaticFiles() handler to use the OnPrepareResponse event of anew StaticFileOptions() to access the response before its sent from the server. If the file is a html file we set the no-cache and expire it so that the file never gets cached, otherwise we set the max-age. Typically for production something > 7 days is great and for dev ~10 minutes. The following will set the cachePeriod variable to the appropriate
var cachePeriod = app.Environment.IsDevelopment() ? "600" : "604900";
// dev 10 mins, otherwise 7 days and some change
Putting It All Together
Congrats! You have now finished configuring the .NET side of things and are ready to get started on the Vue.js client application! Now that we finished our code should look like the following.
using Microsoft.AspNetCore.ResponseCompression;
using System.IO.Compression;

var builder = WebApplication.CreateBuilder(args);

// Add services to the container.
builder.Services.AddHsts()
.AddResponseCompression(options =>
{
    options.EnableForHttps = true;
    options.Providers.Add<BrotliCompressionProvider>();
    options.Providers.Add<GzipCompressionProvider>();
    options.MimeTypes = ResponseCompressionDefaults.MimeTypes.Concat(new[] { "image/svg+xml", "application/xhml+xml", "image/x-icon" });
}).Configure<BrotliCompressionProviderOptions>(options =>
{
    options.Level = CompressionLevel.Optimal;
})
.Configure<GzipCompressionProviderOptions>(options =>
{
    options.Level = CompressionLevel.Optimal;
}).AddResponseCaching();


var app = builder.Build();

if (!app.Environment.IsDevelopment())
{
    app.UseHsts();
}

app.UseHttpsRedirection();
app.UseResponseCompression()
    .UseResponseCaching();

var cachePeriod = app.Environment.IsDevelopment() ? "600" : "604900"; // dev 10 mins, otherwise 7 days and some change

app.UseDefaultFiles(new DefaultFilesOptions { DefaultFileNames = new List<string> { "index.html" } })
   .UseStaticFiles(new StaticFileOptions()
    {
        OnPrepareResponse = ctx =>
        {
            if (ctx.File.Name.EndsWith(".html"))
            {
                ctx.Context.Response.Headers.Add("Cache-Control", "no-cache, no-store");
                ctx.Context.Response.Headers.Add("Expires", "-1");
            }
            else
            {
                ctx.Context.Response.Headers.Append("Cache-Control", $"public, max-age={cachePeriod}");
            }
        }
    });


app.Run();
The Vue Side of Things
So now were ready to add our Vue.js application to the project. Were going to create our Vue.js application in its own folder and keep it removed from all the possible .NET code a project may contain so we can easily manage a separation between our front end code and back end code.
Project Setup
Lets start by adding a new folder to the project and give it a name of ClientApp. Under this folder add two files main.js and App.vue. For now just leave them as is and go ahead and add a folder under ClientApp named public and add a file index.html to it. When you do this you should have the following in your solution explorer.
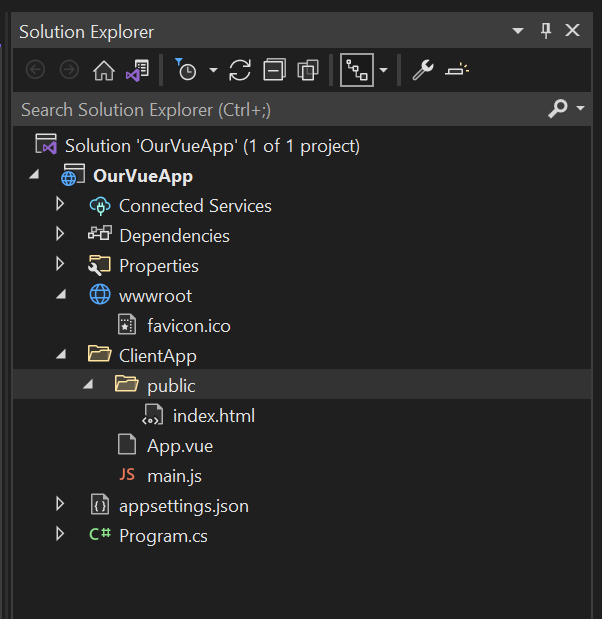
Great so this is going to be the basic layout of our application. Don't worry that we left everything blank and the default html in the index page, we will get to all that shortly. Also if you are familiar with vue-cli generated projects than think of the ClientApp folder as the src folder, it will be all source and tests while configuration will live outside of this folder just like a cli project, if you're not then don't worry as I will cover generating a cli project in another post.
Configuration and Build files
Now that we have the basic layout of the project lets go ahead and add all the files we will need for building and configuration. All these files will be added at the project root unless otherwise noted.
package.json
Package.json if you're not familiar at its basic level is a file that describes our application and what javascript packages are used to build it. There are more advanced uses like linter or test configuration but we won't be using it for that. I do highly suggest that you read up about package managers (npm, yarn) to get a better understanding of their uses. Anyways to get started we will define this file as follows.
{
  "name": "OurVueApp",
  "version": "1.0.0",
  "description": ".net core vue app host",
  "main": "main.js",
  "private": true,
  "scripts": {
    "dev": "cross-env NODE_ENV=development webpack --progress --watch --hot",
    "build": "cross-env NODE_ENV=production webpack --progress"
  },
  "dependencies": {
    "@babel/runtime": "7.17.2",
    "axios": "0.26.0",
    "core-js": "3.21.0",
    "regenerator-runtime": "0.13.9",
    "vue": "3.2.31",
    "vuex": "4.0.2",
    "vue-router": "4.0.4"
  },
  "devDependencies": {
    "@babel/core": "7.17.4",
    "@babel/plugin-syntax-dynamic-import": "^7.8.3",
    "@babel/plugin-transform-runtime": "7.17.0",
    "@babel/preset-env": "7.16.11",
    "@vue/compiler-sfc": "3.0.9",
    "babel-eslint": "10.1.0",
    "babel-loader": "8.2.3",
    "clean-webpack-plugin": "^3.0.0",
    "cross-env": "^7.0.3",
    "css-loader": "6.6.0",
    "eslint": "8.9.0",
    "eslint-config-airbnb-base": "14.2.1",
    "eslint-config-standard": "14.1.1",
    "eslint-friendly-formatter": "^4.0.1",
    "eslint-loader": "4.0.2",
    "eslint-plugin-import": "2.25.4",
    "eslint-plugin-node": "11.1.0",
    "eslint-plugin-promise": "5.1.0",
    "eslint-plugin-standard": "5.0.0",
    "eslint-plugin-vue": "8.4.1",
    "file-loader": "^6.2.0",
    "html-webpack-plugin": "5.5.0",
    "mini-css-extract-plugin": "2.5.3",
    "optimize-css-assets-webpack-plugin": "6.0.1",
    "path": "^0.12.7",
    "postcss": "8.4.6",
    "sass": "1.49.7",
    "sass-loader": "10.2.1",
    "style-loader": "^0.23.1",
    "terser-webpack-plugin": "5.3.1",
    "url-loader": "^1.1.2",
    "vue-loader": "16.8.3",
    "webpack": "5.69.0",
    "webpack-bundle-analyzer": "4.5.0",
    "webpack-cli": "4.9.2"
  },
  "author": "farpetrad.com",
  "license": "ISC"
}
Whew so theres a lot here but the basics are dependencies are things used in the runtime and dev dependencies are packages used in the building of the app. The scripts section are any node scripts we want to execute, in this case we have a dev and prod build. This setup includes babel for transpiling, eslint for file linting and various loaders to support css/sass, images, as well as prod optimizations.
babel.config.js
Why are you talking about babel? Isn't it a tower in Babylon or something? Lol well yes it is but that is not what were talking about here. Babel is a javascript library that transpiles your written javascript based on your configuration so that it can be run across many different browsers and not just those that support ES6.
For our purposes we just need a simple config so we will add targets for some browsers, specifying versions (these are older and I should update them some) as well as adding some plugins.
module.exports = (api) => {
    api.cache(true);

    const presets = [
        [
            "@babel/preset-env",
            {
                "targets": {
                    "edge": "17",
                    "firefox": "60",
                    "chrome": "67",
                    "safari": "11.1",
                    "ie":"11"
                },
                "modules":false,
                "useBuiltIns": "usage",
                "corejs": { "version": 3 },
            }
        ]
    ];

    const plugins = [
        "@babel/plugin-syntax-dynamic-import",
        "@babel/plugin-transform-runtime",
    ];

    return {
        presets,
        plugins,
        comments: true
    };
};
So nothing too crazy going on in the config. You can see we target edge, firefox, chrome, safari and ie 11. The versions I have listed are a little out of date but should be modern enough targets. In addition we add the dynamic import syntax plugin so we can support async imports for routing which we will go over in our next article as well as the transform runtime plugin which will allow reuse of babel code so it doesn't bloat our bundles.
webpack.config.js
So what is webpack? Well the simplest answer I can give you is its a web bundler. Based on your configuration it will bundle html, js, css and various other assets into bundles. Bundles are groups of resources packaged into a single file or module and loaded by the runtime and are efficient ways to send resources over the wire. Webpack is a very advanced topic so I won't go deep into it but will explain all the parts we use.
So what do we need to do? Well we need to tell webpack where our files live, where we want them to be output as well as how to load, bundle and optimize them if running production. The basics are webpack runs on rules, rules define loaders which are based on file type. These loaders can do all kinds of things, for example babel is a loader and it will transpile our javascript before bundling.
const path = require('path');

const webpack = require('webpack');
const { VueLoaderPlugin } = require('vue-loader');
const HtmlWebpackPlugin = require('html-webpack-plugin');
const { CleanWebpackPlugin } = require('clean-webpack-plugin');
const MiniCssExtractPlugin = require('mini-css-extract-plugin');
const OptimizeCssPlugin = require('optimize-css-assets-webpack-plugin');
const TerserPlugin = require('terser-webpack-plugin');

// Output location
const appOutputPath = './wwwroot/Scripts/Bundle';
const styleOutputPath = '../../Content/Styles';
const imgOutputPath = '../../Content';
const pageOutputPath = './wwwroot/';

// App lication in sln
const appbasePath = './ClientApp/';

// Paths
const scriptPath = './Scripts/Bundle/';

const environmentName = (process.env.NODE_ENV || '').trim();
const isProduction = environmentName === 'production';


console.log(`Using babel config: ${path.resolve(__dirname, './babel.config.js')}`);

module.exports = {
    context: path.resolve(__dirname, appbasePath),
    entry: {
        main: './main.js',
    },
    externals: {
        //vue: 'Vue'
    },

  mode: environmentName,
  output: {
    path: path.resolve(__dirname, appOutputPath),
    publicPath: scriptPath,
    filename: `[name]${isProduction ? '.[chunkhash]' : ''}.js`,
    sourceMapFilename: '[file].map',
  },
  resolve: {
    extensions: ['.vue', '.js', '.json'],
    alias: {
      '@': path.resolve(__dirname, appbasePath),
      components: path.resolve(__dirname, appbasePath + 'components'),
      views: path.resolve(__dirname, appbasePath + 'views'),
    }
  },
  module: {
    rules: [
      {
        test: /\.vue$/,
        exclude: /node_modules/,
        loader: 'vue-loader',
        options: {
          hotReload: isProduction ? false : true,
        },
      },
      {
        test: /\.js$/,
        loader: 'babel-loader',
        include:[
            path.resolve(__dirname, appbasePath),
        ],
        options:{
            configFile: path.resolve(__dirname, './babel.config.js'),
        }
      },
      {
        test: /\.*scss$/,
        use: [
          MiniCssExtractPlugin.loader,
          'css-loader',
          {
            loader: 'sass-loader',
              options: {
                  additionalData: "@import '@/scss/sm.scss';",
                  sassOptions: {
                    indentedSyntax: false,
                  }

            },
          },
        ],
      },
      {
        test: /\.*sass$/,
        use: [
          MiniCssExtractPlugin.loader,
          'css-loader',
          {
            loader: 'sass-loader',
            options: {
                additionalData: "@import '@/scss/sm.scss'",
                sassOptions: {
                    indentedSyntax: true,
                }
            },
          },
        ],
      },
      {
        test: /\.css$/,
          use: [
              MiniCssExtractPlugin.loader,
              'style-loader!css-loader'
          ]
      },
      {
        test: /\.(eot|svg|ttf|woff|woff2)(\?\S*)?$/,
        loader: 'file-loader',
      },
      {
        test: /\.(png|jpe?g|gif|svg)(\?.*)?$/,
        use: [
          {
            loader: 'url-loader',
            options: {
              limit: 8192,
              fallback: 'file-loader',
              name: '[name].[ext]?[hash]',
              outputPath: imgOutputPath + '/Images',
            },
          },
        ],
      },
    ],
  },
    plugins: [
        new CleanWebpackPlugin({
            verbose: true,
            dry: false,
            dangerouslyAllowCleanPatternsOutsideProject: true,
            cleanOnceBeforeBuildPatterns: [
                '**/*',
                '../../**/*.css',
                '../../*.html'
            ],
        }),

      new VueLoaderPlugin(),

      new webpack.DefinePlugin({
          'process.env.NODE_ENV': JSON.stringify(process.env.NODE_ENV),
          '__VUE_OPTIONS_API__': true,          // disables vue2 style code when set to false
          '__VUE_PROD_DEVTOOLS__': !isProduction
      }),

      new HtmlWebpackPlugin({
          title: 'Vuetemplate',
          filename: path.resolve(__dirname, pageOutputPath + 'index.html'),
          inject: true,
          template: path.resolve(__dirname, appbasePath + '/public/index.html'),
      }),

      new MiniCssExtractPlugin({
          filename: isProduction ? styleOutputPath + '[name].[hash].css' : styleOutputPath + '[name].css',
          chunkFilename: isProduction ? styleOutputPath + '[id].[hash].css' : styleOutputPath + '[id].css',
      }),
  ],
  optimization: {
      moduleIds: 'deterministic',
      chunkIds: 'named',
      runtimeChunk: {
          name: 'runtime',
      },
      splitChunks: {
          cacheGroups: {
              vendor: {
                  chunks: 'all',
                  test: /[\\/]node_modules[\\/]/,
                  enforce: true,
                  name(module) {
                      // get the name. E.g. node_modules/packageName/not/this/part.js
                      // or node_modules/packageName
                      const packageName = module.context.match(/[\\/]node_modules[\\/](.*?)([\\/]|$)/)[1];

                      // npm package names are URL-safe, but some servers don't like @ symbols
                      return `npm.${packageName.replace('@', '')}`;
                  },
              },
          },
      },
  },
};

switch (process.env.NODE_ENV) {
  case 'production':
    module.exports.devtool = undefined;
    module.exports.optimization.minimize = true;

    module.exports.optimization.minimizer = (module.exports.optimization.minimizer || []).concat([
      new OptimizeCssPlugin(),
        new TerserPlugin({ parallel: true }),
    ]);

    break;
  case 'development':
    module.exports.devtool = 'source-map';

    module.exports.plugins = (module.exports.plugins || []).concat([
      new webpack.SourceMapDevToolPlugin({
        moduleFilenameTemplate: path.relative(appOutputPath, '[resourcePath]'),
      }),
    ]);

    break;
  default:
    break;
}
Yikes! So I said webpack is complex and this is just a simple config. I will break down the important parts that relate to our solution.
Config Variables
// Output location
const appOutputPath = './wwwroot/Scripts/Bundle';
const styleOutputPath = '../../Content/Styles';
const imgOutputPath = '../../Content';
const pageOutputPath = './wwwroot/';

// App location in sln
const appbasePath = './ClientApp/';

// Paths
const scriptPath = './Scripts/Bundle/';

const environmentName = (process.env.NODE_ENV || '').trim();
const isProduction = environmentName === 'production';
So the naming of the variables should tell you whats going on but here we define some output locations as well as the entry location for webpack (appBasePath) and determine if were production or not.
Entry
context: path.resolve(__dirname, appbasePath),
entry: {
    main: './main.js',
},
The context and entry portions of the config tell webpack what the base folder it should look in is as well as the entry point to the application. Using our variables this comes out as ./ClientApp/main.js.
Output
output: {
    path: path.resolve(__dirname, appOutputPath),
    publicPath: scriptPath,
    filename: `[name]${isProduction ? '.[chunkhash]' : ''}.js`,
    sourceMapFilename: '[file].map',
  }
The output defines where files should be placed, the public path is used for resolving script locations, the file name allows us to use hashes in our file names if production (cache busting) as well as source map naming.
Html Generation
So the only other piece I will cover is how we generate and get the app. Remember the index.html file we added? Well were going to tell webpack to use it as the template for the output file. We do this through HtmlWebpackPlugin.
new HtmlWebpackPlugin({
          title: 'Vuetemplate',
          filename: path.resolve(__dirname, pageOutputPath + 'index.html'),
          inject: true,
          template: path.resolve(__dirname, appbasePath + '/public/index.html'),
      }),
So you can see we told it to give the page a title, where it should be output, that it should inject all the bundle scripts into the file and the template it should use. So we now have all the pieces tied together and we can start coding! (If you have webpack questions don't feel afraid to ask I'm more than glad to help answer as its quite complex to setup and master)
Coding the Front End
So before we write our first line of code we need to actually install all the packages we listed in package.json. To do so open a terminal in visual studio or a command prompt (I prefer a command prompt over the vs terminal). Once in the project directory, the same folder where package.json lives run the command npm i. This will start the node package manager install. You will see some warnings and if all goes right should see a message telling you it added packages and warn about any security vulnerabilities.

index.html
So go ahead and delete the contents. Were going to set this up with a few different resources from cdns so we can help optimize our site and not bundle things like google fonts or bootstrap. Using the cdn should ensure the users get these resources fast no matter where our web server is run from since most cdn services offer multiple location based hosting.
<!DOCTYPE html>
<html>
<head>
    <meta charset="utf-8" />
    <meta http-equiv="X-UA-Compatible" content="IE=edge" />
    <meta name="viewport" content="width=device-width, initial-scale=1.0" />
    <link href='https://fonts.googleapis.com/css?family=Roboto:300,400,500,700|Material+Icons' rel="stylesheet" async />
    <link rel="stylesheet" href="https://maxcdn.bootstrapcdn.com/bootstrap/4.0.0/css/bootstrap.min.css" async integrity="sha384-Gn5384xqQ1aoWXA+058RXPxPg6fy4IWvTNh0E263XmFcJlSAwiGgFAW/dAiS6JXm" crossorigin="anonymous">
    <link rel="stylesheet" href="https://use.fontawesome.com/releases/v5.3.1/css/svg-with-js.css" async />
    <title></title>
</head>
<body>
    <noscript>
        This site requires javaScript to be enabled.
    </noscript>
    <div id="app"></div>
    <div id="target"></div>
</body>
</html>
So this is pretty simple, as you can see we include some google fonts, bootstrap 4.0, and fontawesome from cdns. In addition we use meta tags to setup our vewport and compatibility. The other parts of note are our tag, you need javascript enabled since we are a bundled javascript application after all. Last we have 2
elements, the first id="app" is the mounting target for our vue application. The second id="target" is so we can take advantage of a new Vue.js 3 feature and teleport modals and other things to it as an anchor point.main.js
The entry point of our application. In our case this is going to be super simple but this is where we will expand later and import components we want to use gobally or libraries that we use for setup.
import 'core-js/stable';
import 'regenerator-runtime/runtime';

import { createApp } from 'vue'

import App from './App.vue';

const app = createApp(App)
app.mount('#app');
So whats going on? Well first we import 2 different libraries, first core-js and then regenerator-runtime. What do they do? Well core-js adds polyfills and regenerator-runtime loads the polyfils we use and need ensuring that our code will run on as many browsers as possible. Next we import a function createApp from the vue package as well as our App.vue file we created. We use the helper function to load our App.vue and then mount it to the #app div in index.html.
App.vue
Last but not least lets create our app. Were just going simple for this so were only going to add a basic template and use bootstrap classes for layout.
<template>
<div class="container-fluid">
<div class="row">
<div class="offset-2 col-8 text-center">
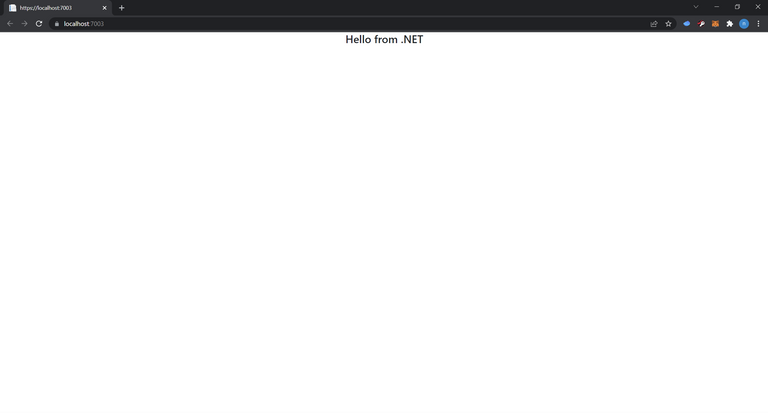
<h4>Hello from .NET</h4>
</div>
</div>
</div>
</template>
Wow that is simple. Were just going to use a container, with a row and a single 'centered' column that displays in a h4 tag Hello from .NET. Were not going to use any code yet so there is no need to define a script section or style section. In our future articles we will go over code setup in more detail but for now should be able to render our vue application!
Building and Running
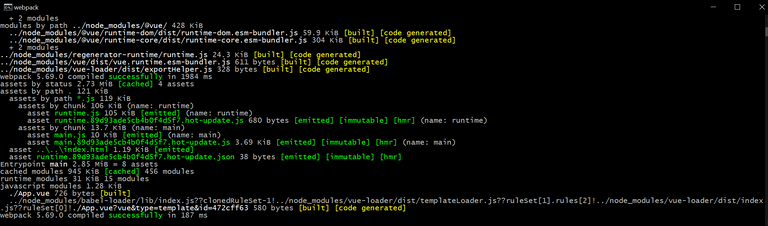
So now that we have all our code in place we should be able to actually build and run our application. To do so we can use the visual studio terminal or the command prompt (terminal on Mac) that we installed the node packages from. To do so you should be in the project directory on the command line and run npm run dev. This will kick off a build and put it into watch mode. In watch mode any time you change one of the files in the ClientApp folder it will rebuild. Since were using .NET for hosting we don't get hot reload capability but if you have your developer tools open in your browser you should be able to right click the reload button and select empty cache and hard reload. This will clear the cache and reload all the files, its a tradeoff for using .NET for hosting. If the build went well you should see something like the following
Whoo so exciting! Now in visual studio you can hit start or debug, it will kick off the .NET webserver or IIS express if you're on windows and you should see our page.
Wrapping Up
Well hope I kept you through all of that and you were excited to see how .NET and Vue.js can live and play together. Both are very different and exciting technologies but both work very well together and very happily at that. Next time we will go over creating Vue components as well as some of the Vue 3 composition api. The repo for this article is located here
Disclaimer
All screenshots taken in Visual Studio community edition or Chrome. Visual Studio is copyright Microsoft, Chrome copyright Google
Nice work @farpetrad 👍.
Thanks. Hopefully it wasn't too much information. I really enjoy sharing my knowledge.
Congratulations @farpetrad! You have completed the following achievement on the Hive blockchain and have been rewarded with new badge(s):
Your next target is to reach 600 upvotes.
You can view your badges on your board and compare yourself to others in the Ranking
If you no longer want to receive notifications, reply to this comment with the word
STOPCheck out the last post from @hivebuzz: