Tutorial Completo paso a paso, del Editor de Texto de Ecency. ESP/EN.
Imagen creada por IA para este texto y modificada con Gimp Editor de imágenes. / Image created by AI for this text and modified with Gimp Image Editor.

Español: | English |
|---|---|
Antes que nada, cordiales saludos a la comunidad de Ecency y de Hive en general. Hoy, les presento un nuevo tutorial en español del nuevo editor de texto de Ecency, con la intención de que los nuevos usuarios, al igual que algunos compañeros de la plataforma, que están acostumbrados al editor clásico, conozcan todas las herramientas de este nuevo editor en nuestro idioma. Hace poco, hice un videotutorial del editor de texto, pero realmente era muy básico, ya que solo hablaba de las funciones primarias, es decir, la colocación del texto, las imágenes y la colocación de enlaces y referencias, que es lo que normalmente utilizamos. Pero este nuevo editor, tiene muchas funciones, que debemos conocer. Y para dar un uso real a todas las herramientas que nos da esta nueva herramienta de Ecency, para realizar contenidos, atractivos y profesionales, con mucha más rapidez y eficacia que con el editor clásico, debemos conocer todo lo que el editor pone en nuestras manos. Por otro lado, debemos reconocer que muchos estamos acostumbrados al editor clásico, y como siempre, nos cuesta mucho salir de nuestro estado de confort. Razón esta, por la que muchos usuarios, no utilizan el nuevo editor, o lo hacen de manera muy esporádica y de forma muy básica. Lo que le da una gran importancia a este tutorial, como herramienta de ayuda al usuario. Es importante que el tutorial sea en español, para que la comunidad hispanohablante, que es una de las más grandes y activas de Ecency y de Hive, pueda entender bien el funcionamiento de esta herramienta, en nuestro propio idioma. Por otro lado, puedo decir, que una parte del equipo de Ecency, está muy interesada en que la comunidad hispanohablante, tenga una vida más activa tanto en la plataforma de Ecency, al igual que en el chat en español de la comunidad. Y una de las principales impulsadoras de ese proyecto es @melinda010100, que es uno de los pilares de la comunidad de Ecency. De hecho, yo, me comprometí con ella en realizar este tutorial, para ser publicado esta semana, de hecho pensaba hacerlo ayer, pero decidí, no hacer algo básico, sino muy completo, cuando recordé de una conversación que tuve con @melinda010100, cuando hubo la reciente falla en los servidores y le comenté que me sentía extraño al publicar fuera de Ecency. Después, ella me comentó que @good-karma, que es el fundador de Ecency, estaba tan pendiente de la situación, que ese día no iba a dormir, vigilando el proceso, dando respuesta a las posibles fallas y verificando las nuevas actualizaciones. Y lo cierto es, que yo, al recordarme de ese compromiso, me sentí inspirado y decidí hacer un tutorial completo del editor de texto, donde se explicará cada una de las funciones que contiene y su utilización. Por eso este tutorial es largo, ya que explica desde la colocación de texto, hasta el uso de la tarjeta de geolocalización y la encuesta. Me despido y realmente espero, que este tutorial, les ayude y les sirva para la utilización de Ecency. Mis mejores deseos para todos. | First of all, warm greetings to the Ecency community and Hive in general. Today, I present a new tutorial in Spanish of the new text editor of Ecency, with the intention that new users, like some colleagues of the platform, who are used to the classic editor, know all the tools of this new editor in our language. Recently, I made a video tutorial of the text editor, but it was really very basic, since it only talked about the primary functions, that is, the placement of text, images and the placement of links and references, which is what we usually use. But this new editor, has many functions, which we should know. And in order to make real use of all the tools that this new Ecency tool gives us, to make attractive and professional content much faster and more efficiently than with the classic editor, we must know everything that the editor puts in our hands. On the other hand, we must admit that many of us are used to the classic editor, and as always, it is very difficult for us to leave our state of comfort. This is the reason why many users do not use the new editor, or they do it very sporadically and in a very basic way. Which gives a great importance to this tutorial, as a tool to help the user. It is important that the tutorial is in Spanish, so that the Spanish-speaking community, which is one of the largest and most active in Ecency and Hive, can understand the operation of this tool well, in our own language. On the other hand, I can say that a part of the Ecency team is very interested in the Spanish-speaking community having a more active life both on the Ecency platform, as well as in the community's Spanish chat. And one of the main promoters of that project is @melinda010100, who is one of the pillars of the Ecency community. In fact, I, I committed with her to make this tutorial, to be published this week, in fact I was planning to do it yesterday, but I decided, not to do something basic, but very complete, when I remembered from a conversation I had with @melinda010100, when there was the recent failure in the servers and I commented that I felt strange to publish outside of Ecency. Later, she told me that @good-karma, who is the founder of Ecency, was so aware of the situation, that he was not going to sleep that day, monitoring the process, responding to possible failures and checking for new updates. And the truth is, when I was reminded of that commitment, I felt inspired and decided to make a complete tutorial of the text editor, where each of the functions it contains and its use will be explained. That's why this tutorial is long, since it explains from the placement of text, to the use of the geolocation card and the survey. I say goodbye and I really hope that this tutorial will help you and help you to use Ecency. My best wishes to everyone. |
Tutorial:
1- Para iniciar con la escritura de un post, le damos al símbolo del lápiz que está en la parte superior derecha. / To start writing a post, we give the pencil symbol that is in the upper right.
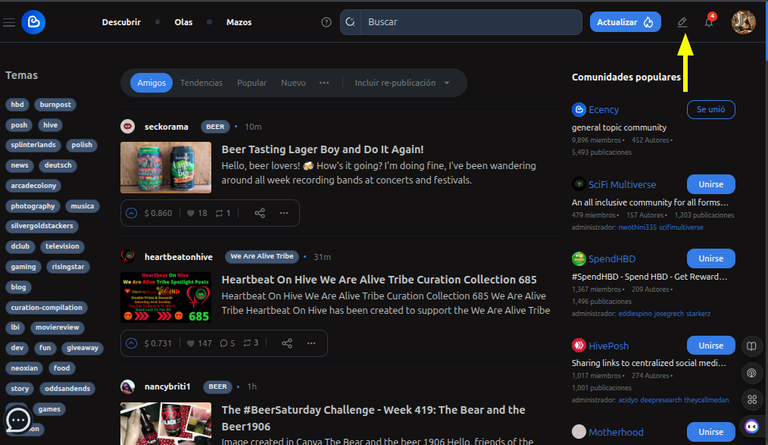
2- Para escribir el post, elegimos la comunidad, donde deseamos escribir, dando sobre nuestro icono en la pestaña "Mi blog". / To write the post, we choose the community, where we want to write, giving about our icon in the tab "My Blog".
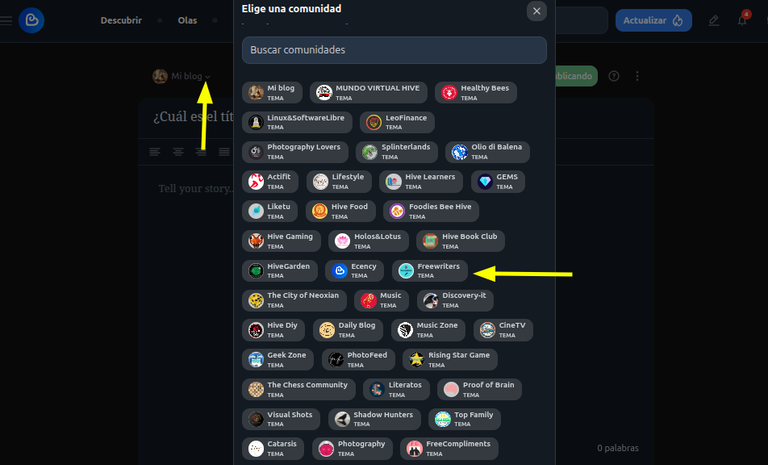
Ya estás en la comunidad donde vas a publicar. / You are already in the community where you are going to post.
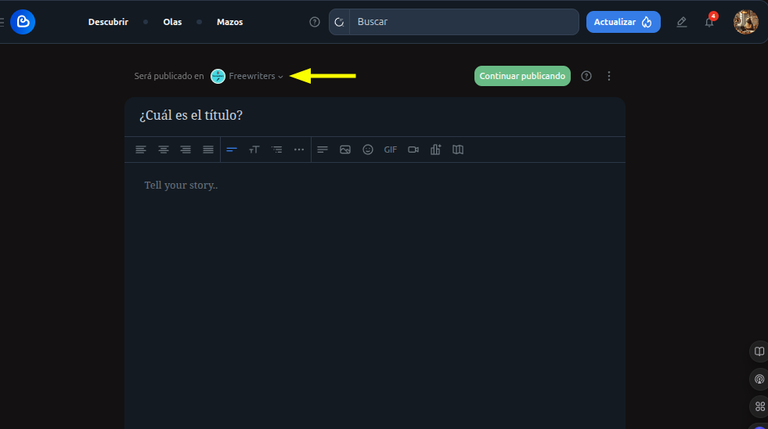
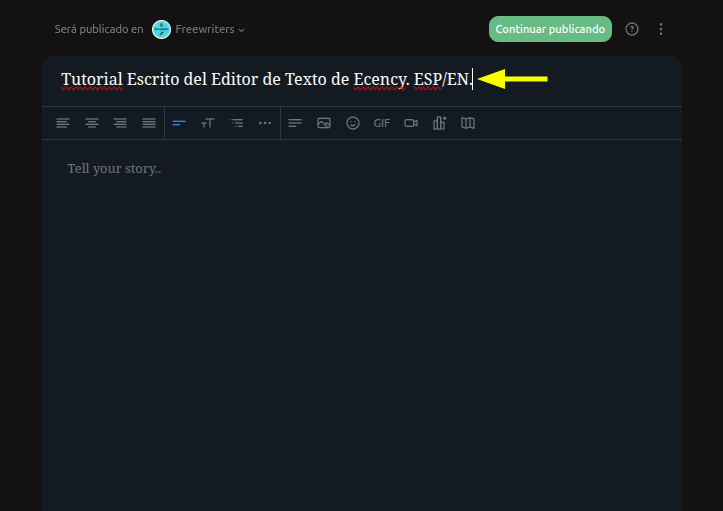
-3 Ahora viene la colocación del título. / Now comes the placement of the title.
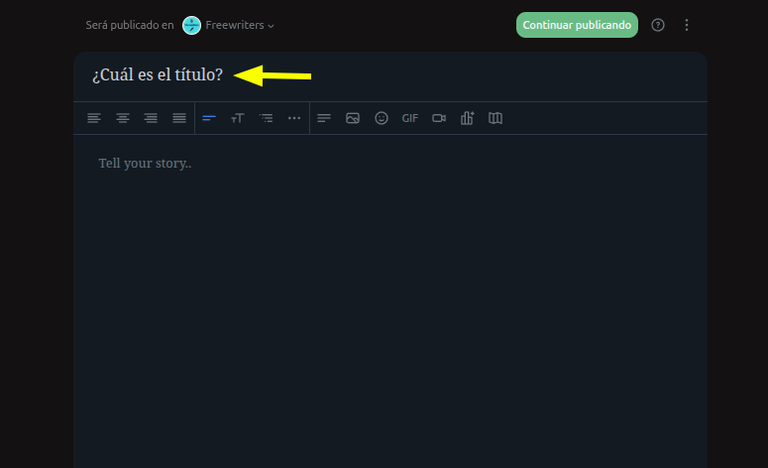
Colocamos nuestro título en el post. / We put our title in the post.
4- Ahora vamos a guardar el borrador, para que todo lo que hagamos en nuestro post se guarde de manera automática. / Now we are going to save the draft, so that everything we do in our post is saved automatically.
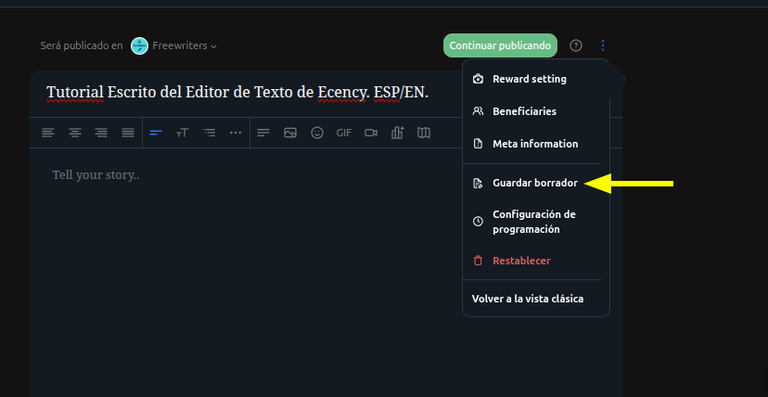
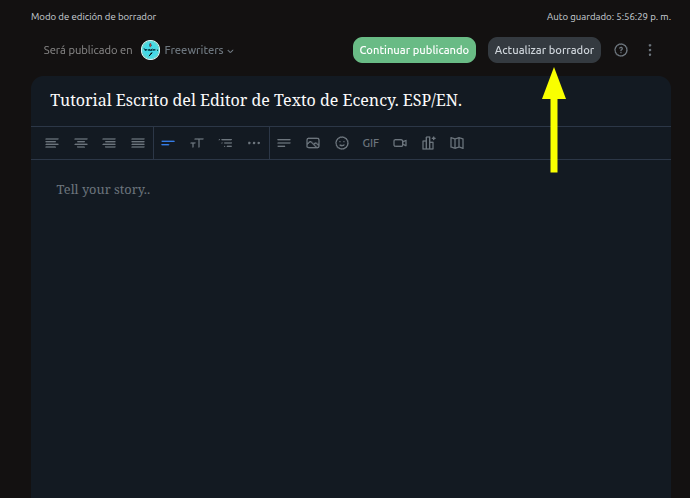
Después de guardar el borrador, nos va a salir el siguiente mensaje y el mismo saldrá, cada vez que realicemos una actividad en el post, ya que se guarda de manera automática. / After saving the draft, the following message will come out and it will come out, every time we perform an activity in the post, since it is saved automatically.
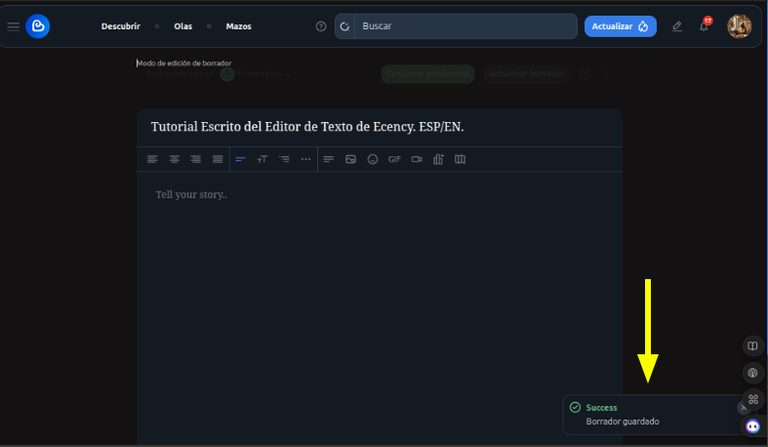
Finalmente, en la parte superior derecha del post, saldrá la pestaña "Actualizar Borrador" que también va a permitir que actualicemos el post de manera manual si lo deseamos. / Finally, in the upper right part of the post, the "Update Draft" tab will appear, which will also allow us to update the post manually if we wish.
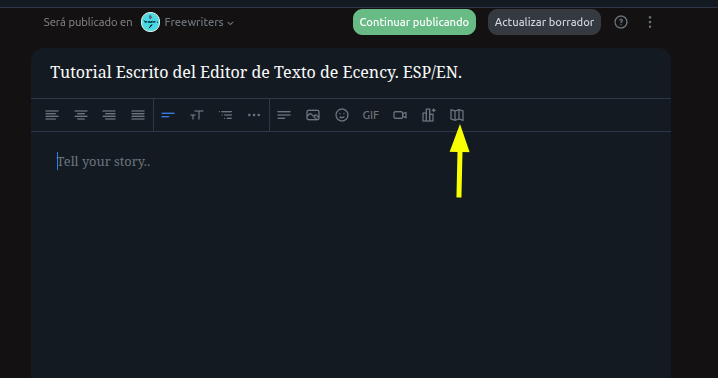
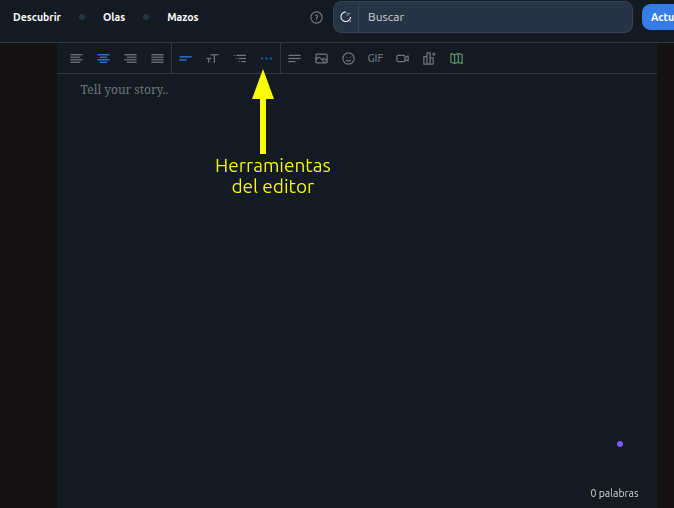
Ahora conoceremos cada una de las herramientas del editor. / Now we will get to know each of the editor's tools
1- Etiqueta Geo. Permite colocar la localización donde se realizó el post. / Geo tag. Allows to place the location where the post was made.
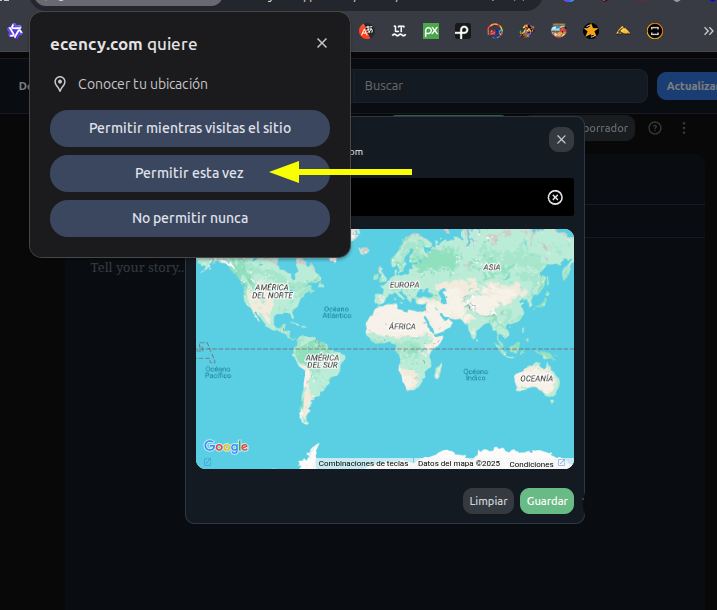
Al abrir hay que dar permiso a la aplicación. / When opening you have to give permission to the application.
Después pones una dirección cercana, tu país. Luego te va a aparecer el mapa, el cual lo aumentas o reduces con el ratón. Finalmente guardas la dirección, la cual aparecerá cuando publiques. / Then you put a nearby address, your country. Then the map will appear, which you can increase or decrease with the mouse. Finally you save the address, which will appear when you publish.
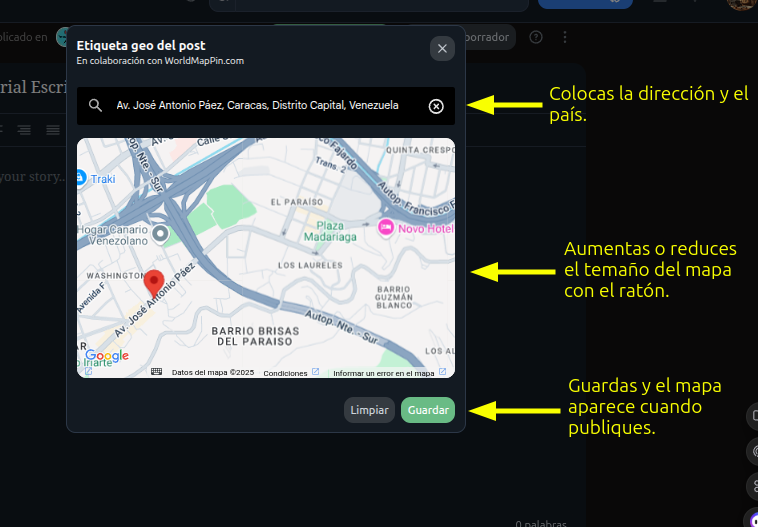
Una vez que terminas el proceso, te indica que está activada al ponerse de color verde. / Once you finish the process, it tells you that it is activated by turning green.
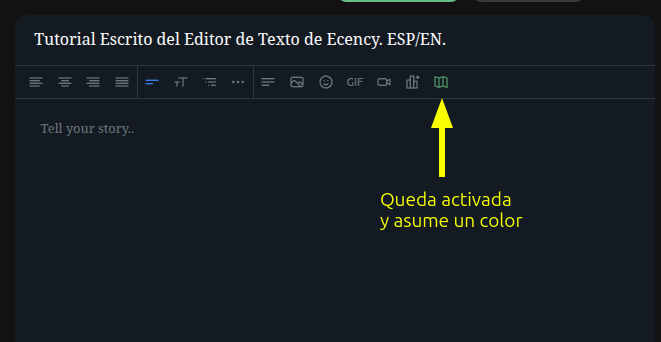
6- Pestaña de encuesta. / Survey tab.
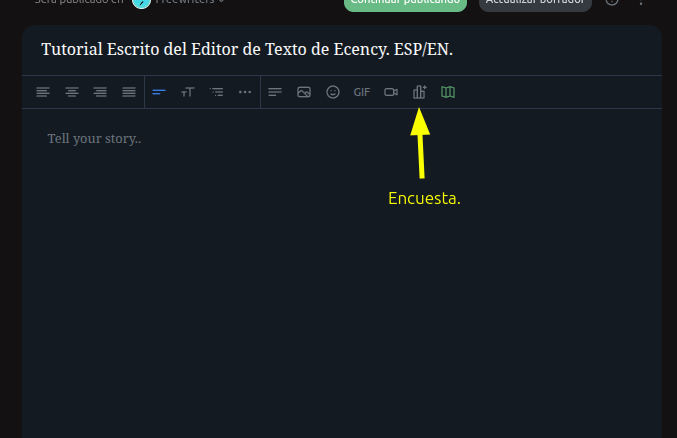
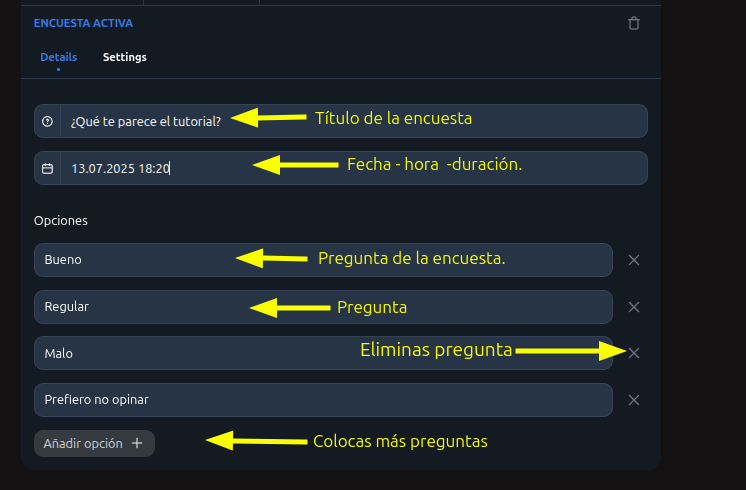
Al presiona sobre la pestaña, se abrirá una nueva ventana, en la primera línea, colocaremos el nombre de la encuesta, en la segunda se coloca la fecha de inicio y la fecha de cierre, después vienen las opciones, podemos colocar las que deseemos, para colocar una adicional le damos a la pestaña "Añadir opción", para eliminarla le damos a la "X" que esta a la derecha de la opción. / When you click on the tab, a new window will open, in the first line, we will place the name of the survey, in the second line the start date and the closing date are placed, then the options come, we can place the ones we want, to place an additional one we give to the "Add option" tab, to delete it we give to the "X" that is to the right of the option.
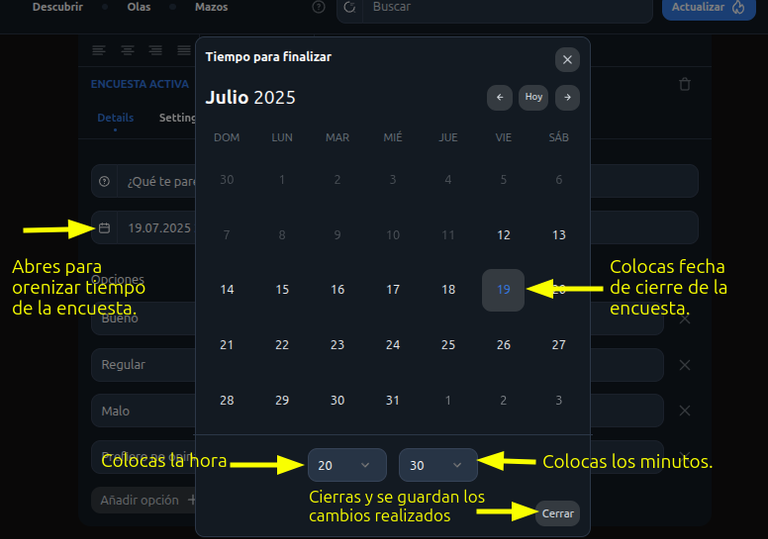
Entramos a la fecha y hora, apretando el icono de calendario en la segunda fila, luego colocamos la fecha en la que queremos que cierre la encuesta, yo le puse 5 días. Finalmente colocamos la hora de cierre de la encuesta, le damos a cerrar y ya tenemos nuestra encuesta activada con la fecha y hora que indicamos. / We enter the date and time, pressing the calendar icon in the second row, then we put the date on which we want the survey to close, I put 5 days. Finally we set the closing time of the survey, we give it to close and we already have our survey activated with the date and time we indicated.
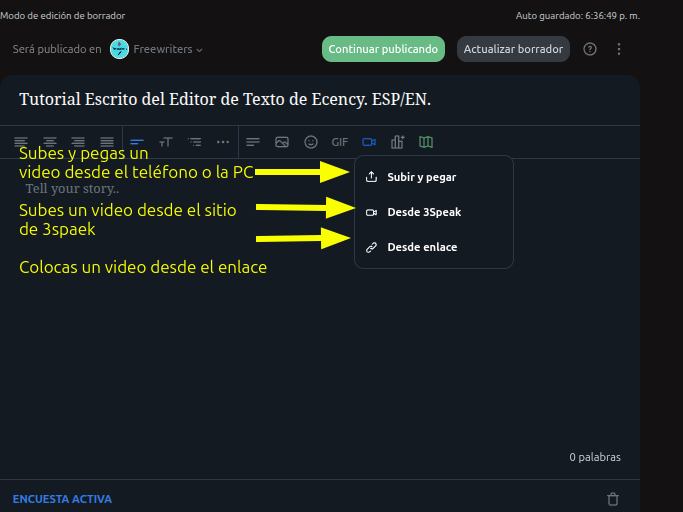
-7 Herramienta de video. / Video tool.
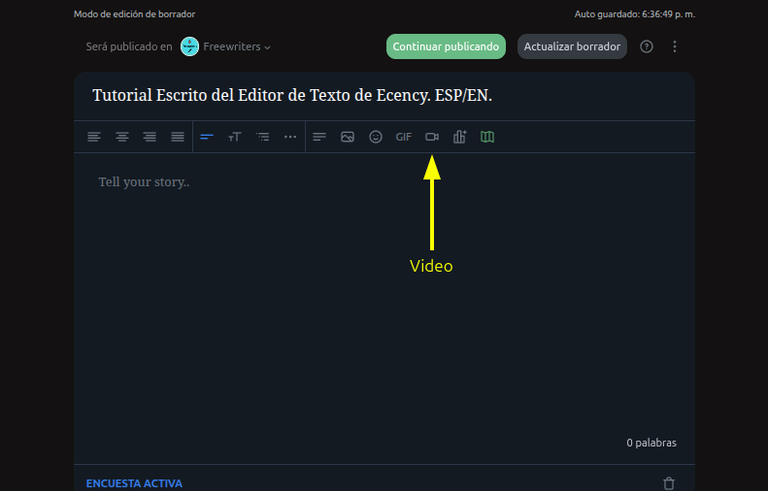
Podemos subir los vdeos desde la PC, desde el Teléfono u otro dispositivo, también podemos subir los videos con un enlace directo desde 3Speakd, o colocarlo por enlace, desde otra plataforma. No profundicé aquí ya que solo hay que seguir las instrucciones de las opciones y es realmente intuitivo y amigable, la herramienta. / We can upload the videos from the PC, from the Phone or another device, we can also upload the videos with a direct link from 3Speakd, or place it by link, from another platform. I didn't delve in here as you just have to follow the instructions of the options and it's really intuitive and friendly, the tool.
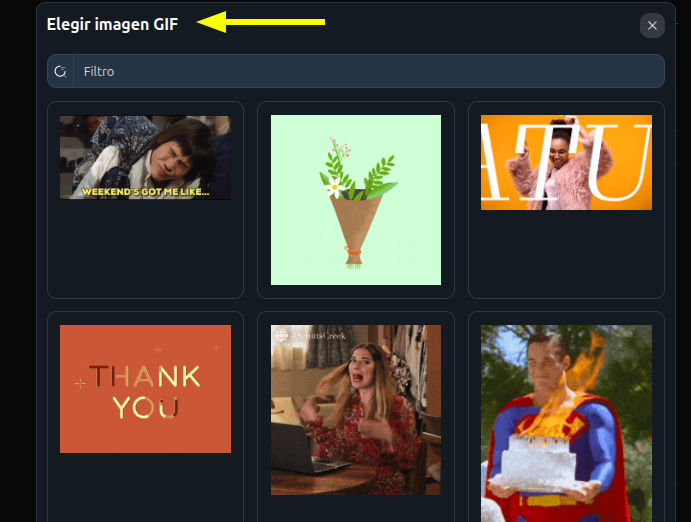
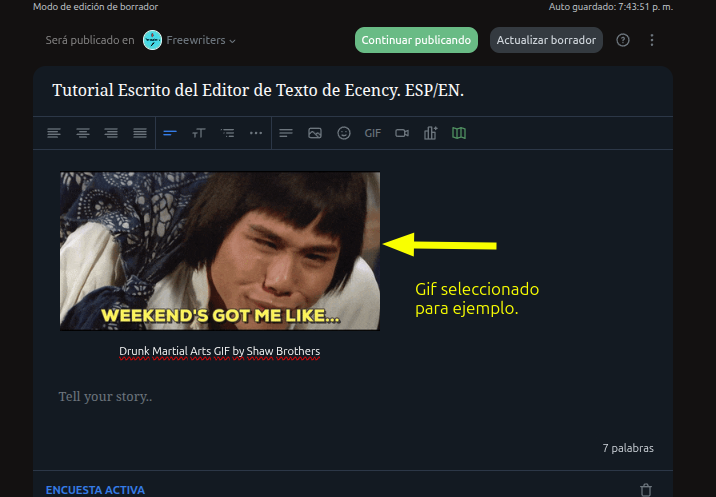
8- Herramienta de Gif.
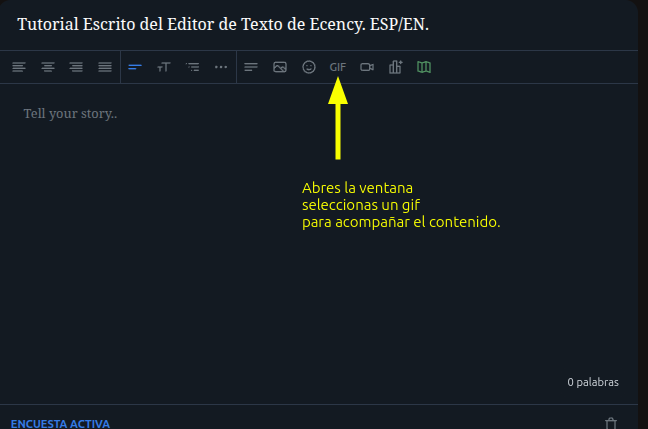
Con ella escogemos cualquiera de los gif que estén en la plataforma, lo seleccionamos y lo colocamos en nuestro post. / With it we choose any of the gifs that are on the platform, select it and place it in our post.
Gif publicado. / Gif posted.
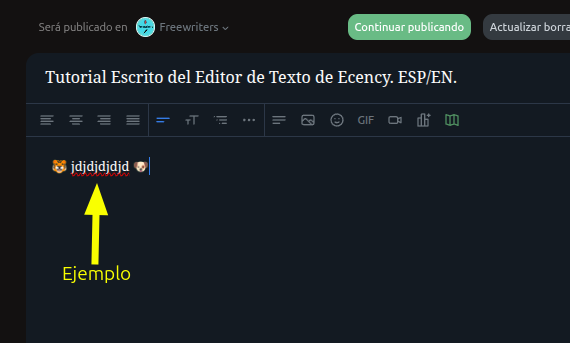
9- Herramienta Emotions.
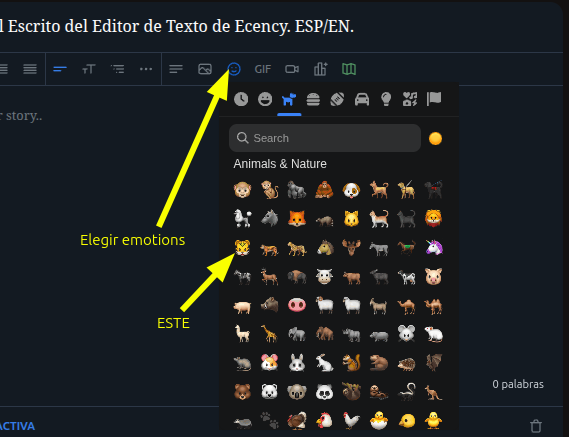
Con esta herramienta seleccionamos el emotions que queremos colocar, ya sea para acompañar nuestro texto o nuestro título. / With this tool we select the emotions that we want to place, either to accompany our text or our title.
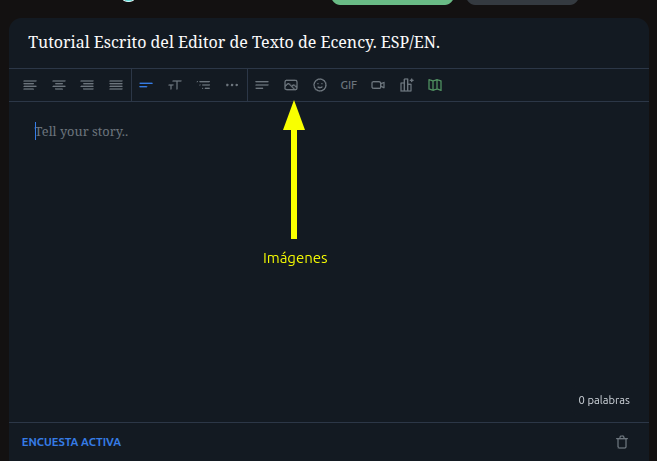
10- Herramienta imágenes. / Images tool.
Opción subir y pegar. / Option to upload and paste.
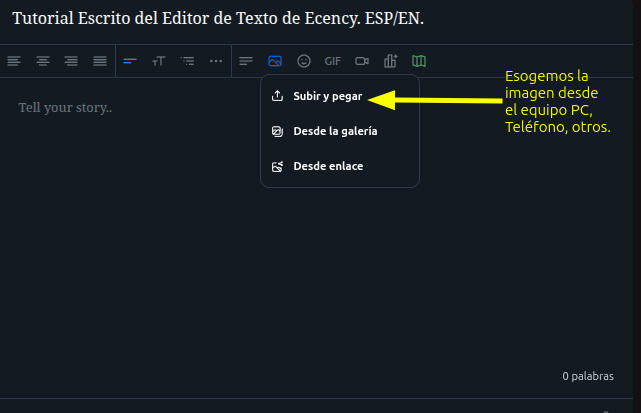
Paso 1 pulsamos en el icono de la ventana que se abre. / Step 1 click on the icon of the window that opens.
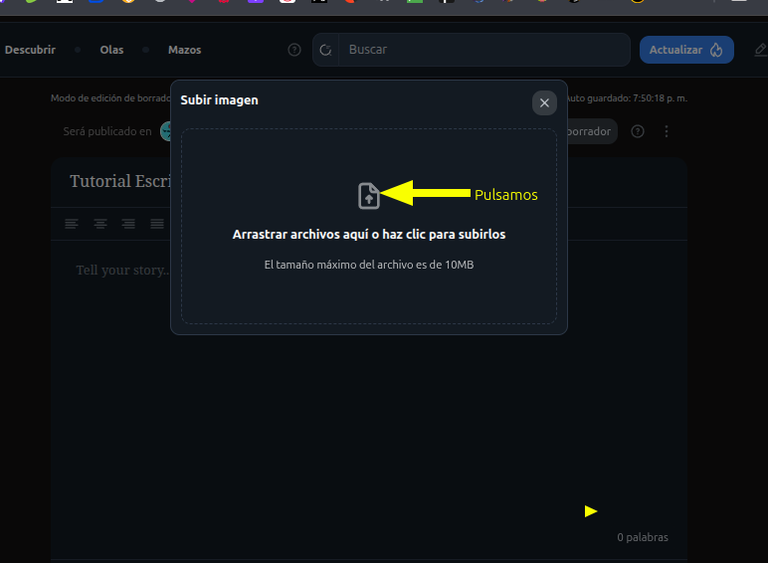
Se abre la ventana de imagen de nuestro dispositivo y seleccionamos la imagen que vamos a usar. / The image window of our device opens and we select the image that we are going to use.

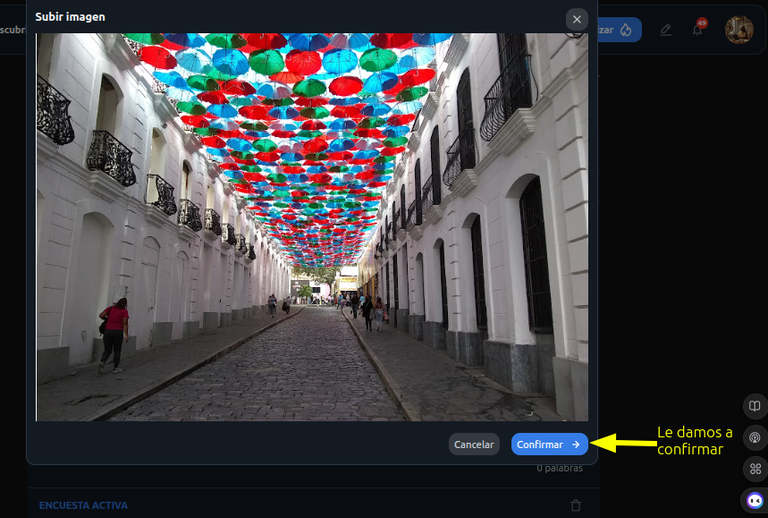
Cunado abra la imagen, le damos a confirmar. / When you open the image, we give you to confirm.
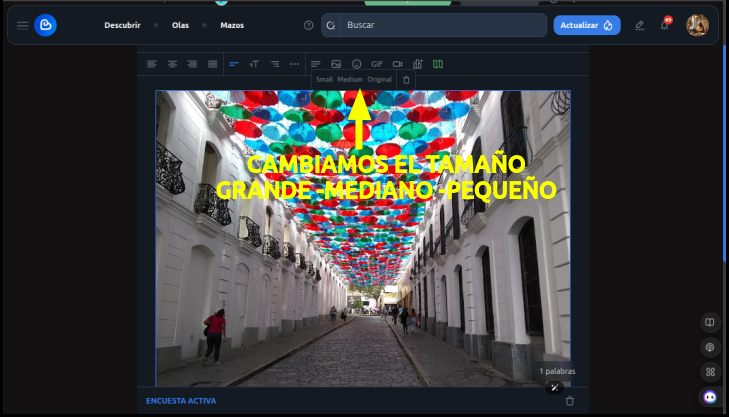
En el cuadro de dialogo que se abre en la imagen, le podemos cambiar el tamaña, a pequeño, mediano y original o grande. / In the dialog box that opens in the image, we can change the size, to small, medium and original or large.
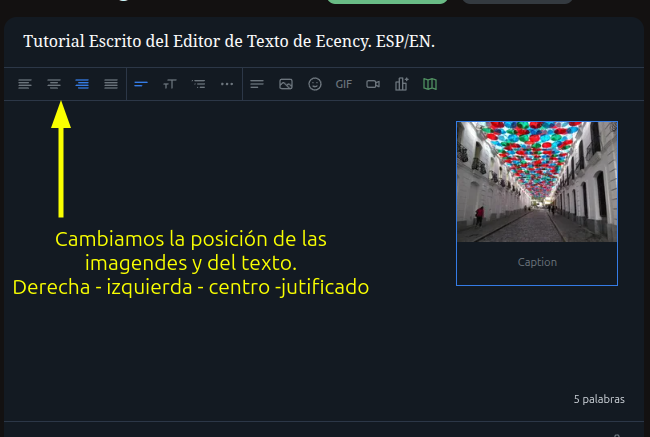
Con los primeros 4 iconos del lado izquierdo del editor, podemos cambiar la posición de la imagen, a la derecha, al centro, a la izquierda y justificado. Acá en el ejemplo, la imagen está pequeña y colocada a la derecha. / With the first 4 icons on the left side of the editor, we can change the position of the image, to the right, to the center, to the left and justified. Here in the example, the image is small and placed on the right.
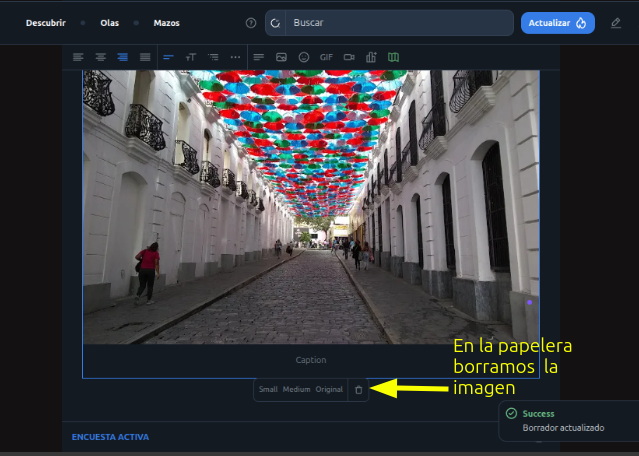
Para eliminar la imagen, le damos al símbolo de la papelera que está en cuadro de dialogo, que aparece al poner el puntero del ratón sobre la imagen. / To delete the image, we give the trash can symbol that is in the dialog box, which appears when we put the mouse pointer over the image.
11- Subir imágenes desde la galería. / Upload images from the gallery
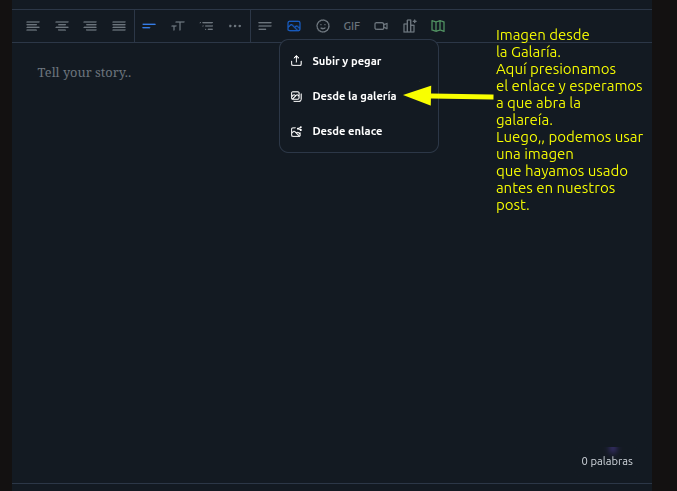
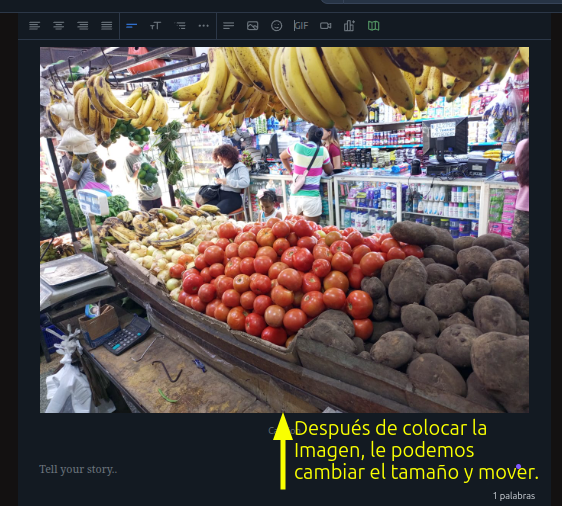
Presionamos donde dice galería, esperamos a que abra la ventana, luego escogemos la imagen que queremos usar, presionamos sobre ella con el ratón y la imagen se publica. / We press where it says gallery, wait for the window to open, then choose the image we want to use, press on it with the mouse and the image is published.
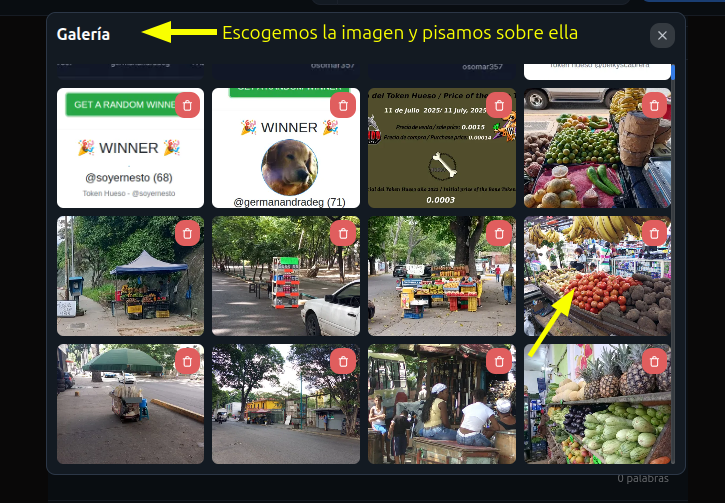
Después de colocar la imagen, podemos cambiar el tamaño y la posición, como vimos antes. / After placing the image, we can change the size and position, as we saw before.
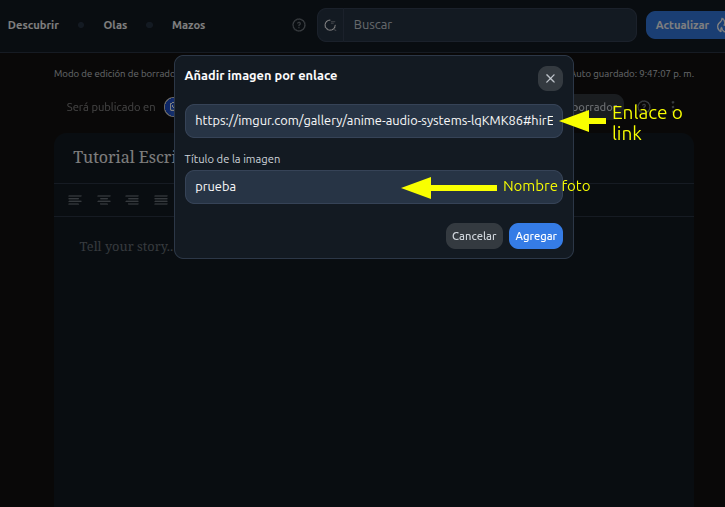
12- Publicar imagen desde un enlace. / Post image from a link.

Colocamos el enlace de la imagen que queremos subir. Recuerda que la imagen debe ser de una página de imágenes, abajo colocamos el nombre de la imagen y después le damos agregar, y así la colocamos en nuestro post. / We put the link of the image we want to upload. Remember that the image must be from a page of images, below we put the name of the image and then we give add, and so we place it in our post.
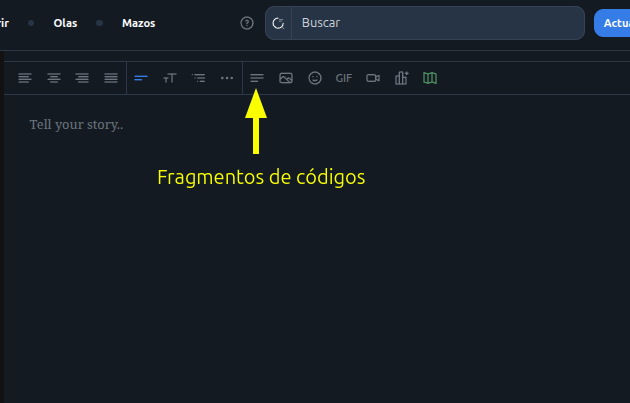
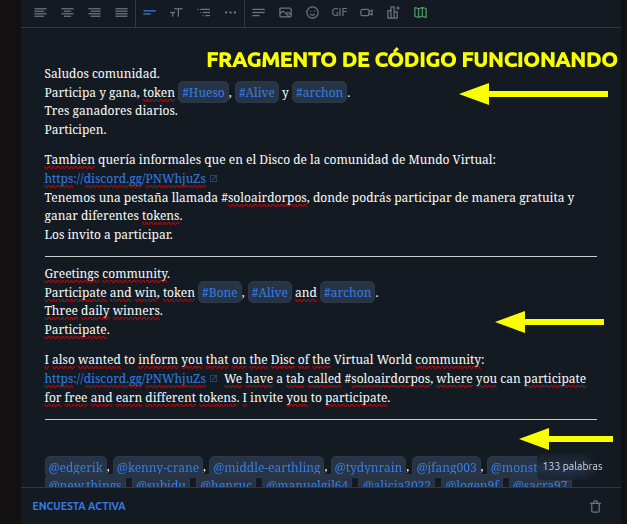
13- Herramienta fragmentos de códigos. Code snippets tool.
Varios compañeros me han comentado que los fragmentos de código, le dan error en el editor nuevo. Eso solo pasa, cuando el código, tiene fragmentos de HTLM. Como cuando vamos a poner una dirección web que usamos este código: [xxx] (uuu). Al usar un código con HTLM, el editor nuevo no lo va a aceptar, debido a que los enlaces web ahora se ponen de forma automática en el editor de texto nuevo. Los códigos con HTLM, sirven para el editor clasico y para los comentarios. / Several colleagues have told me that the code snippets give you error in the new editor. That only happens, when the code, has HTLM fragments. Like when we are going to put a web address we use this code: [xxx] (uuu). When using a code with HTLM, the new editor will not accept it, because the web links are now automatically put in the new text editor. The codes with HTLM, serve for the classic editor and for the comments.
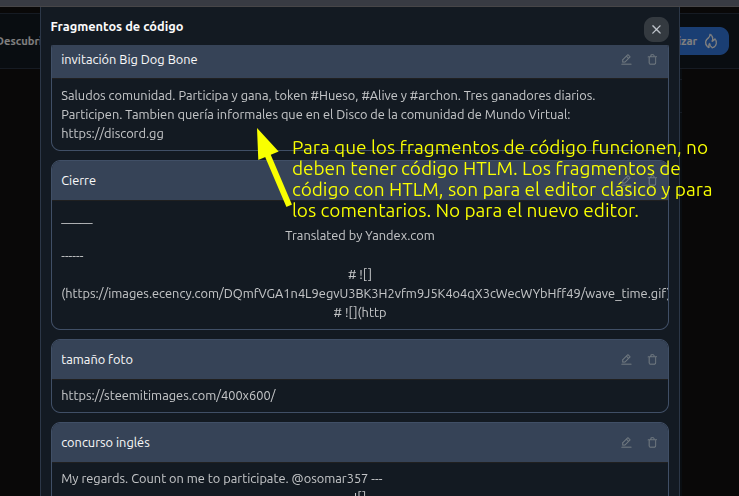
Aquí está el fragmento de código funcionando, solo me causa errores cuando le coloco HTLM. / Here is the code snippet working, it only causes me errors when I put HTLM to it.
14- Ahora vamos a ver parte de las herramientas del editor, que están en los tres puntos, y que nos sirven, para organizar mejor nuestros post. / Now we are going to see part of the editor tools, which are in the three points, and which serve us, to organize our posts better.
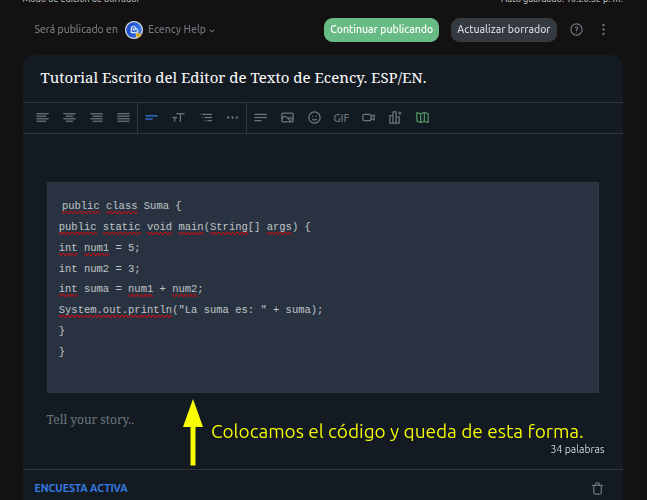
Herramienta del bloque de códigos. La usamos cuando estamos escribiendo códigos de computación, para que queden resaltados. / Code block tool. We use it when we are writing computer codes, so that they are highlighted.

Cuando colocamos el código en esta herramienta se ve de esta manera en la publicación. / When we put the code in this tool it looks like this in the post
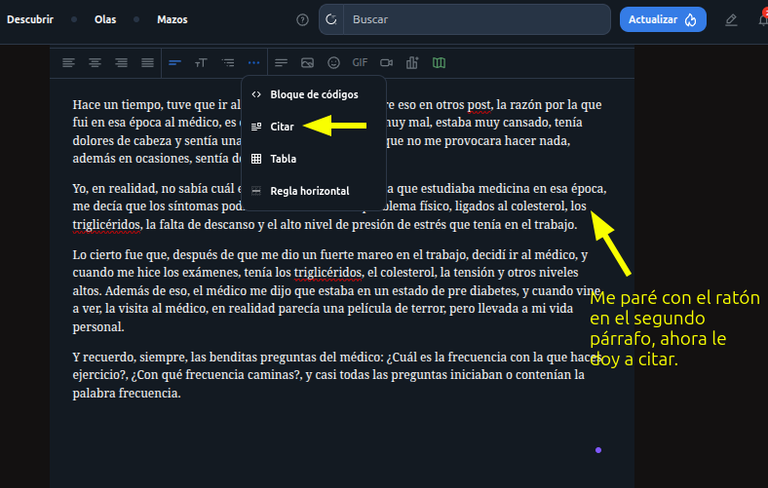
-15 Herramienta citar. / The citation tool.
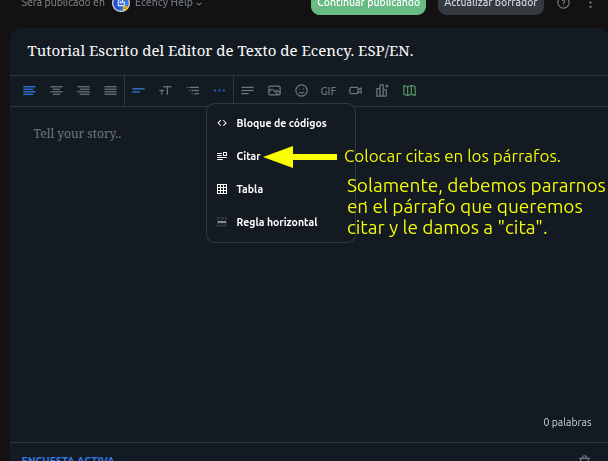
Colocamos el texto, nos paramos en el párrafo o sección del texto que queremos citar, con el ratón, después vamos a los tres puntos, le damos a citar y listo. / We place the text, we stop at the paragraph or section of the text that we want to quote, with the mouse, then we go to the three points, we give it to quote and that's it.
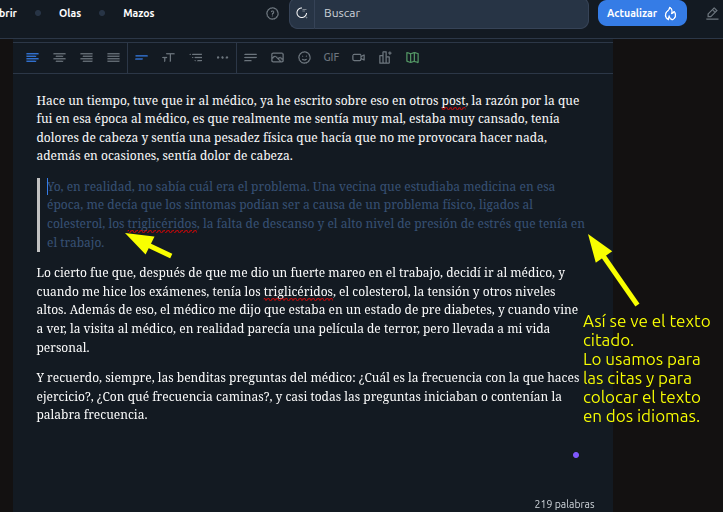
Así queda el testo citado en el post. / This is the test quoted in the post.
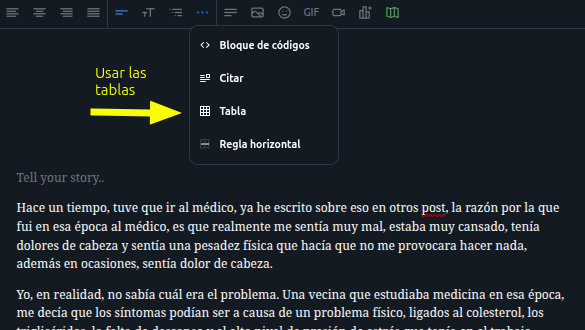
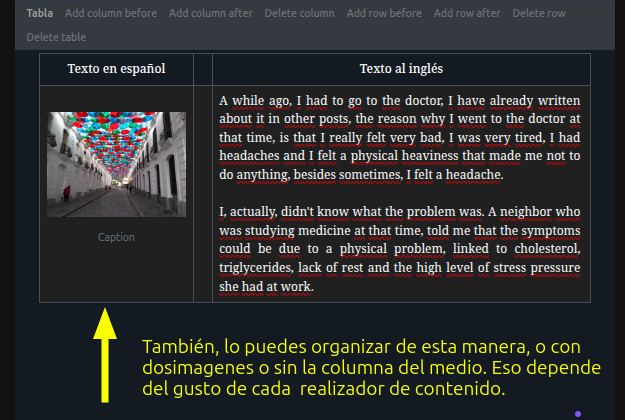
-16 La herramienta tabla. Con esta herramienta, colocamos tablas y podemos ir aumentando las columnas y las líneas que necesitemos, la usamos para diferentes actividades. / The table tool. With this tool, we place tables and we can increase the columns and the lines that we need, we use it for different activities.
Este texto lo realicé con tres columnas, poniendo una columna de separación en el medio. / I made this text with three columns, putting a separation column in the middle.
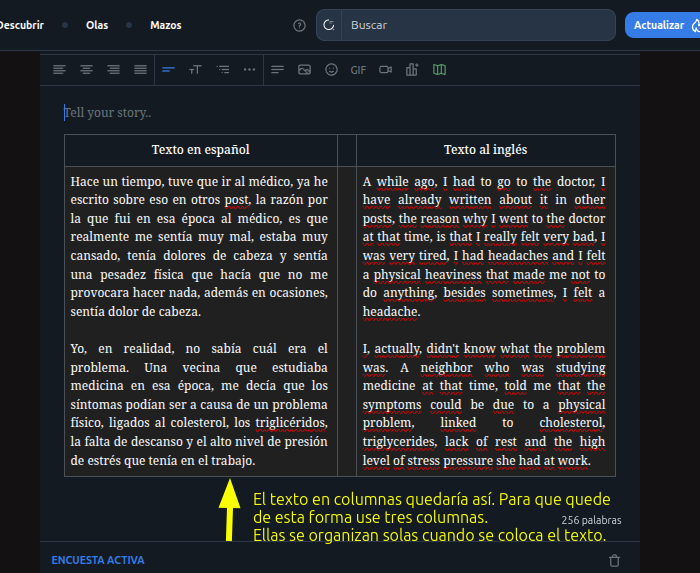
Aquí hice un ejemplo con 3 columnas, colocando imagen y texto. La herramienta es muy instintiva y su cuadro de dialogo explica como aumentar o borrar columnas y filas. / Here I made an example with 3 columns, placing image and text. The tool is very instinctive and its dialog box explains how to increase or delete columns and rows.
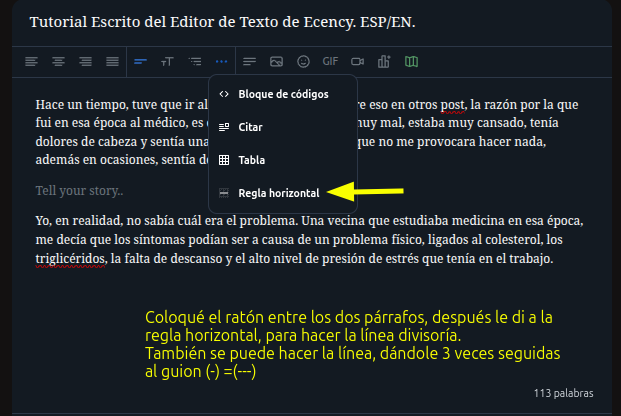
-17 Herramienta regla horizontal. / Horizontal ruler tool.
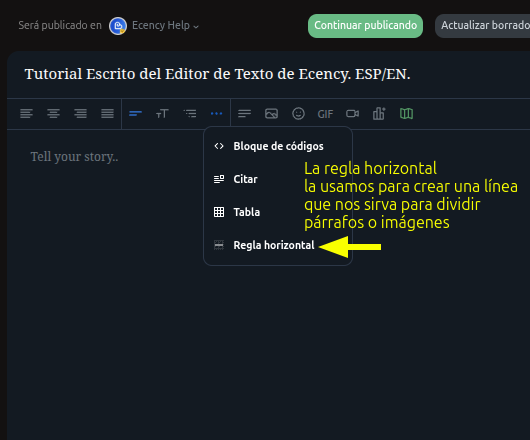
Se coloca el ratón donde se quiere la línea horizontal, después se le da en los 3 puntos, se le da a la opción regla horizontal y se crea la línea. También se puede hacer la línea recta colocando tres guiones (-) seguidos, (---) como en el editor clásico. / The mouse is placed where the horizontal line is wanted, then it is given in the 3 points, the horizontal ruler option is given and the line is created. You can also make the straight line by placing three dashes (-) in a row, (---) as in the classic editor.
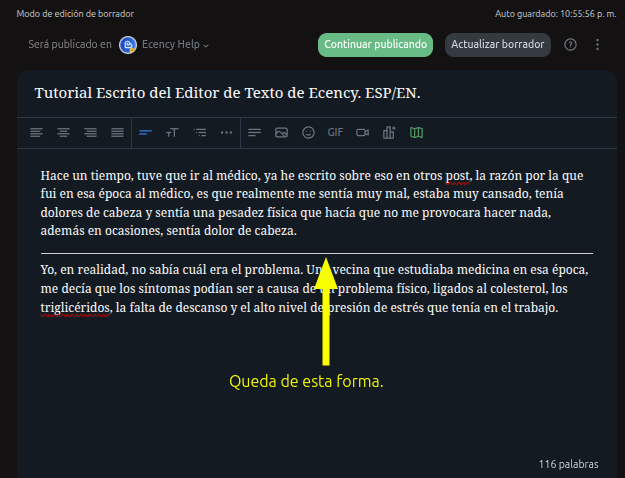
Queda de esta manera la línea. / The line remains this way.
-18 Herramienta lista y viñetas. / Tool list and bullets.
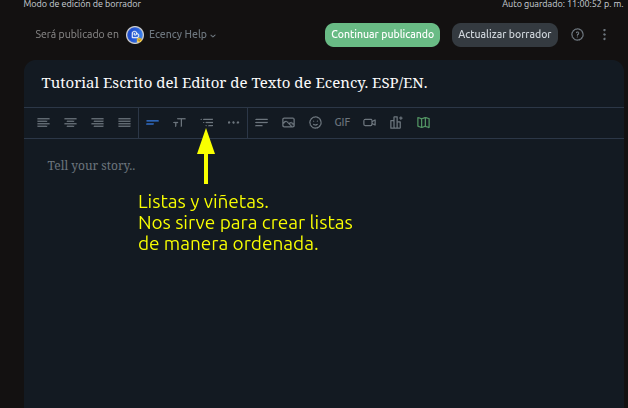
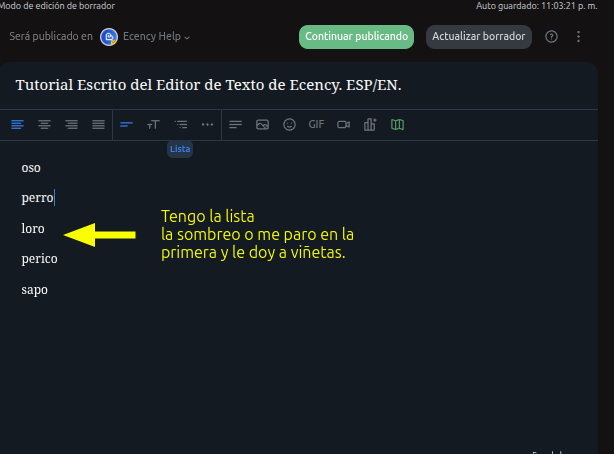
Esta herramienta nos sirve para ordenas nuestras listas en los post. Para usar la herramienta, colocamos la lista y la sombreamos con la ratón. / This tool helps us to sort our lists in the post. To use the tool, we place the list and shade it with the mouse.
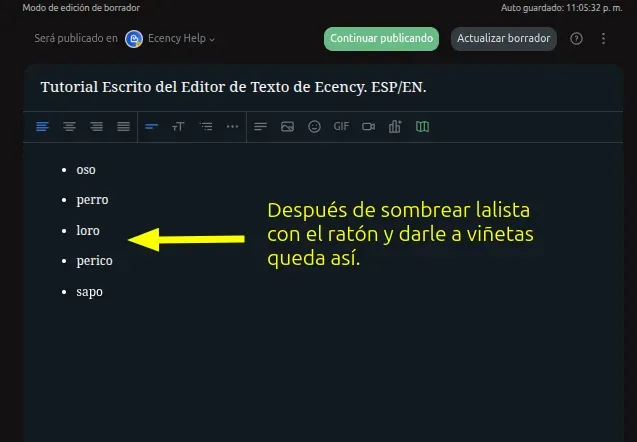
Al usar las viñeta queda así la lista. / When using the bullet points, the list looks like this.
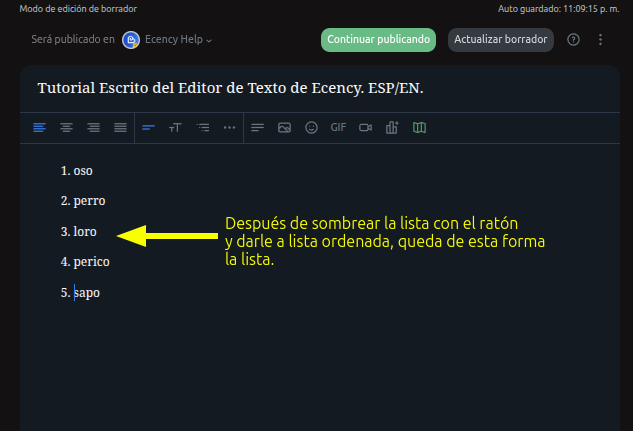
Al usar la herramienta lista organizada, queda así la lista. / When using the organized list tool, the list looks like this.
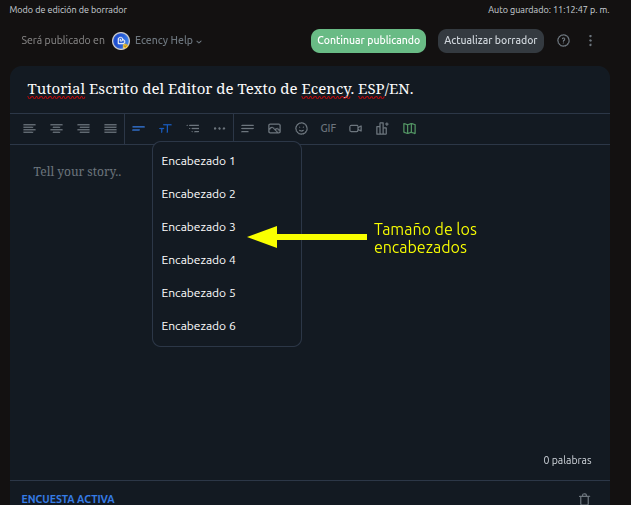
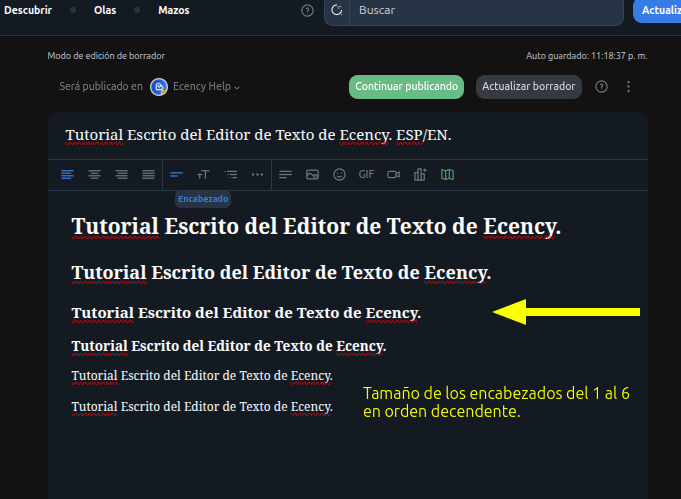
-19 Herramienta de encabezad, la misma sirve para poner el tamaño de los títulos y subtítulos. / Header tool, it serves to set the size of the titles and subtitles.

Tamaño de los encabezados. / The size of the headers.
Tamaños de los textos, usando la herramienta encabezados. / Sizes of the texts, using the headings tool.
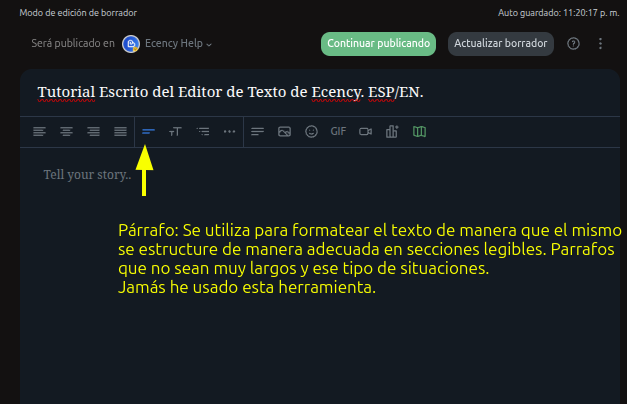
-20 Herramienta párrafo. Se usa para formatear el texto y hacerlo más legible. Esta herramienta nunca la he usado y la desconozco. / Paragraph tool. It is used to format the text and make it more readable. I have never used this tool and I don't know it.
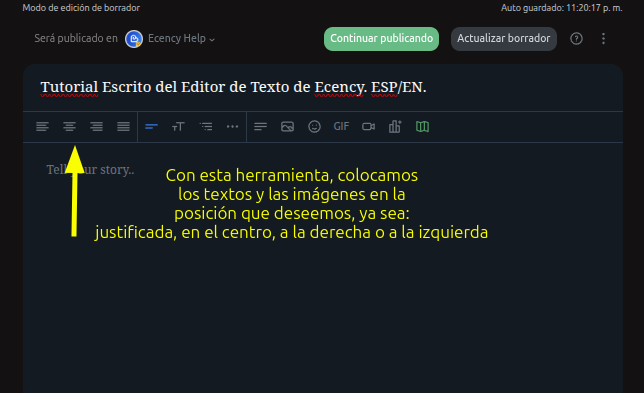
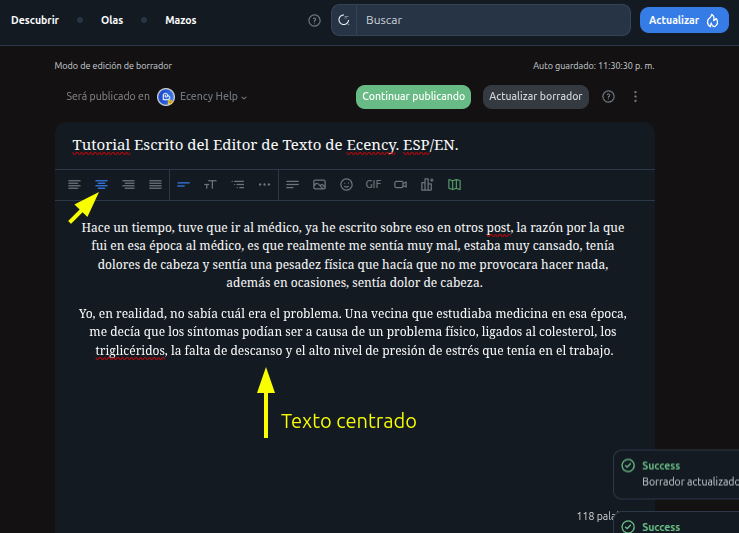
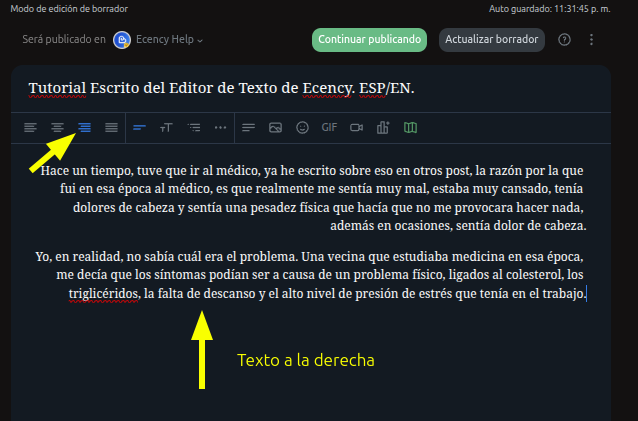
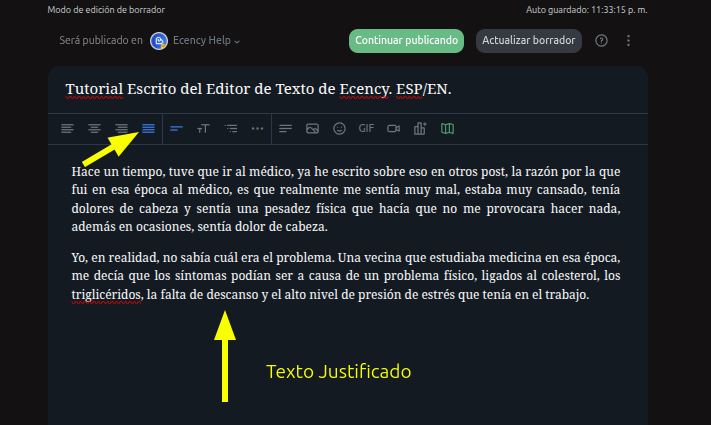
-21 Herramienta de posición de texto. Esta herramienta nos sirve para colocar los textos y las imagines, de manera justificada, a la derecha , la izquierda o el centro del post. / Text position tool. This tool helps us to place the texts and images, in a justified way, to the right, left or center of the post.
Texto a la izquierda. / Text on the left.

Texto centrado. / Centered text.
Texto a la derecha. / Text on the right.
Texto justificado. / Justified text.
Colocar fuentes a imágenes, enlaces a textos y otras herramientas de edición. / Place fonts to images, links to texts and other editing tools.
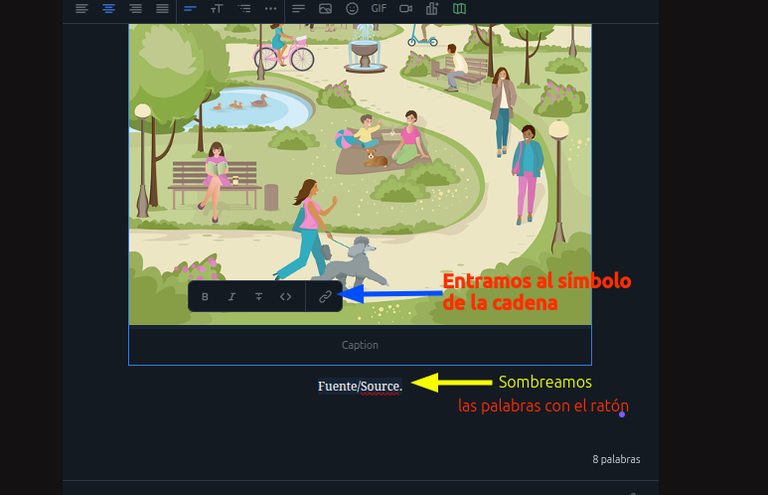
-1 Colocar fuentes a imagen. Lo primero que debemos hacer es colocar las palabras fuente y source, debajo de la imagen. / Place fonts to image. The first thing to do is to place the words source and source, below the image.
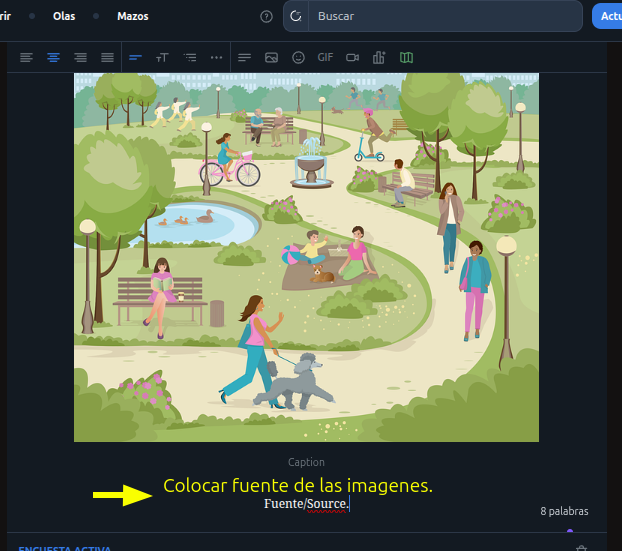
Sombreamos la palabra fuente y source, con el ratón, al hacerlo se va a abrir un cuadro de dialogo, hay vamos a marcar con el ratón el símbolo de la cadena. / We shade the word source and source, with the mouse, doing so will open a dialog box, there we will mark with the mouse the symbol of the string.
Luego, cuando se abra el segundo cuadro de dialogo, vamos a poner la dirección web de la imagen. Y después le damos la flecha curva que es el símbolo de entrada. / Then, when the second dialog box opens, we are going to put the web address of the image. And then we give the curved arrow which is the input symbol.
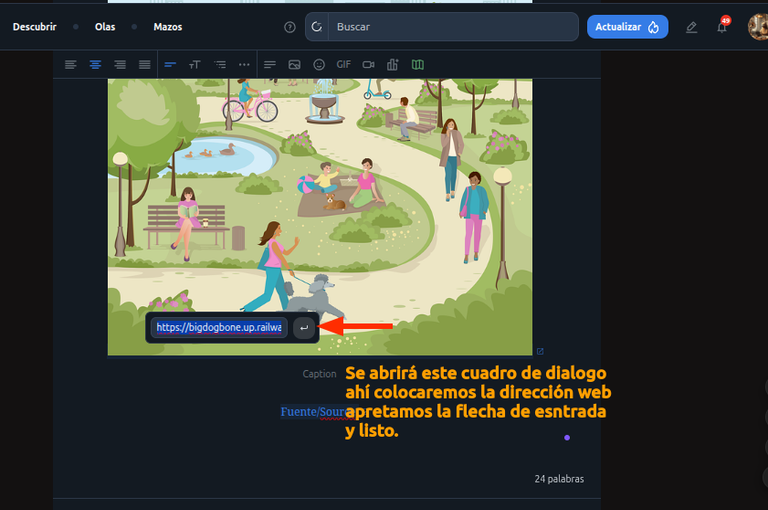
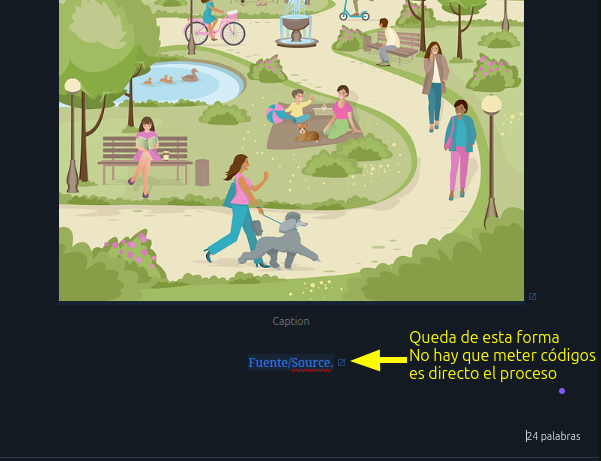
Queda de esta forma en enlace de la fuente, se hace de manera directa sin necesidad de códigos. / It remains in this way in the link of the source, it is done directly without the need for codes.
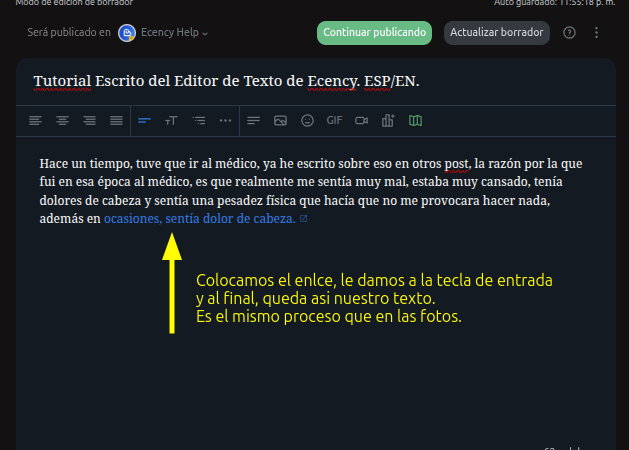
-2 Colocar enlaces en los textos. Para colocar los enlaces, vamos a usar el mismo método usado con las imágenes,vamos a sombrear el texto, se abrirá el cuadro de dialogo, le damos al símbolo de la cadena, se abre el otro cuadro de dialogo, hay colocamos el enlace y le damos la flecha de entrada y listo./ Placing links in the texts. To place the links, we are going to use the same method used with the images, we are going to shade the text, the dialog box will open, we give the string symbol, the other dialog box opens, there we place the link and we give the input arrow and that's it
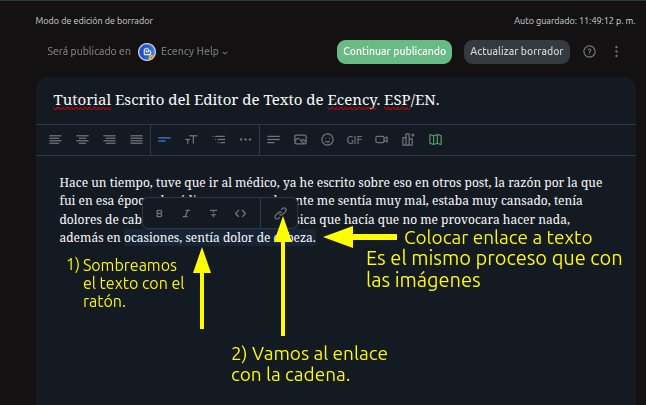
Al colocar el enlace en el texto, queda de esta manera. / When you put the link in the text, it looks like this.
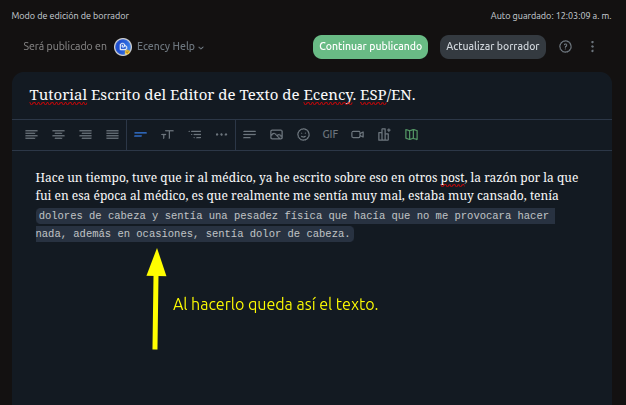
-3 Herramienta sombrear. Para usarla, sombreamos el texto que queremos remarcar con el ratón, y luego cuando se abra el cuadro de dialogo le vamos a dar al símbolo (<>) y se sombreará el texto. / Shading tool, to use it, we shade the text that we want to highlight with the mouse, and then when the dialog box opens we are going to hit the symbol (<>) and the text will be shaded.
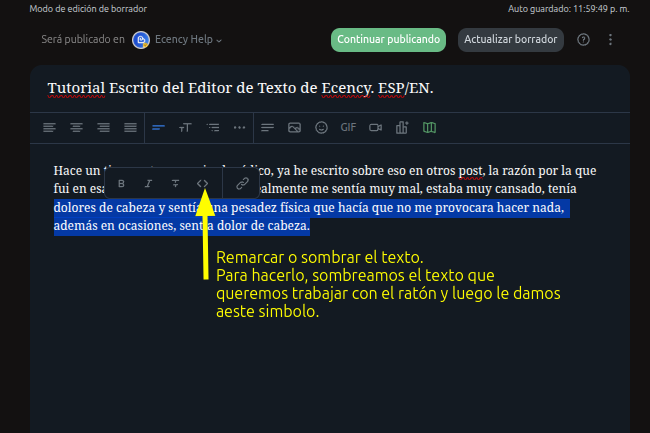
Así queda el texto, después de usar la herramienta. / This is how the text remains, after using the tool.
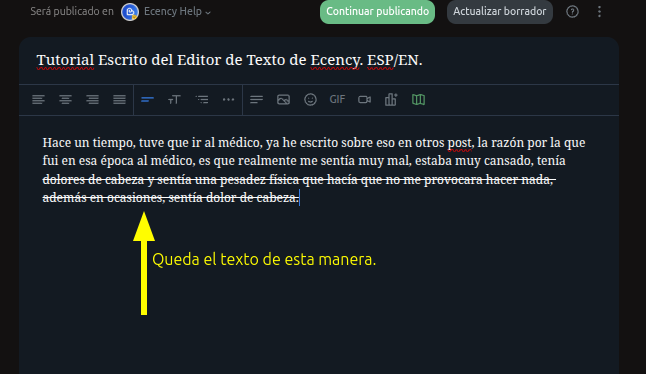
-4 Herramienta de tachado. Para usarla, sombreamos el texto que queremos remarcar con el ratón, y luego cuando se abra el cuadro de dialogo le vamos a dar al símbolo parecido a este (¥) y se tachará el texto. / Strikethrough tool. To use it, we shade the text that we want to highlight with the mouse, and then when the dialog box opens we are going to give the symbol similar to this (¥) and the text will be crossed out.
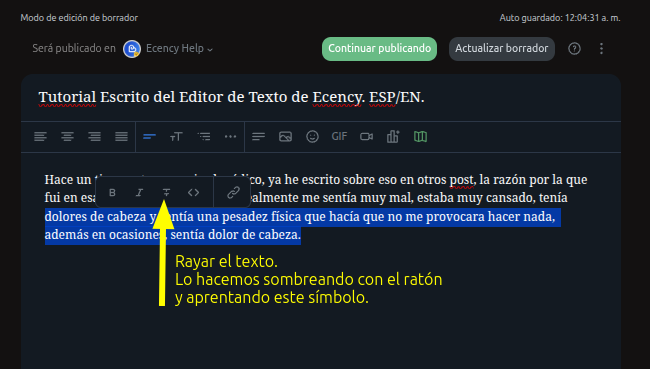
El texto quedará así, después de usar la herramienta. / The text will look like this, after using the tool.
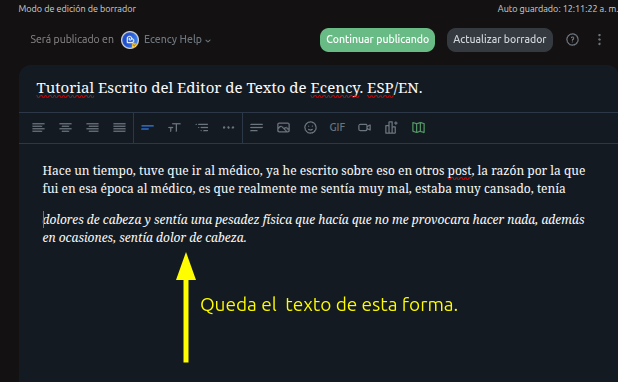
-5 Letra Itálica en el texto. Para usarla, sombreamos el texto que queremos remarcar con el ratón, y luego cuando se abra el cuadro de dialogo le vamos a dar al símbolo parecido a este (I) y se tachará el texto. / Italic letter in the text. To use it, we shade the text that we want to highlight with the mouse, and then when the dialog box opens we are going to give the symbol similar to this (I) and the text will be crossed out.
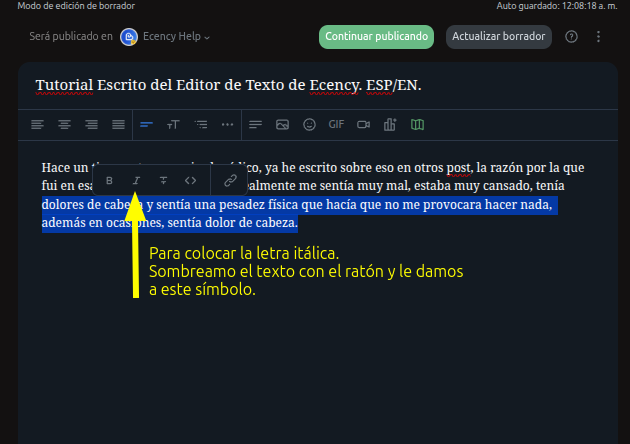
Al usar la herramienta el texto queda así. / When using the tool the text looks like this.
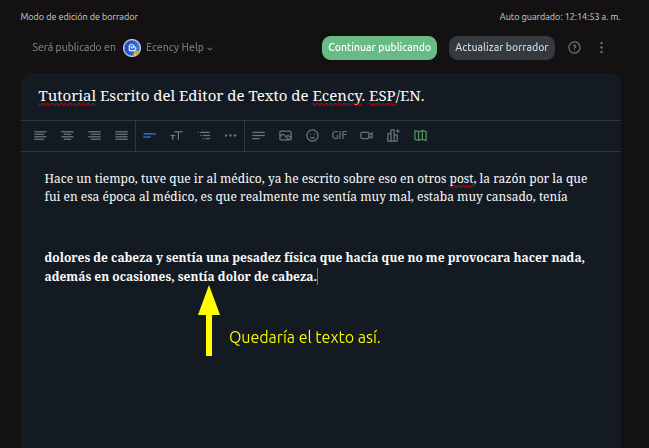
-6 Utilizar la herramienta negrillas. Para usarla, sombreamos el texto que queremos remarcar con el ratón, y luego cuando se abra el cuadro de dialogo le vamos a dar al símbolo parecido a este (B) y se tachará el texto. / Use the bold tool. To use it, we shade the text that we want to highlight with the mouse, and then when the dialog box opens we are going to give the symbol similar to this (B) and the text will be crossed out.

Al usar la herramienta el testo queda así. / When using the tool the testo looks like this.
Espero que este largo y trabajoso tutorial, les ayude y les dé todas las herramientas que necesitan para usar el nuevo editor de texto de Ecency.
I hope this long and laborious tutorial will help you and give you all the tools you need to use the new Ecency text editor.
Les agradezco a todos los miembros de la comunidad que llegaron al final de este post y mi agradecimiento a @melinda010100 , @good-karma y a todo el equipo de desarrolladores de #Ecency, por desarrollar esta grandiosa herramienta y por las últimas actualizaciones.
I thank all the community members who reached the end of this post and my thanks to @melinda010100, @good-karma and the entire #Ecency developer team, for developing this great tool and for the latest updates.
Mis mejores deseos para todos y gracias por leerme. Cualquier duda la colocan en los comentarios y con gusto se las responderemos.
Best wishes to all and thanks for reading. Any questions are put in the comments and we will gladly answer them.
Translated by Yandex.com

Crece en Hive con el apoyo de Crypto Company.
![]()
#Archon, es una comunidad que apoya proyectos, resuelve problemas, y te ayuda a crecer en Hive.
Visita su Discord, tienen un chat en español.


You can check out this post and your own profile on the map. Be part of the Worldmappin Community and join our Discord Channel to get in touch with other travelers, ask questions or just be updated on our latest features.
Nice
Excelente tutorial, gracias, en verdad, hacía falta.
!BBH
!WINE
Hola, me alegra que te guste, gracias pro el comentario y el apoyo.
[@PowerPaul:]
Hey buddy. Greetings! Because of your participation in the CryptoCompany community you received a vote from @CryptoCompany and its trail! Thank you for your participation in the "Banner for Boost" campaign.
Hive a great day!
Hi, thank you very much for the support.
Muchas gracias, realmente necesitaba ése excelente tutorial ,gracias por tan maravilloso gesto 😘👍♥️
Hola, feliz tarde, me alegra mucho que te haya gustado y más que te haya ayudado.
Si tienes alguna duda, estamos a la orden.
Muchas gracias, siempre es de muy buena ayuda poder contar con personas que nos brindan todo su apoyo en la comunidad Hive, gracias 😘🤗❤️
Wow, this was such an inspiring post! I’m still new on Hive and learning a lot by reading posts like yours. Your support means a lot to us newcomers. Hope one day I can write like you. Much respect 🙏