#ViernesDeEscritorio. 24 De enero 2025. Sepeech Note, herramienta de IA para transcribir textos y audio de manera local en #Linux. ESP/EN
Captura de Pantalla

Saludos y presentación:
Saludos #Linuxeros, miembros de la comunidad de #Linux&SoftwareLibre, y saludos a toda la comunidad de #Linux en #Hive, bienvenidos a un nuevo post de #ViernesDeEscritorio, hoy 31 de enero del 2025.
Como siempre, sigo usando mi apreciado Linux Mint solo que ahora lo actualicé a la versión 22,1 de nombre "Xia", y sigo usando el escritorio Cinnamon, que es el escritorio creado el equipo de Linux Mint.
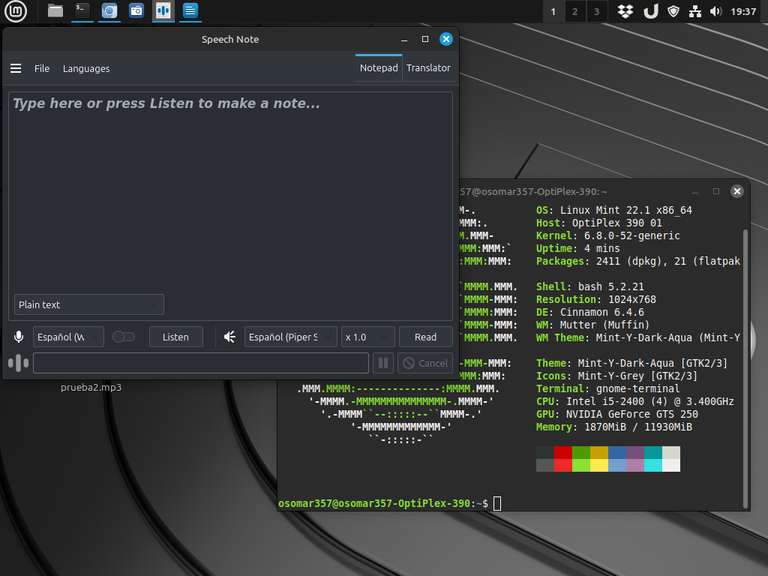
Speech Note, herramienta de IA para transcribir textos y audio de manera local en tu equipo sin conexión a la red.
Muchas veces, los realizadores de contenido, los periodistas, los estudiantes y las personas que trabajan con textos y audios, nos encontramos con la tediosa tarea de pasar el audio a texto, pasando, a veces, muchas horas transcribiendo, todo el contenido de un audio.
También, nos encontramos con otra situación, y es cuando somos creadores de contenido audiovisual, y estamos pasando, nuestro material escrito a un audio, con diferentes voces, o con una voz única, para realizar nuestros videos.
Y cuando nos encontramos con estas situaciones, lo que hacemos, es acudir, a herramientas de inteligencia artificial en línea, donde vamos pasando, nuestros escritos a audio por fragmentos, debido a que las IA gratuitas, vienen con límites de tiempo y contenido.
Pero en el caso de #Linux, podemos resolver esta situación, ya que contamos con la herramienta Speech Note, que funciona con la IA Whisper, la cual podemos usar de forma nativa en nuestra PC, para realizar transcripciones de audio a texto y de texto a audio, en nuestro equipo, sin límite de tiempo y duración, y sin necesidad de estar conectado al internet.
Otro punto importante a destacar, es que Speech Note, no una voz robótica, lo que nos permite elegir si deseamos una voz de hombre, de mujer, la velocidad del sonido y los tonos. Por ejemplo en el idioma español, podemos poner el español con acento mexicano, o podemos poner español latino neutral, entre muchos otros. Y también nos permite traducir los textos a diferentes idiomas.
Speech Note, tiene un traductor, que junto con el proceso de transcripción puede ser usado de forma local en nuestro equipo. Lo que hace, que esta herramienta se haga esencial para los desarrolladores de contenido, los estudiantes, los periodistas y otros profesionales.
Un punto importante de Speech Note
Dentro de la aplicación Speech Note, vamos a utilizar Whisper, que es un motor gratuito de la misma empresa de ChatGPT, que se puede incorporar en cualquier aplicación o página web. Y Speech Note, nos permite bajar tanto el traductor como el transcriptor a nuestra PC o equipo, para así poder usarlo de manera local, y sin necesidad de estar conectados a la red.
Debemos tener en cuenta que Speech Note, se puede usar tanto en equipos antiguos, como en equipos con grandes recursos. Pero, debemos tomar en cuenta que, mientras mayor sea la cantidad de recursos, más rápido va a funcionar el programa.
Otro punto interesante es que si tenemos una tarjeta de video potente, podemos utilizar la aplicación con la RAM de la tarjeta de video, lo que hará, que funcione más rápido y sin consumir la memoria RAM de nuestro equipo.
Y para terminar con este punto y seguir avanzando, es importante decir, que la aplicación se puede usar, solo con la memoria RAM del equipo, y con la tarjeta de video, que viene por defecto en la tarjeta madre. Al hacerlo así, con un equipo pequeño de 2 o 4 GB de memoria RAM, Speech Note, va a trabajar, pero de manera más lenta. Y para esos equipos muy limitados, se recomienda utilizar la versión pequeña del programa, que está diseñada para el uso de esos equipos.
Cómo descargar Speech Note
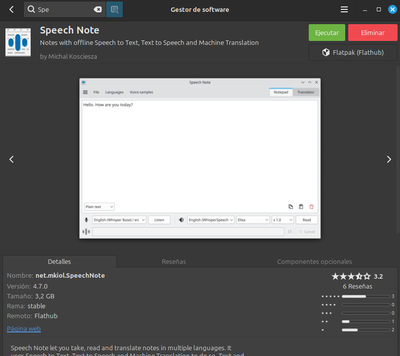
La aplicación Speech Note, la podemos descargar a través de Flatpak. Que es algo que se puede hacer desde cualquier distribución de #Linux.
Captura de Pantalla
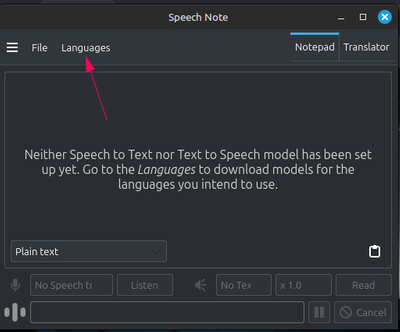
Cómo preparar para su uso a Speech Note
- Lo primero que debemos hacer, es obtener los archivos para poder hacer las transcripciones. En este punto, debemos tomar en cuenta, que debemos escoger cual versión vamos a descargar, según el potencial de nuestro equipo. Es decir, si bajamos la Wisper Large, es el archivo más poderoso y con mas recursos, pero te exige, hasta 10 GB de memoria RAM para su uso.
Mientras que Wisper Small o Wisper Tuiny, te exige, solo 1GB de memoria RAM para su uso.
Otro punto, cuando vayas a bajar los archivos, vas a ver que hay varias opciones, baja solo los archivos Wisper, que son gratuitos y sin limitaciones. Igual, marque los archivos en las imágenes.
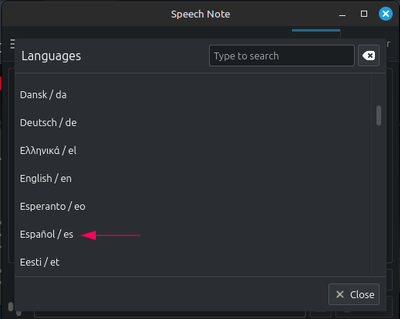
Para bajar los archivos vamos a la pestaña Lenguaje, y ahí podemos buscar el idioma que deseamos en la lista, o también podemos poder el idioma en el buscador que está en la parte superior derecha del programa. Ver imagenes.
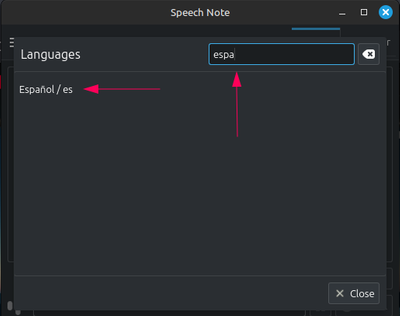
Captura de Pantalla
Cómo descargar los motores, voces y otros recursos en Speech Note
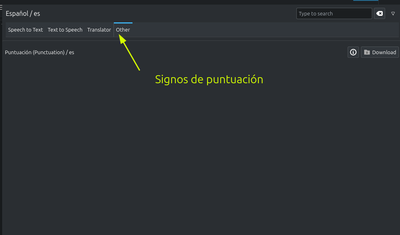
- Una vez que seleccionamos la pestaña de español en lenguajes, se nos va a abrir otra ventana y en ella veremos 4 pestañas: la primera llamada: 1) Speech to Text, donde bajaremos los motores de Wisper, 2) la pestaña llamada Test to Speech, donde bajaremos las voces en español de hombres y mujeres. Yo las bajé todas a mi equipo. 3) Translator, donde bajaremos el traductor. 4) Other: Donde bajaremos los signos de puntuación del español. Ver imágenes.
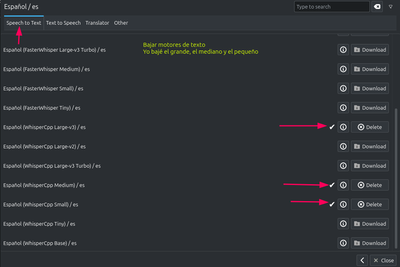
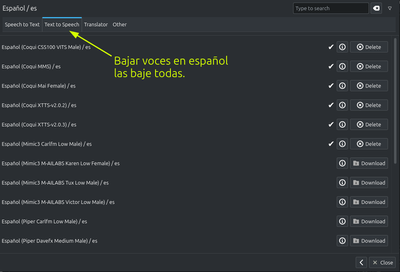
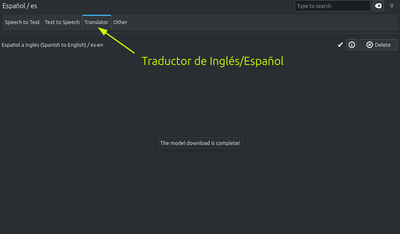
Captura de Pantalla
Cómo usar Speech Note
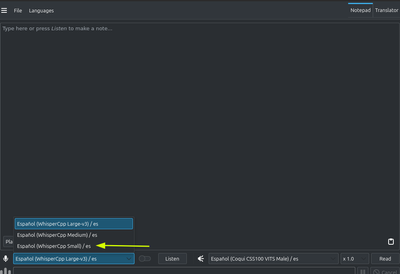
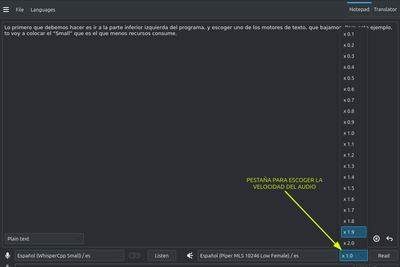
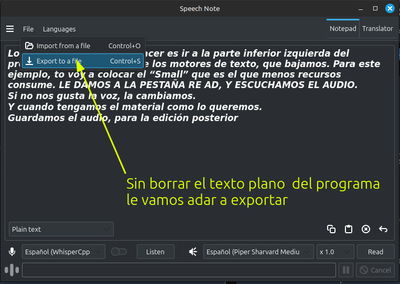
- Lo primero que debemos hacer es ir a la parte inferior izquierda del programa, y escoger uno de los motores de texto, que bajamos. Para este ejemplo, to voy a colocar el “Small” que es el que menos recursos consume.
Captura de Pantalla
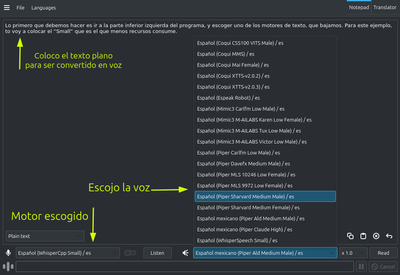
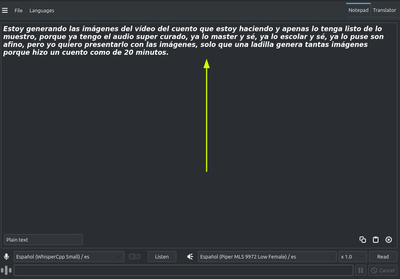
- Lo segundo es colocar el texto plano que queremos convertir en voz, luego escogemos la voz, y lo usamos con el motor escogido.
Captura de Pantalla
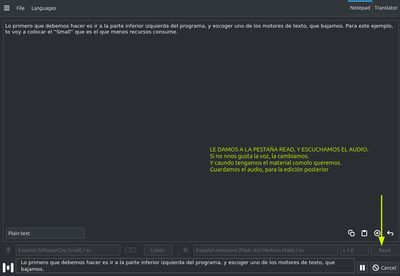
- Luego le damos ala pestaña "read" y escuchamos el texto, si no nos gusta podemos cambiar la voz y la velocidad del audio.
Captura de Pantalla
Para pasar de audio a texto, es el mismo proceso, solo que vamos a escoger un archivo de audio y lo vamos a convertir en texto plano. Ver imagenes.
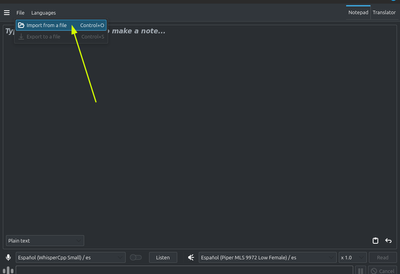
Se busca el archivo a importar
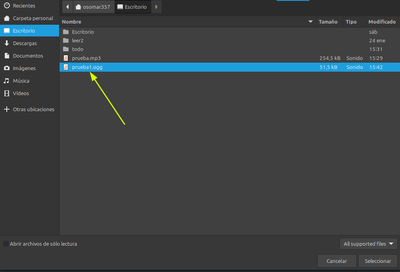
Se selecciona y se importa el archivo y de inmediato empieza el proceso
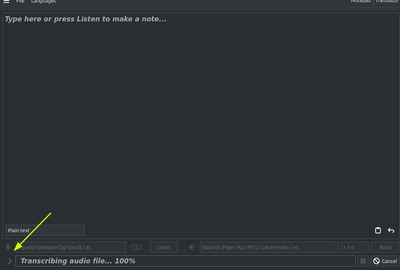
Esta transcribiendo el audio a texto plano
La transcripción del audio al texto esta realizada.
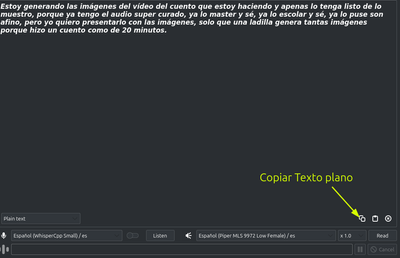
Se copia el texto plano y se guarda, o se le da a la pestaña file y se exporta.
Captura de Pantalla
Cómo exportar el texto plano convertido en audio.
- Para guardar el texto plano convertido en audio, seguiremos los siguientes pasos.
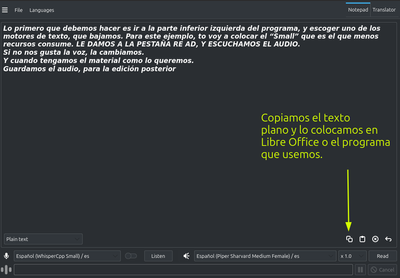
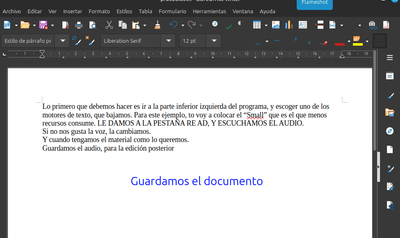
Vamos a copiar el texto plano. Esto lo hacemos después de haber escuchado la transcripción a audio del texto, sin modificar, la voz o la velocidad que escogimos. Después de estar contento con el audio, copiamos y guardamos el texto plano en un archivo de texto. En mi caso use Libre Office.
No debemos quitar el texto del programa, en ningún momento.
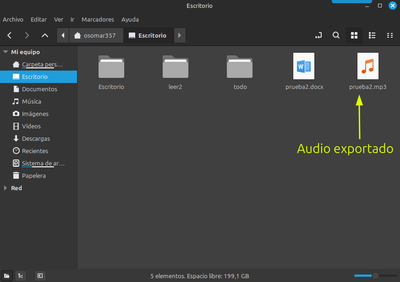
Guardamos el archivo, yo lo guarde con el nombre de: "prueba2"
Sin borrar el texto que esta en el programa, le vamos a dar a "Exportar archivos"
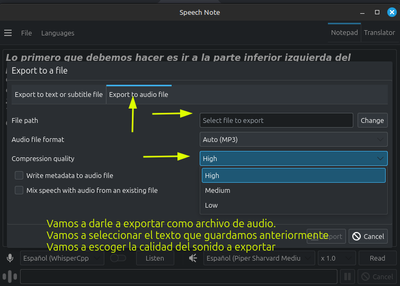
Cuando abra la nueva ventana, vamos a escoger la opción "Exportar archivo de audio", después vamos a escoger la calidad con la que deseamos el sonido, y de último, vamos a buscar el archivo que guardamos que para este ejemplo se llama: ¨Prueba2¨, en la pestaña: "Change"
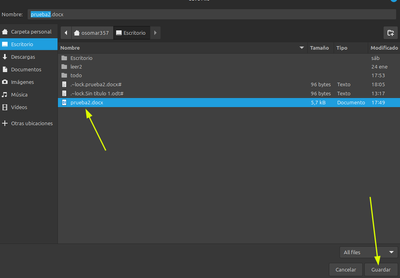
Buscamos el archivo y le damos a guardar.
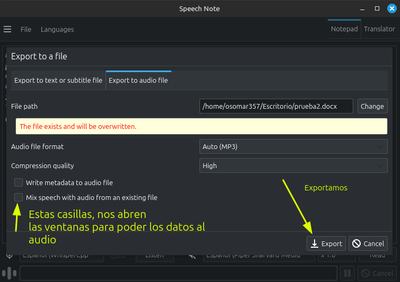
Después de que guardemos el archivo, se nos abre una nueva ventana que nos dala opción de exportar.
Y en la parte inferior izquierda, hay dos casillas, que se las escogemos, nos abrirán unas ventanas para poner los datos que deseemos a nuestros audios.
Le damos a exportar, y se inicia la magia.
Después de un tiempo, en mi caso fue muy corto, pero recuerda que eso depende de los recursos de cada equipo, se guarda el texto plano en audio.
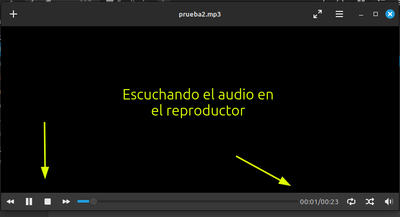
Finalmente, escuchamos el audio,que realizamos con nuestro escrito en el reproductor de nuestro equipo.
Puntos a tomar en cuenta:
El programa Speech Note, como todos los programas de #Linux, pude ser personalizado, se le pueden cambiar las letras, el tamaño, se pueden hacer subtítulos, traducciones, transcripciones de audio a texto y de texto a audio en varios idiomas, y también puedes grabar de manera directa desde el micrófono.
En fin es un programa de IA, que puedes usar en tu equipo, y eliminar las restricciones de tiempo y de cantidad que tienes en los procesos de transcripción, traducción y realización de textos a audios.
Lo mejor es que al bajar los motores, las voces, el traductor y los signos de puntuación, puedes trabajar de manera local en tu equipo, sin estar conectado en la red. Y esto lo puedes hacer en varios idiomas.
Para terminar, consegui un video muy bueno sobre el programa, esta en inglés, pero con la traducción automática de Youtube, se entiende bastante bien. Puede verlo aquí
Espero que este post sea de utilidad,para todos los creadores de contenido de nuestra red.
Mis mejores deseos y muchas gracias por leerme.


To read English
Screenshot
Greetings and introduction:
Greetings #Linuxeros, members of the #Linux&Free softwarecommunity, and greetings to the entire #Linux community in #Hive, welcome to a new post of #ViernesDeEscritorio, today January 31, 2025.
As always, I'm still using my beloved Linux Mint only now I upgraded it to version 22.1 named "Xia", and I'm still using the Cinnamon desktop, which is the desktop created by the Linux Mint team.
Speech Note, AI tool to transcribe texts and audio locally on your computer without a network connection.
Many times, content creators, journalists, students and people who work with texts and audios, we find ourselves with the tedious task of converting audio to text, sometimes spending many hours transcribing the entire content of an audio.
Also, we come across another situation, and that is when we are audiovisual content creators, and we are passing, our written material to an audio, with different voices, or with a unique voice, to make our videos.
And when we encounter these situations, what we do is go to online artificial intelligence tools, where we are passing our writings to audio by fragments, because free AI, come with time and content limits.
But in the case of #Linux, we can solve this situation, since we have the Speech Note tool, which works with the Whisper AI, which we can use natively on our PC, to perform audio-to-text and text-to-audio transcriptions, on our computer, with no time limit and duration, and without having to be connected to the internet.
Another important point to highlight is that Speech Note, not a robotic voice, which allows us to choose whether we want a man's voice, a woman's, the speed of sound and tones. For example, in the Spanish language, we can put Spanish with a Mexican accent, or we can put neutral Latin Spanish, among many others. And it also allows us to translate the texts into different languages.
Speech Note, has a translator, which together with the transcription process can be used locally in our team. This makes this tool essential for content developers, students, journalists and other professionals.
An important point of Speech Note
Within the Speech Note application, we are going to use Whisper, which is a free engine from the same ChatGPT company, which can be incorporated into any application or website. And Speech Note, allows us to download both the translator and the transcriber to our PC or computer, so we can use it locally, and without having to be connected to the network.
We must take into account that Speech Note, can be used both on old computers, and on computers with large resources. But, we must take into account that, the greater the amount of resources, the faster the program will work.
Another interesting point is that if we have a powerful video card, we can use the application with the RAM of the video card, which will make it work faster and without consuming the RAM of our computer.
And to finish with this point and continue moving forward, it is important to say, that the application can be used, only with the computer's RAM, and with the video card, which comes by default in the motherboard. By doing so, with a small computer of 2 or 4 GB of RAM, Speech Note, will work, but more slowly. And for those very limited computers, it is recommended to use the small version of the program, which is designed for the use of such computers.
How to download Speech Note
The Speech Note application, we can download it through Flatpak. Which is something that can be done from any #Linux distribution.
Screenshot
How to prepare a Speech Note for use
- The first thing we need to do, is to get the files so that we can make the transcripts. At this point, we must take into account that we must choose which version we are going to download, according to the potential of our team. That is, if we download the Wisper Large, it is the most powerful file and with the most resources, but it requires up to 10 GB of RAM memory for its use.
While Wisper Small or Wisper Tuiny, requires you, only 1GB of RAM for use.
Another point, when you go to download the files, you will see that there are several options, download only the Wisper files, which are free and without limitations. Anyway, mark the files in the images.
To download the files we go to the Language tab, and there we can search for the language we want in the list, or we can also use the language in the search engine that is at the top right of the program. See pictures.
Screenshot
How to download the engines, voices and other resources in Speech Note
- Once we select the Spanish tab in languages, another window will open and in it we will see 4 tabs: the first one called: 1) Speech to Text, where we will download the Wisper engines, 2) the tab called Test to Speech, where we will download the voices in Spanish of men and women. I took them all down to my team. 3) Translator, where we will download the translator. 4) Other: Where we will lower the punctuation marks of Spanish. See images.
Screenshot
How to use Speech Note
- The first thing we must do is go to the bottom left of the program, and choose one of the text engines, which we download. For this example, I'm going to put the "Small" which is the one that consumes the least resources.
Screenshot
- The second thing is to place the plain text that we want to convert into speech, then we choose the speech, and use it with the chosen engine.
Screenshot
- Then we give the "read" tab and listen to the text, if we don't like it we can change the voice and the speed of the audio.
Screenshot
To move from audio to text, it is the same process, only we are going to choose an audio file and we are going to convert it into plain text. See pictures.
The file to import is searched
The file is selected and imported and the process immediately begins
Is transcribing the audio to plain text
The transcription of the audio to the text is done.
The plain text is copied and saved, or it is given to the file tab and exported.
Screenshot
How to export the plain text converted into audio.
- To save the plain text converted into audio, we will follow the following steps.
Let's copy the plain text. We do this after having listened to the audio transcription of the text, without modifying the voice or the speed that we chose. After being happy with the audio, we copied and saved the plain text to a text file. In my case I use Libre Office.
We must not remove the text from the program, at any time.
We saved the file, I saved it with the name of: "test2"
Without deleting the text that is in the program, we are going to give it to "Export files"
When the new window opens, we are going to choose the "Export audio file" option, then we are going to choose the quality with which we want the sound, and finally, we are going to look for the file that we saved that for this example is called: Test2, in the tab: "Change"
We search for the file and give it to save.
After we save the file, a new window opens that gives us the option to export.
And in the lower left, there are two boxes, which we choose, they will open some windows to put the data we want to our audios.
We give it to export, and the magic begins.
After a while, in my case it was very short, but remember that it depends on the resources of each computer, the plain text is saved in audio.
Finally, we listened to the audio, which we made with our writing on our computer's player.
Points to take into account:
The Speech Note program, like all #Linux programs, can be customized, you can change the letters, the size, you can make subtitles, translations, audio-to-text and text-to-audio transcripts in several languages, and you can also record directly from the microphone.
In short, it is an AI program that you can use on your computer, and eliminate the time and quantity restrictions that you have in the processes of transcription, translation and making texts into audios.
The best thing is that by turning down the engines, voices, translator and punctuation marks, you can work locally on your computer, without being connected on the network. And you can do this in several languages.
To finish, I got a very good video about the program, it is in English, but with the automatic translation of YouTube, it is understood quite well. You can see it here
I hope this post will be useful, for all the content creators of our network.
Best wishes and thank you very much for reading me.
From Venezuela, our witness drives decentralization and the adoption of Web3 technology, creating opportunities for the local community and contributing to the global ecosystem. // Desde Venezuela, nuestro testigo impulsa la descentralización y la adopción de la tecnología Web3, generando oportunidades para la comunidad local y contribuyendo al ecosistema global.
Sigue, contacta y se parte del testigo en: // Follow, contact and be part of the witness in:
Hola @hispapro, muchas gracias por el apoyo.
Explicas muy bien. Un saludo Oso!
Hola, feliz tarde.
Ando iniciando hoy en Hive, llegando de la calle.
Bueno mi estimado @mateom03, muchas gracias por el comentario, y espero que este tipo de post, te ayude a decidirte a probar, #Linux.
Feliz tarde.
Brutal esta herramienta bro, creo que me va a ser muy útil.
Hola @alberto0607, feliz tarde e inicio de semana.
¡Sí, vale! Es muy buena. Yo la estoy usando con la base Small y la mediana.
La larga, tiene pruebas por mas de 1 millón de horas. la bajé, pero no la estoy usando, ya que pide 10 de RAM. Y ahora tengo 12 de RAM.
Pero la voy a subir a 16, para poder usarla.
Es muy buena, y es personalizable.
Ve este video de configuración Vidieo
Ahí, pudes ver cómo hacer los subtítilos de manera directa y otras cosas.
Feliz día, esperoque la disfrutes.