| JAVA-CREIAMO UN CODICE INSIEME pt.2 |SIMULATORE NEGOZIO ALIMENTARI eng ita
benvenuti a tutti, il mio primo post riguardante java è andato alla grande, ho notato che come argomento vi è sembrato molto interessante, oggi vi ho portato un nuovo progetto che ho implementato io stesso con delle modifiche, ho aggiunto un'oggetto...andiamo a vedere in tutti i dettagli come programmarlo.
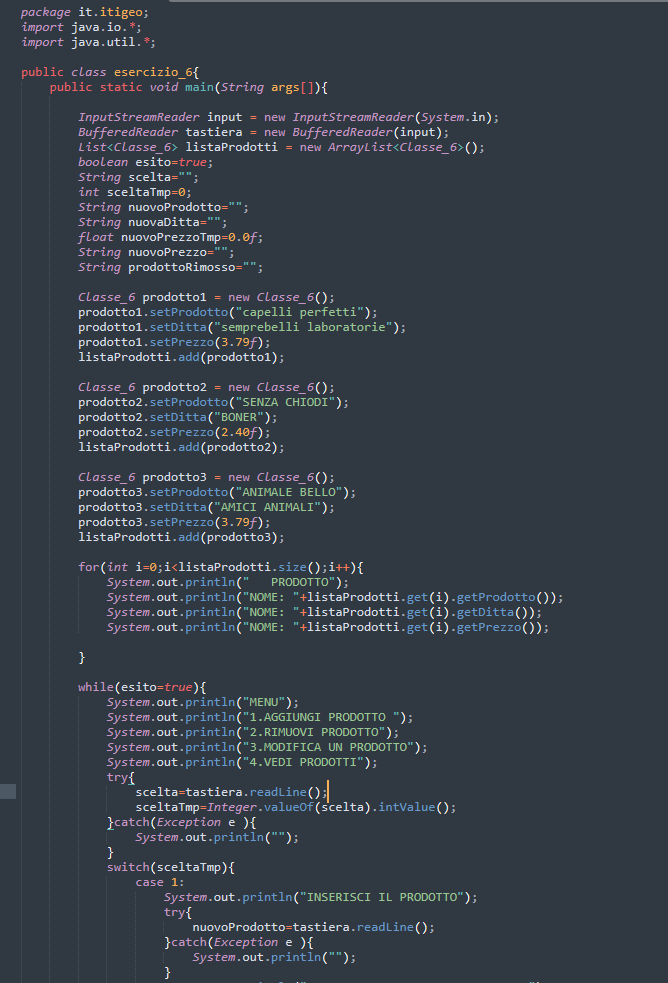
Come primo step,ci andremo a creare il nostro oggetto, essendo l'argomento un "sito di alimentare", quello che ci servirà a noi, sarà l'oggetto "PRODOTTO";
un oggetto non è altro che una realtà del mondo reale,un oggetto può essere uno studente, un cavallo, una persona,ecc...una qualsiasi cosa abbia degli attributi, l'oggetto è molto comodo se durante la creazione ci tocca crearlo più volte, infatti compreso nell'oggetto esistono 2 funzioni:
SET=settare un'oggetto
GET=richiamarci l'oggetto
All'interno del nostro oggetto inseriremo gli attributi che ci serviranno per differenziarlo da altri oggetti,in questo caso nome del prodotto, ditta del prodotto e prezzo del prodotto...l'unica variabile che ho fatto è stato mettere float al prezzo di int,dopo vi spiegherò le differenze...
Continuiamo con la creazione nella nostra classe e del main,una volta svolta questa parte che viene ripetuta per ogni file si parte con la programmazione del nostro codice.
Inserite questi 2 righi,che serviranno per l'acquisizione da tastiera di un certo dato:
        InputStreamReader input = new InputStreamReader(System.in);
        BufferedReader tastiera = new BufferedReader(input);
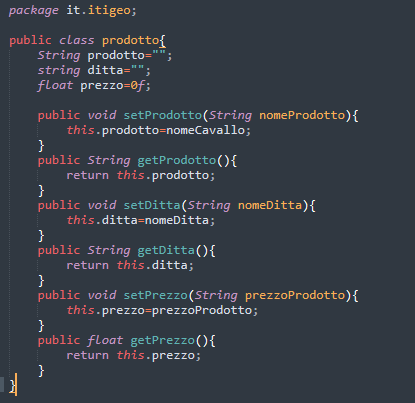
adesso arriva la parte più difficile del nostro file, l'utilizzo dell'oggetto creato in precedenza, per utilizzare l'oggetto iniziamo digitando la classe di appartenenza, subito dopo il nome dell'oggetto seguito da =new di nuovo il nome della class e due parentesi aperte e chiuse, il risultato dovrò essere così:
Classe_6 prodotto1 = new Classe_6();
in questo modo abbiamo completato il nostro oggetto, per settarlo basterà digitare il nome del nostro oggetto con .set(quello che volete),nel nostro caso potremmo settare nome, ditta e prezzo, completiamo il tutto e avremo un risultato del genere.
in questo caso per contenere l'oggetto creato abbiamo proceduto con la creazione di un array...
Cos'è un array?
un array è un contenitore di dati strutturato in posizioni, ogni posizione contiene un dato, abbiamo due tipi di array, l'array classico nella quale bisogna inserire anche la posizione del array, e un array dinamico nella quale ogni volta che andremo a inserire un dato, ci calcolerà automaticamente la posizione successiva.
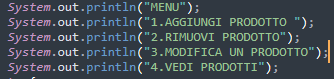
Dopo aver creato tutto il necessario passiamo alla struttura vera e propria del codice, inseriamo una parte grafica per rendere il tutto più "amichevole" per dare un immagine diversa del nostro
file e procediamo con la creazione del nostro menù di scelta.
in questo caso le operazioni che andrà ad eseguire saranno:
1.AGGIUNGI PRODOTTO
2.RIMUOVI PRODOTTO
3.MODIFICA UN PRODOTTO
4.VEDI PRODOTTI
creato il menù di scelta il risultato sarà così:
Dopo aver creato il nostro menù di scelta procediamo con la costruzione del primo caso, ovvero L'AGGIUNTA DI UN PRODTTO,partiamo subito inserendo le nuove variabili nella quali assoceremo la tastiera per prende un dato in input dall'utente, create le 3 variabili, digitiamo la funzione che ci permette di associare alla variabile il valore preso da tastiera(non dimentichiamoci il try e il catch, è fondamentale per la lettura del nostro dato, una volta fatto tutto ciò creiamo un nuovo oggetto seguendo i passaggi di prima,ma cambiando il nome dell'oggetto, se prima il nome era prodotto1,questa volta lo chiameremo prodotto2,e andiamo a inserire nei vari set le variabili create...come ultima cosa andiamo a inserire l'oggetto in una nuova posizione dell'array, il risultato sarà qualcosa del genere:

il secondo caso ci chiede di rimuovere un prodotto,anche se non sembra è una delle parti più facili del nostro codice poiché per eliminare un prodotto basta creare una nuova variabile nella quale assoceremo da tastiera il numero del prodotto da eliminare e inseriremo il seguente comando
Fai molta attenzione poichè la variabile ti servirà di tipo int,quindi andrà eseguita una conversione da stringa a intero.
listaProdotti.remove(i) i=posizione dell array da elminare.
concludiamo il nostro progetto inserendo l'ultimo caso che ci chiede di far visualizzare i nostri prodotti, per farlo basterà creare un for,che ha lo scopo di far ciclare un qualcosa per un tot di volte(inserite dall'utente),in questo caso faremo ciclare il nostro array facendolo stampare contemporaneamente sullo schermo ed il codice sarà pronto.

per concludere al nostro meglio basterà andare sul promt dei comandi per controllare se il nostro codice funziona in modo corretto...ora potrete fare la spesa con prodotti virtuali ahahahah,grazie mille per l'attenzione e fatemi sapere se questi argomenti vi interessano.
welcome everyone, my first post regarding java went great, i noticed that as a topic you seemed very interesting, today i brought you a new project that i implemented myself with some modifications, i added an object...let's go to see in all the details how to program it.
As a first step,we are going to create our object.Since the subject is a "food site," what we will need is the "PRODUCT" object;
an object is nothing but a reality of the real world,an object can be a student,a horse,a person,etc...anything has attributes,the object is very convenient if during the creation we have to create it several times,in fact included in the object there are 2 functions:
SET=set an object
GET=retrieve the object
Inside our object we will insert attributes that we will need to differentiate it from other objects,in this case product name,product company and product price...the only variable I did was put float to int price,later I will explain the differences...
We continue with the creation in our class and main,once we have done this part that is repeated for each file we start with the programming of our code.
Insert these 2 lines,which will be used for keyboard acquisition of some data:
        InputStreamReader input = new InputStreamReader(System.in);
        BufferedReader keyboard = new BufferedReader(input);
now comes the most difficult part of our file, the use of the object created earlier, to use the object we start by typing the class it belongs to, immediately after the name of the object followed by =new again the name of the class and two open and closed parentheses, the result should look like this:
Class_6 product1 = new Class_6();
in this way we have completed our object, to set it we will just type the name of our object with .set(whatever you want),in our case we could set name, company and price, we complete it and we will have a result like this.
In this case to contain the created object we proceeded to create an array...
What is an array?
an array is a container of data structured in positions, each position contains a piece of data, we have two types of arrays, the classic array in which we must also enter the position of the array, and a dynamic array in which every time we go to enter a piece of data, it will automatically calculate us the next position.
After creating everything necessary we move on to the actual structure of the code, we insert a graphic part to make it more "friendly" to give a different image of our
file and we proceed with the creation of our choice menu.
In this case the operations it will perform will be:
1.ADD PRODUCT
2.REMOVE PRODUCT
3.EDIT A PRODUCT
4.SEE PRODUCTS
created the choice menu the result will look like this:
After having created our choice menu we proceed with the construction of the first case, that is THE ADDING OF A PRODUCT,we start right away by inserting the new variables in which we will associate the keyboard to take an input data from the user, created the 3 variables, we type the function that allows us to associate to the variable the value taken from the keyboard(let's not forget the try and catch, it is essential for reading our data, once all this is done we create a new object following the steps from before,but changing the name of the object,if before the name was product1,this time we will call it product2,and we go to insert in the various sets the variables created. ..as a last thing we are going to insert the object in a new array position,the result will be something like this:
the second case asks us to remove a product,although it doesn't look like it is one of the easiest parts of our code since to delete a product we only need to create a new variable in which we will associate from the keyboard the number of the product to be deleted and we will enter the following command
Be very careful as you will need the variable to be of type int,so a conversion from string to integer will have to be performed.
listProducts.remove(i) i=position of the array to be elminated.
let's conclude our project by inserting the last case that asks us to have our products displayed, to do this we will just create a for,which is meant to make something cycle for a number of times(entered by the user),in this case we will make our array cycle by having it print at the same time on the screen and the code will be ready.
to finish at our best just go to the command promt to check if our code works correctly...now you can go shopping with virtual products ahahahah,thank you very much for your attention and let me know if these topics interest you.
Translated with www.DeepL.com/Translator (free version)